Overview
Securely store and inject login credentials into browser sessions without exposing them to agents or the page.
Steel’s Credential system is currently in beta and is subject to improvements, updates, and changes. It will be free to use and store credentials during this period.
If you have feedback, join our Discord or open an issue on GitHub.
Steel’s Credentials system is designed to allow developers to securely store credentials, inject them into sessions, and automatically sign-into websites. All without leaking sensitive data back to the agents, programs, or humans viewing a live session.
Some of the most important use-cases for AI agents are hidden behind an auth wall. Some of the data most important to both our work and personal lives live inside sign-in-protected applications. If we want browser agents to help us automate the most tedious aspects of our lives, they need access to those same applications.
The problem is sending your personal credentials (username/passwords, etc) to a browser-agent, powered by an opaque LLM API that may or may not be training on your data, represents a non-trivial security risk. Further, the process of logging in can be error prone and keeping/storing credentials on behalf of users, as an application developer, can represent a ton of responsibility and overhead.
That is the motivation behind Steel’s Credentials system. Credentials are stored globally against your organization, so once created, you can reuse them in any session going forward – no need to constantly re-enter or re-provision them.
Steel’s Credentials system is built around three core goals:
-
Secure storage of credentials using enterprise-grade encryption.
-
Controlled injection into browser sessions without exposing sensitive fields.
-
Isolation mechanisms to prevent agents from extracting secrets post-injection.
Table of Contents
Getting Started
Before credentials can be used in a browser session, they must first be uploaded and stored securely.
All credentials are stored globally against your organization. You only need to create them once.
To upload credentials:
curl -X POST https://api.steel.dev/v1/credentials \
  -H "Content-Type: application/json" \
  -H "steel-api-key: YOUR_API_KEY_HERE" \
  -d '{
    "origin": "https://app.example.com",
    "value": {
      "username": "test@example.com",
      "password": "password123"
    }
}'await client.credentials.create({
origin: "https://app.example.com",
value: {
username: "test@example.com",
password: "password123"
}
});client.credentials.create(
origin="https://app.example.com",
value={
"username": "test@example.com",
"password": "password123"
}
)These credentials are encrypted and stored securely within Steel’s credential management service. The namespace field helps separate use cases for the same origin and must match the namespace used when creating the session. For more information on how namespaces work visit the namespace section. You can optionally include a totpSecret field if your login flow uses one-time passwords (see TOTP Support).
Injecting Credentials into a Session
When starting a session via POST /sessions, you can request credential injection using the optional credentials field:
curl -X POST https://api.steel.dev/v1/sessions \
  -H "Content-Type: application/json" \
  -H "steel-api-key: YOUR_API_KEY_HERE" \
  -d '{
    "namespace": "default",
    "credentials": {}
}'const session = await client.sessions.create({
namespace: "default",
credentials: {}
});client.sessions.create(
namespace="default",
credentials={}
)If the credentials object is omitted, no credentials will be injected. If included as an empty object (credentials: {}), the default options apply:
{
  "autoSubmit": true,
  "blurFields": true,
  "exactOrigin": true
}-
autoSubmit: Iftrue, the form will automatically submit once filled. -
blurFields: Iftrue, each filled field is blurred immediately after input, preventing access. -
exactOrigin: Iftrue, credentials will only inject into pages that match the exact origin.
You can override any of these to suit your use-case. Remember to match the namespace with the one used in your credential creation, if omitted, it defaults to "default".
Once the session is active and on the login page, credentials are typically injected within 2 seconds. If autoSubmit is disabled, the agent or user must manually click the login button.
TOTP Support
Steel supports auto-filling TOTP (Time-based One-Time Passwords). To use this feature, include a totpSecret in the value object when uploading credentials:
{
  "username": "test@example.com",
  "password": "password123",
  "totpSecret": "JBSWY3DPEHPK3PXP"
}The secret is securely stored and never exposed to the page. When a one-time password field is detected, Steel generates a valid code on-demand and injects it directly.
How Credentials are Injected
The system is responsible for securely retrieving and injecting them into service webpages. This happens through a general background communication layer that connects to a secure credential service.
Overview: how the service fills credentials in a page
-
The credential service loads a lightweight script into each active page and frame.
-
On startup, it watches for forms or login components using mutation observers and shadow DOM traversal.
-
When a valid credential target is detected, it is validated and ranked.
-
The top-ranked candidate is selected as the active target.
-
Observers are attached to the relevant input fields and forms.
-
The credential service requests credentials matching the current org, namespace, and target origin.
-
Once decrypted, credentials are injected directly into the selected form fields.
-
Inputs are updated programmatically, preserving synthetic events and page behavior.
-
We detect and only inject credentials into a username, password, and one-time password field. The username field is generic and we try our best to map any identifier to this property (email, identifier, username, etc.).
-
inputs are blurred once a value is inserted (configurable) to prevent vision agents from reading PII
-
-
The form is submitted either natively or via simulated interaction, depending on the form structure if
autoSubmitis configured. -
Updates to the DOM are continuously monitored to adapt to dynamic changes in the page.
Envelope encryption
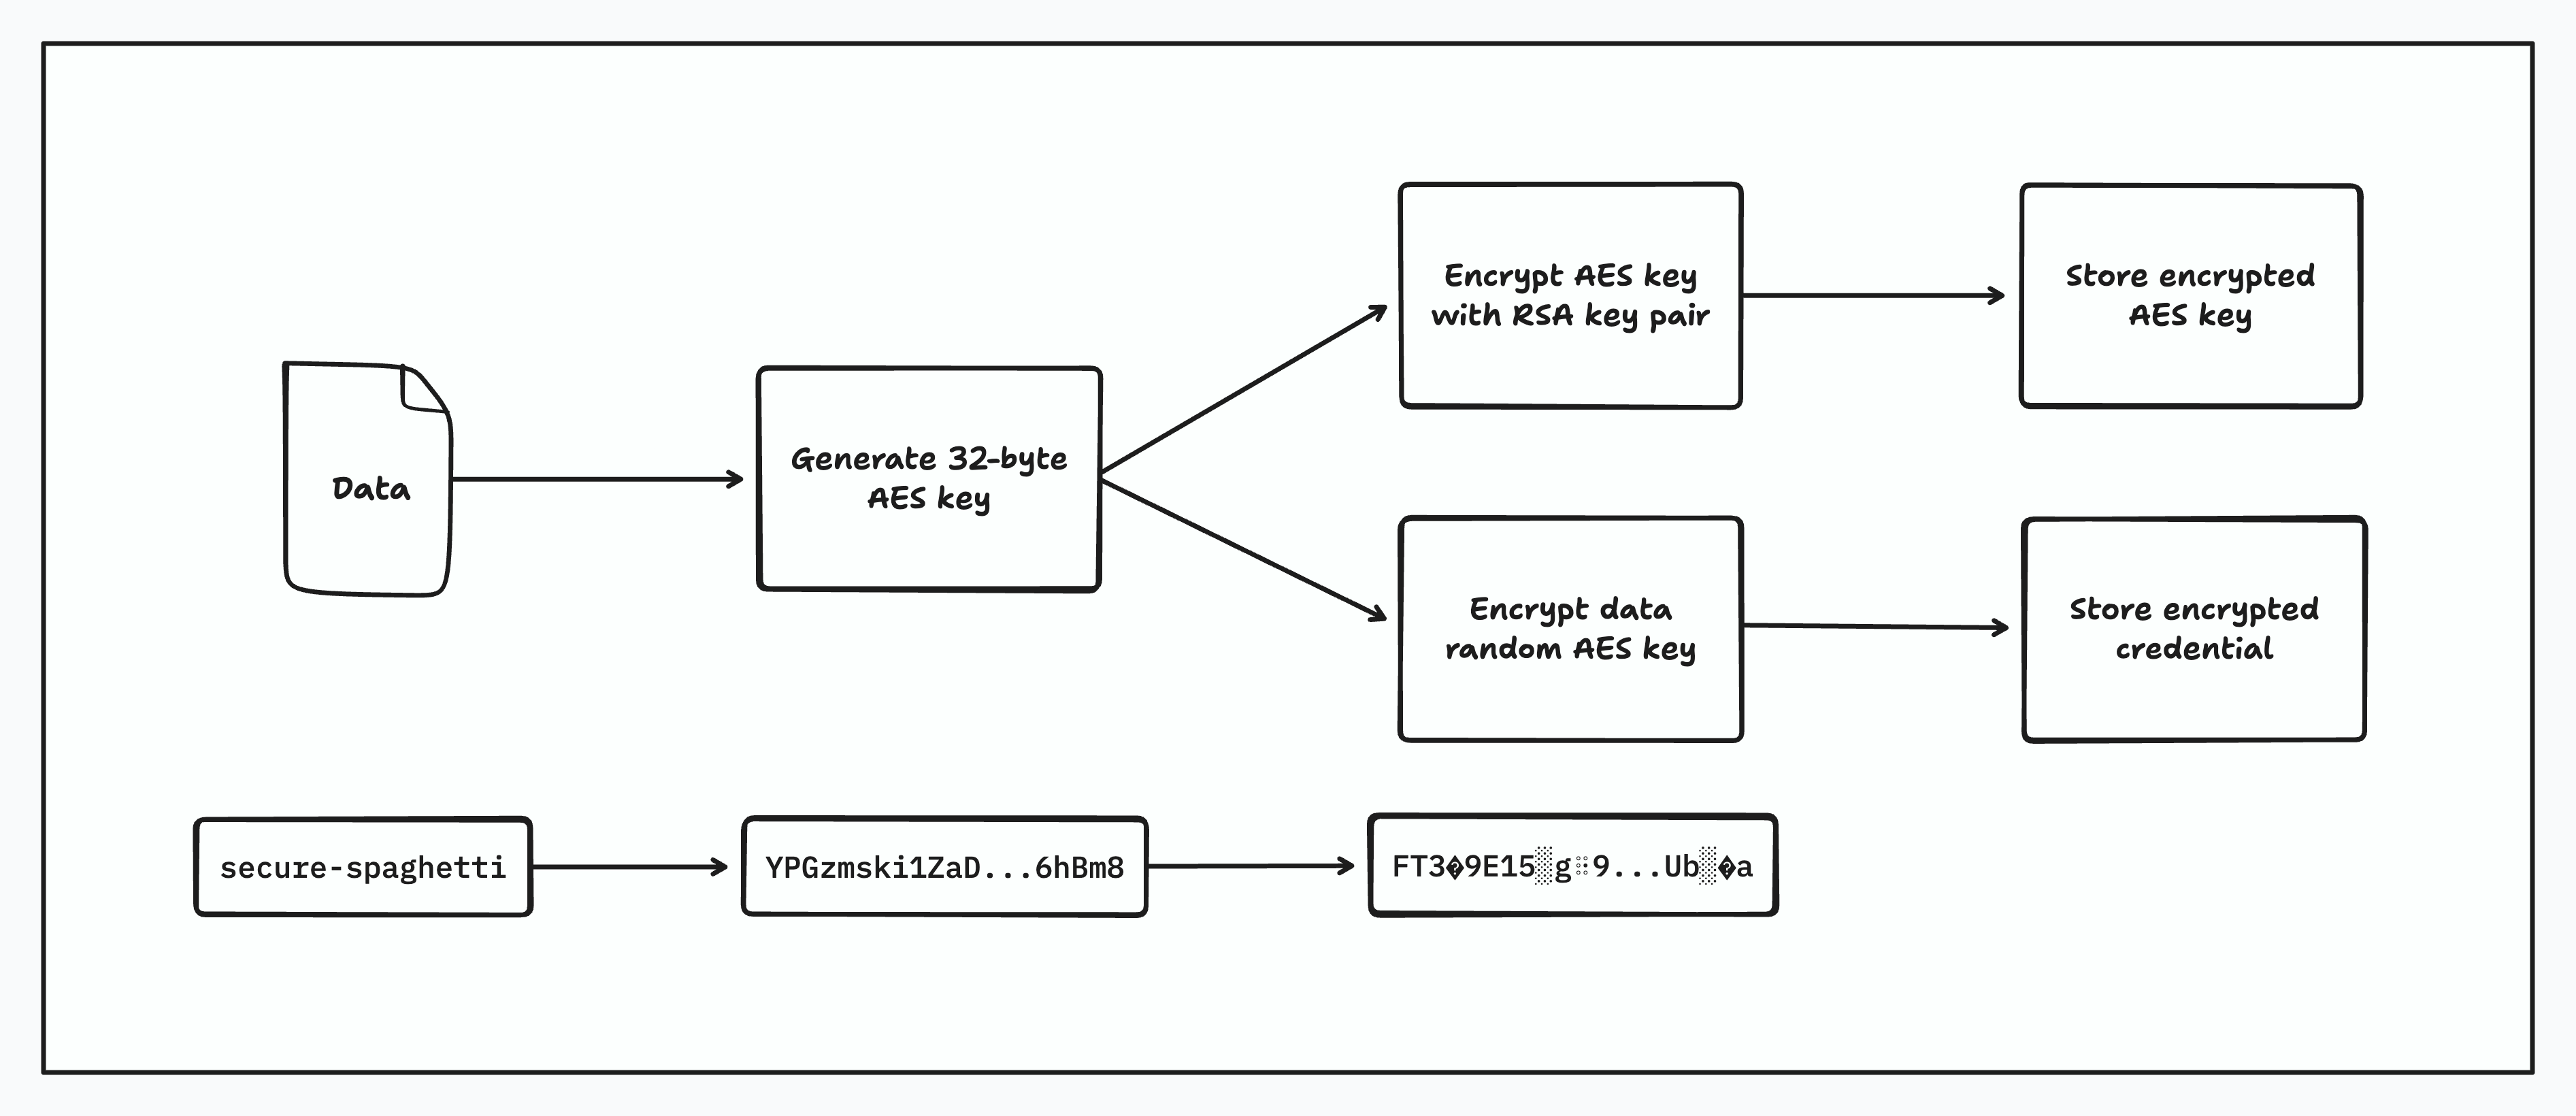
Envelope encryption is a secure and scalable pattern where data is encrypted using a randomly generated data key (usually with a symmetric algorithm like AES), and that data key is then encrypted with a master key managed by a key management store (KMS).
Each credential is protected with its own short‑lived AES‑256‑GCM key. The key is then encrypted with a private KMS key specific to an organization. The encrypted data and the encrypted key travel together.

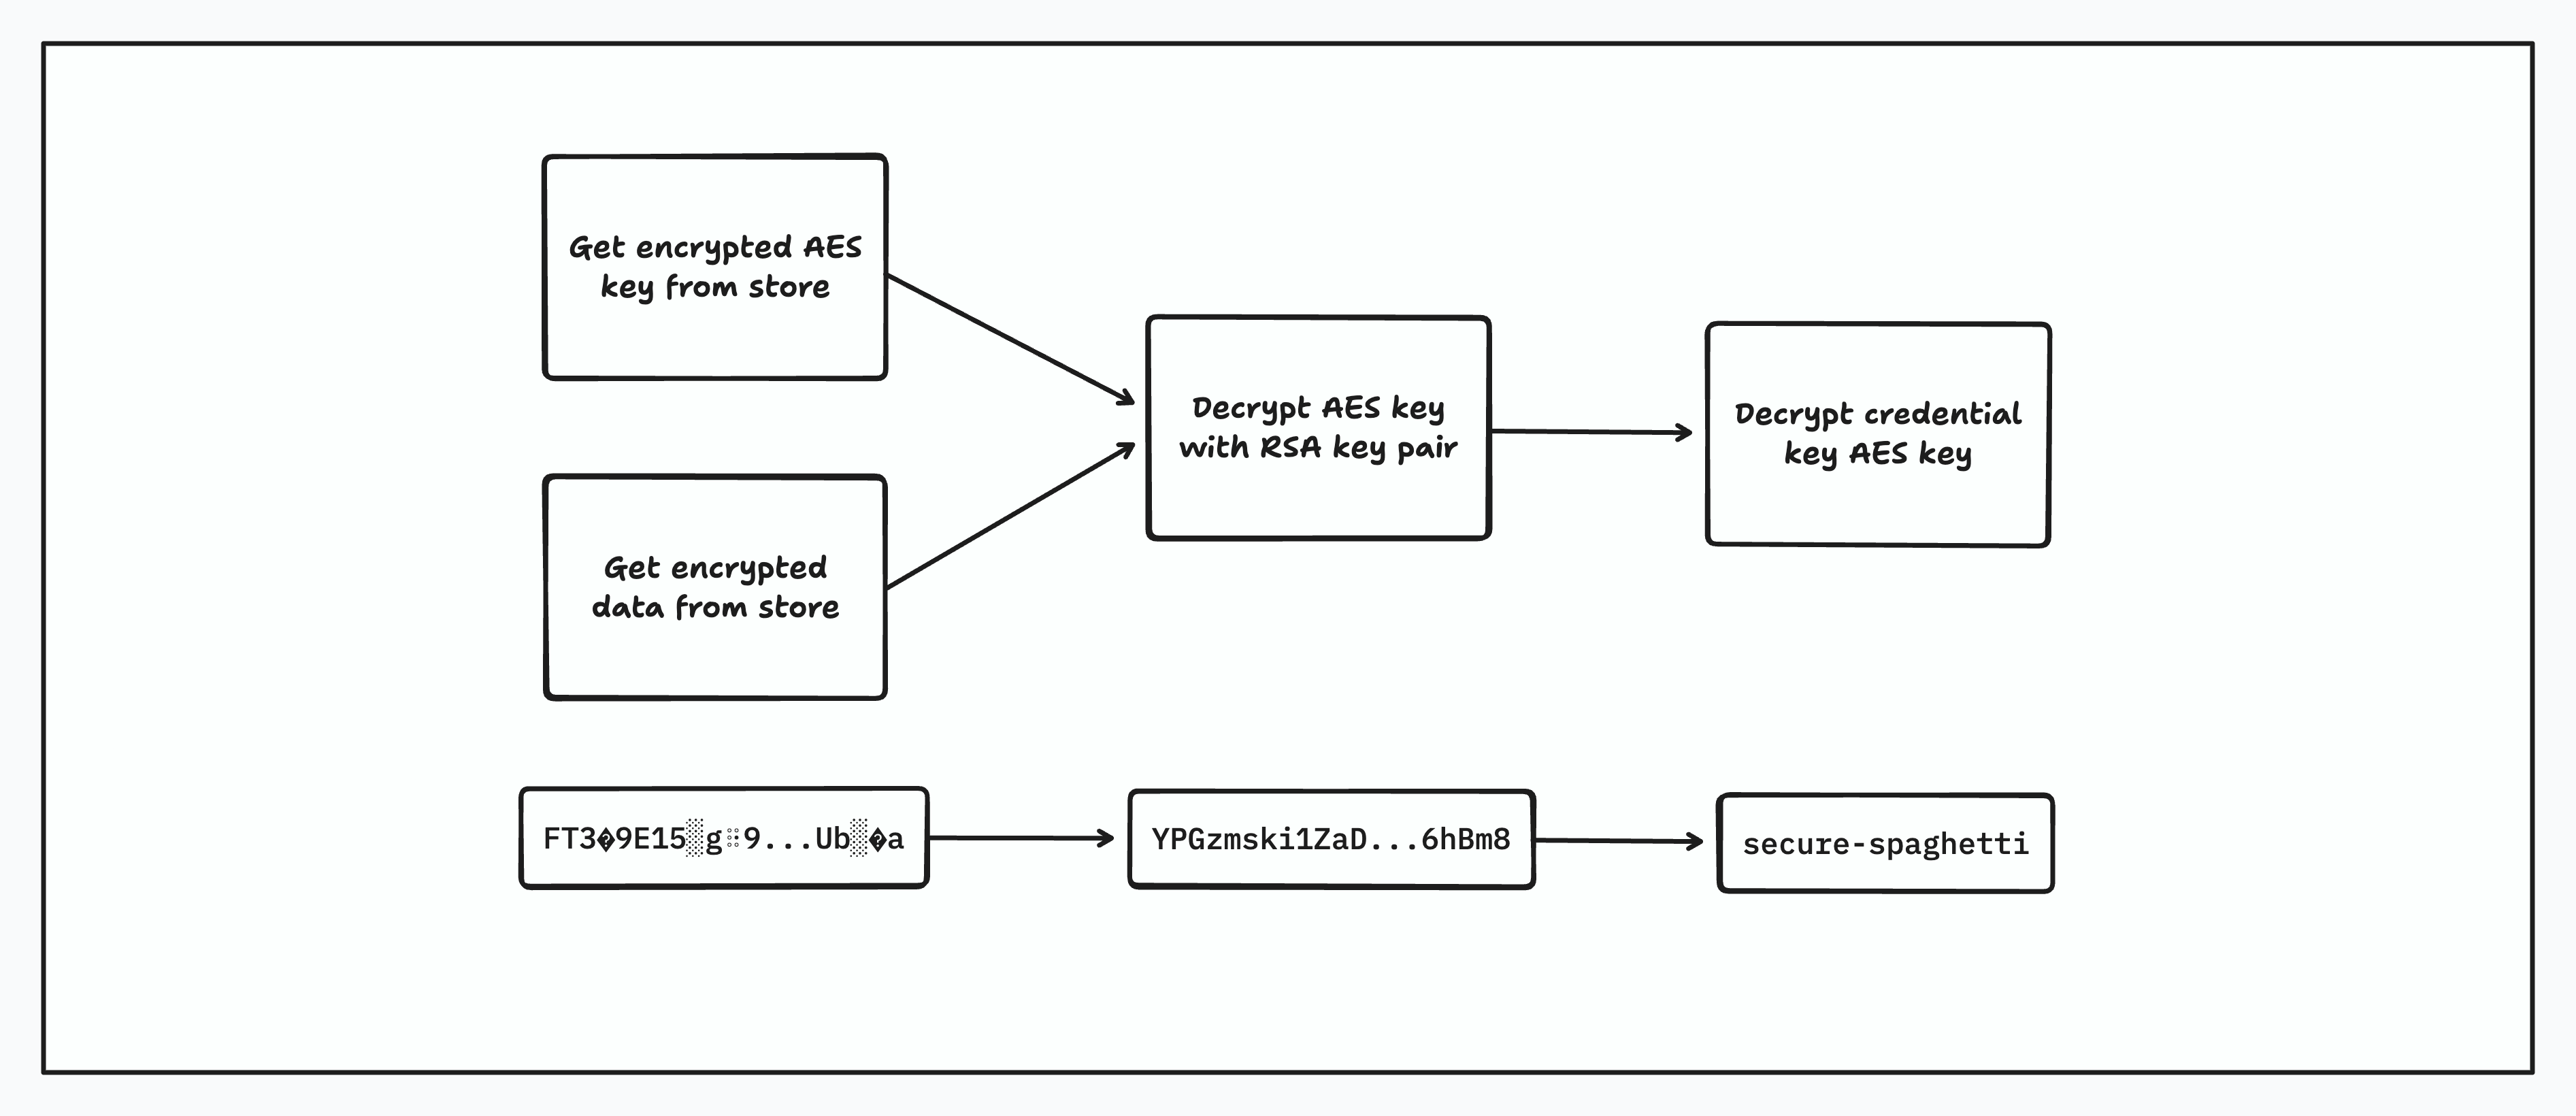
At decryption time, the inverse happens where we then get the encrypted AES key, decrypt it using the specific key pair for the KMS and then use this decrypted AES key to decrypt the credential. The clear-text credentials are placed directly into the in-memory session and sent to the target service over our private WireGuard backbone ensuring end-to-end encryption and safe keeping of your credentials.

Additional authenticated data (AAD)
We bind the cipher-text to its context by including the org ID and credential origin as AAD. A mismatch during decrypt causes the operation to fail which blocks replay attacks across orgs.
Namespaces
Namespaces allow you to differentiate between multiple credentials for the same origin. This is useful when you need to store and use separate login details for different users or use cases.
By default, all credentials and sessions are created under the default namespace. If you don’t specify a namespace, this is what will be used.
Why Use Namespaces?
If you have multiple credentials for the same website, namespaces help you control which one is used in a given session.
For example, say you have two users who log in to the same domain:
// Credential A
{
  "namespace": "example:fred",
  "origin": "https://app.example.com",
  "value": {
    "username": "fred@example.com",
    "password": "hunter2"
  }
}

// Credential B
{
  "namespace": "example:jane",
  "origin": "https://app.example.com",
  "value": {
    "username": "jane@example.com",
    "password": "letmein"
  }
}To use Fred’s credentials in a session:
POST /sessions
{
  "namespace": "example:fred",
  "credentials": {}
}This ensures only the credentials created under example:fred will be injected.
Best Practices
-
Use simple, descriptive namespaces like
example:fredortest:jane. -
Stick to a consistent pattern (e.g.,
org:user) for better organization. -
Always match the
namespacein your session with the one used to create the credentials.
Namespace matching is exact. There is no inheritance or wildcard matching—only credentials in the exact namespace provided will be used.
Using with Agent Frameworks
Steel is designed to integrate seamlessly with browser automation tools and agent frameworks such as browser-use and similar libraries.
While we don’t yet expose framework-specific SDKs or utilities, the process is straightforward and works out of the box with minimal setup.
How it Works
Once credentials are linked to your session, injection and login will occur automatically as part of the page lifecycle. To make use of this in your agent or script, follow this basic pattern:
-
Navigate to the login page of the target website.
-
Wait at least 2 seconds to allow Steel to detect and fill the form.
-
Continue once logged in.
If autoSubmit is enabled (which it is by default), the login form will be submitted automatically once the fields are populated and validated.
If autoSubmit is disabled, you must explicitly trigger the login action (e.g., click the login button) after credentials are filled.
Example Flow
await page.goto("https://app.example.com/login");

// Optional: ensure login form is present
await page.waitForSelector("form");

// Wait for Steel to inject and (optionally) submit the form
await page.waitForTimeout(2000);

// Recommended: confirm login succeeded
await page.waitForSelector(".dashboard"); // or some element/text that confirms login
Notes
-
Credential injection is bound to the session's namespace and the origin provided when the credential was created.
-
Injection will only occur on exact origins if
exactOrigin: true(default). -
The page must be fully loaded and interactive for injection to proceed reliably.
We plan to release official helpers and utilities for common frameworks like browser-use, Playwright, and Puppeteer soon. For now, you can build on this guide to integrate Steel into your existing automation workflows.