# Changelog #000
URL: /changelog/changelog-000
---
title: "Changelog #000"
sidebarTitle: "Changelog #000"
llm: false
---
Happy AGI day (?) & inaugural changelog post. I wanted to share some updates we made to Steel over the last few weeks!
### ⭐ New
* Just launched a new MCP server for Claude Desktop integration that lets Claude visually browse & interact with the web using our Browser API and Web Voyager
* Works with self-hosted, local, and cloud implementations
* Built on a custom Web Voyager implementation using Bounding Boxes and Custom tools to map webpages into LLM action spaces
* Check it out: [https://github.com/steel-dev/steel-mcp-server](https://github.com/steel-dev/steel-mcp-server)
### 🔧 **40+ Bugfixes like**
* Fixed billing page + usage tracking issues
* Resolved rate limit errors
* Resolved session creation bugs with large request volumes
* Fixed compatibility issues with Windows for OS repo
* Improved recording extension handling, so it should be more stable now
* Resolved session viewer crashes for sites >10MB
* Fixed performance issues with loading certain sites in the open source repo
### ⚡**Improvements**
* Large, complex sites now render in just a few seconds (instead of forever like before)
* Session launch time improved by ~30%
* Faster and clearer error messaging
* Enhanced session viewer stability
### 🏡 Housekeeping
* We're rolling out a Research Grants program to support AI researchers with Steel Credits! If you're working on web scraping research or exploring new ways for agents to use the web, reach out to [research@steel.dev](mailto:research@steel.dev) and we'd love to support you.
* We're hiring across engineering roles! Looking for full stack, Applied AI, and infra developers who love open source, AI, and tackling challenging problems. Plus, there's a $5,000 referral bonus if you help us find the right person! More details: [https://steel-dev.notion.site/jobs-at-steel](https://steel-dev.notion.site/jobs-at-steel)
Thanks for testing out the Steel beta. We really look forward to more of your feedback and continuing to build with this awesome, curious, and supportive community. Happy Holidays ☃️
# Changelog #001
URL: /changelog/changelog-001
---
title: "Changelog #001"
sidebarTitle: "Changelog #001"
llm: false
---
Happy Super Bowl Sunday 🏈 Before we settle in to lose money on our respective betting apps, we have some updates we NEED to tell you about.
### **⭐ New**
#### Introducing [Surf.new](http://surf.new/)
[Surf.new](http://surf.new/) is an open-source playground for chatting with different web-agents via Steel. We want it to serve as a resource for the community to try out new web agents as they become available, helping developers evaluate what works best for their use-cases. Currently, you can try browser-use's web agent and a browser-specific fork of Claude’s Computer-use agent. We'll be actively maintaining it while using it as a launching pad to showcase new Steel features and improvements in web automation.
It's pretty neat if you ask us 🤠 Give it a try and let us know what you think! Contributions are more than welcome too :)
#### Embedding and interactive with Live Sessions
Our debugURL has some new life blown into it and, oh boy, are we ever pumped about it. The debugURL you get returned when creating a session is most commonly used for viewing what’s happening live in the browser. A common use-case is embedding that view into your app, such that people can see what’s going on in the browser as actions are being taken. It’s what powers our live session viewer in the Steel dashboard.
In addition to a complete refactoring to improve performance, some of the improvements include:
* Ability to let a viewer interact with the browser sessions directly via clicking, typing, scrolling, etc. This was a big one lots of people have asked for to powering human-in-the-loop features (think “take control” in OpenAI’s Operator).
* Ability to show/hide mouse on screen
* Show/hide URL bar & to toggle be light mode or dark mode
All of which can be turned on or off via UTM params. Check out [the docs](https://docs.steel.dev/overview/guides/viewing-and-embedding-live-sessions) for more on this here!
Available on Steel Cloud and available soon on the steel-browser repo.
#### Dimensions for sessions
We now support the ability to set screen + viewport dimensions when creating a session (`POST/v1/sessions`).
```python Python -wcn -f main.py
from steel import Steel
client = Steel()
session = client.sessions.create(
dimensions={
"width":1280,
"height":800
}
)
```
This helps save you from having to set page viewport on every page load. Which can cause buggy resizing behaviour with your sessions.
Available on Steel Cloud and the steel-browser repo.
#### Ad blocking
You can now block ads from rendering in your sessions. This is useful for saving on proxy bandwidth, simplifying action space for agents (so they don’t have the option of clicking on ads), and generally speeding up page load times.
It's defaulted to `true` when starting a session but you can explicitly turn it on/off by passing a bool into the `blockAds` param in the create session endpoint (`POST/v1/sessions`) or via the SDK like so:
```python Python -wcn -f main.py
from steel import Steel
client = Steel()
session = client.sessions.create(
block_ads=true
)
```
### **🔧 Fixes/Improvements**
Lots of bug fixes and improvements across the board including:
* Fixed with inability to view sessions where proxy was enabled
* Better scrape errors
* Improved Proxy usage tracking
* Fixed multiple issues with Recording sessions
* Implemented graceful shutdowns
* Various dockerfile optimizations
* Custom executable paths for local browsers when running steel-browser repo locally
### 💖 First time contributors
Special thanks to the following new contributors to steel-browser who've made the above improvements possible 💖
[@marclave](https://github.com/marclave), [@krichprollsch](https://github.com/krichprollsch), [@BrentBrightling](https://github.com/BrentBrightling) , [@Envek](https://github.com/Envek), [@danew](https://github.com/danew), [@raymelon](https://github.com/raymelon), [@21e8](https://github.com/21e8), [@QAComet](https://github.com/QAComet), [@mislavjc](https://github.com/mislavjc), and [@Emmanuel-Melon](https://github.com/Emmanuel-Melon)
As always, thanks for testing out the Steel beta. We really look forward to more of your feedback and continuing to build with this awesome, curious, and supportive community.
* * *
# Changelog #002
URL: /changelog/changelog-002
---
title: "Changelog #002"
sidebarTitle: "Changelog #002"
llm: false
---
We decided to maniacally focus on the Steel UX this week and we’re crazy pumped to show you what’s new. Let’s get it 🫡
### ⭐ New
**New Steel Dashboard Experience ✨**
The Steel dashboard has a sleek new look and feel! We’ve redesigned what it feels like to use Steel Cloud and get onboarded for the first time. We focused on quickly getting started for new users and starting new projects for experienced users.
We’re super proud of this one and look forward to your feedback.
*Coming to the steel-browser repo experience soon!*
#### Docs & cookbook updates👨🍳
You asked and we listened: A bunch of new resources have been created across the Steel Universe.
* **Browser-use:** We’ve added a cookbook example and quickstart guide to using browser-use with Steel. Browser-use x Steel is an insanely powerful combo we’ve seen many users deploy and wanted to help make it even easier to get started.
* [Cookbook Example](https://github.com/steel-dev/steel-cookbook/tree/main/examples/steel-browser-use-starter) | [Quickstart Guide](https://docs.steel.dev/overview/integrations/browser-use/quickstart)
* **DebugURL use-cases:** We’ve added new guides to our docs with a focus on how to best leverage the powerful little debug URL you get back from a Steel session response. Check em out:
* [Embed and view live sessions](https://docs.steel.dev/overview/guides/view-and-embed-live-sessions) | [Human in the Loop Controls](https://docs.steel.dev/overview/guides/implement-human-in-the-loop-controls)
**Surf model updates**
We’ve upgraded [surf.new](http://surf.new/) with a bunch of new models that you can try out like:
* **Deepseek** (`deepseek-chat` and `deepseek-reasoner`)
* **Gemini** (like `2.0 flash` _fast!_)
* **Claude 3.7 sonnet** (woah + _fast!_)
Or use local models running on your computer with Ollama support :)
### 🔧 Bugfixes/Improvements
* Patched issues with fetching and re-using contexts between Sessions (docs coming soon)
* DebugURL went through a variety of changes + has had it’s full capabilities rolled out to the steel-browser repo
* Added event counts to Steel Cloud’s Sessions page to make it easier to sift through sessions lists
* _Steel-browser:_ Improved logging across the board + other upgrades (checkout the latest release here: : [**v0.1.3-beta**](https://github.com/steel-dev/steel-browser/releases/tag/v0.1.3-beta))
* Improved session viewer reliability across the board when viewing live sessions (even more coming!)
### 🏡 Housekeeping
* This week, we welcomed [Mislav](https://x.com/mislavjc) to the Steel team! He’ll be working on making building agents on Steel even easier and more capable. You can bug him in the Steel discord server @mislavjc.
### 💖 First-time contributors
Special thanks [**@hakzarov**](https://github.com/hakzarov) for adding better logging for both the API and the Chrome process on the steel-browser repo!
As always, thanks for testing out the Steel beta. We really look forward to more of your feedback and continuing to build with this awesome, curious, and supportive community.
# Changelog #003
URL: /changelog/changelog-003
---
title: "Changelog #003"
sidebarTitle: "Changelog #003"
llm: false
---
import Image from 'next/image';
Happy Tuesday everyone! This week, the team has been heads down working through customer issues/bugs/complaints (especially the trickier ones) and we have a lot of exciting stuff in the works. But first, some updates!
### ⭐ **New**
**Browser Agent Leaderboard 🏆 |** [**leaderboard.steel.dev**](https://leaderboard.steel.dev/)
We've been seeing some exciting new developments in the web agent space. From OpenAI Operator, to Browser Use, there’s been a ton of announcements in the last two months and the state of the art is constantly being outdone. That’s why we decided to launch a leaderboard, compiling the top ranking web agents based on WebVoyager results.
**Lightning-fast Session Creation Times** ⚡️
Now, when creating a session that uses that use default value (except timeout, you can change that), sessions will be booted up in ~400ms or less. This was possible due to some new scaling logic that we laid out which allows us to keep new clean browser sessions hot and ready to be used.
**Note:** these optimizations will not affect sessions using custom proxies or non-default session creation flags.
### 🔧 **Bugfixes/Improvements**
* Resizing the live session view iframe that's returned from session.debugUrl no longer produces a black screen
* Hiding the session details tab no longer breaks the session viewer on [app.steel.dev](http://app.steel.dev/)
* Recorded DOM events are now compressed in transport, allowing for smaller sizes in transport (don't forget to unpack when displaying recorded events)
### **💖 First-time contributors**
Special thanks to [**@**](https://github.com/hakzarov)
[**junhsss**](https://github.com/junhsss) for adding a file management API to Steel Browser. This will allow for very neat applications on both the open source repo and Steel Cloud!
As always, thanks for testing out the Steel beta. We really look forward to more of your feedback and continuing to build with this awesome, curious, and supportive community.
# Changelog #004
URL: /changelog/changelog-004
---
title: "Changelog #004"
sidebarTitle: "Changelog #004"
llm: false
---
import Image from 'next/image';
Wooooooooooooo!! We got some new updates we’re pumped to share.
### ⭐ New
#### npx create-steel-app
The easiest way to get started with Steel just dropped!
Run `npx create-steel-app` to spin up a full project based on any of the recipes in the Steel cookbook repo.
**_Note:_** This works with pure Python projects too! As long as you have npm installed, you’ll be able quick spin up projects like Browser-use and Playwright-python on Steel!
#### Multitab Support
We shipped support for multiple tabs via the debug URL. This comes with support for embedding specific pages as well as a full browser view that displays all tabs with full interactivity. Essentially a fully embeddable browser UI can now exist right in your app. Light/dark mode supported ;)
[Documentation Link](https://docs.steel.dev/overview/guides/view-and-embed-live-sessions)
#### Embed and view session recordings
We’ve published an endpoint (`v1/sessions/:id/events)` and docs around how you can simply embed and view session recordings inside your app.
Here’s a code snippet of how to create an embeddable session replay component:
```typescript Typescript -wcn -f main.ts
import rrwebPlayer from 'rrweb-player';
import 'rrweb-player/dist/style.css'; // important for styling of the player
// Once you've fetched the events
const events = await client.sessions.events(session.id)
// Create player element
const playerElement = document.getElementById('player-container');
// Initialize the player with events
const player = new rrwebPlayer({
target: playerElement,
props: {
events: events,
width: 800, // Width of the player
height: 600, // Height of the player
autoPlay: true,
skipInactive: true // Skip periods of inactivity
}
});
```
[Documentation Link](https://docs.steel.dev/overview/guides/embed-session-recordings)
#### CUA x Steel
OpenAI’s Computer-use agent just dropped and it’s awesome! We’ve added a whole bunch of resources across the Steel universe to demo how the CUA agent can control a Steel browser!
* [Cookbook: Simple CUA Loop (Python)](https://github.com/steel-dev/steel-cookbook/tree/main/examples/steel-oai-computer-use-python-starter)
* [Cookbook: Simple CUA Loop (Node)](https://github.com/steel-dev/steel-cookbook/tree/main/examples/steel-oai-computer-use-node-starter)
* Coming soon to [Surf.new](http://surf.new/) 🌊
### 🔧 Bugfixes/Improvements
* Python/Node SDKs are out of beta and official starting on version `0.0.1` 🥂 This update comes with all the afore mentioned capabilities incorporated into the SDKs.
* Lots of improvements and fixes to the Surf UI
* Added guide to docs on how to re-use contexts between sessions for carrying over things like authenticated state ([docs](https://docs.steel.dev/overview/guides/reusing-contexts-auth))
* Patches some source of memory leak errors causing slower session times
### 🏡 Housekeeping
* Carti dropped 🗣️
### 💖 First-time contributors
Special thanks to [@PaperBoardOfficial](https://github.com/PaperBoardOfficial) for making some key PRs and issues on Surf 💖
As always, thanks for testing out the Steel beta. We really look forward to more of your feedback and continuing to build with this awesome, curious, and supportive community.
# Changelog #005
URL: /changelog/changelog-005
---
title: "Changelog #005"
sidebarTitle: "Changelog #005"
llm: false
---
import Image from 'next/image';
Happy Wednesday, chat 🫡 We've been working hard on some key improvements to our bot detection avoidance capabilities, adding new features, and squashing bugs. Here's what's new this week:
### ⭐ New
#### Enhanced Stealth Improvements 🥷
We've made significant improvements to our stealth features and patched several fingerprinting leaks that were causing browser sessions to be flagged as bots. These updates help ensure your sessions can navigate the web more reliably without triggering anti-bot measures.
**Availability: Steel Cloud** ☁️ + **Steel-browser (OSS) 🔧**
#### Cloudflare Turnstile Solving ✅
We've launched an early version of Cloudflare Turnstile solving, now included in our CAPTCHA solving module within sessions. The solver works well for most common Turnstile implementations, though we're still refining it for some edge cases.
**Availability: Steel Cloud** ☁️
#### Take Control Feature in [Surf.new](http://surf.new/) 🎮
Inspired by OpenAI's Operator, we've implemented a new "Take Control" feature in [Surf.new](http://surf.new/). This allows you to:
* Pause the AI agent and manually interact with the browser
* Complete complex tasks like signing into websites
* Hand control back to the AI to continue where you left off
This showcase demonstrates the power of our debug URL capabilities, which you can integrate into your own applications.
#### 🔧 Bugfixes/Improvements
* Fixed issues with the one-click deployment to Railway on steel-browser
* Better error handling for incorrect inputs
* Frontend updates for multi-tab / playback
* Various performance optimizations for browser initialization
### 💖 First-time contributors
Special thanks to [@shivamkhatri](https://github.com/shivamkhatri) for making some key PRs on Surf and steel-browser! 💖
As always, thanks for testing out Steel! We really look forward to more of your feedback and continuing to build with this awesome, curious, and supportive community.
Got questions or want to chat? Join us on [Discord](https://discord.gg/steel-dev) or reach out on [Twitter/X](https://twitter.com/steeldotdev).
* * *
# Changelog #006
URL: /changelog/changelog-006
---
title: "Changelog #006"
sidebarTitle: "Changelog #006"
llm: false
---
import Image from 'next/image';
Happy April Fools day y’all! We’ve been heads down this week on some large features that we have coming soon — but thought we should give you guys a little update
### 🔧 Bugfixes/Improvements
* Bug causing the session viewer to flicker on certain websites is no longer
* Issue with non-existent session directory when starting up steel-browser is now gone
* "proxyTxBytes is required!" error when accessing past session details was also fixed
* On steel-browser, you can now pass in `SKIP_FINGERPRINT_INJECTION` to override our stealth logic and use your own
### 🏡 Housekeeping
* HUUUGE welcome to the newest members of the Steel team [Dane](https://x.com/daneo_w) and [JunHyoung](https://github.com/junhsss)! They’ll both be pushing tons of features to steel-browser and Steel Cloud and join us in building out the rest of the Steel universe!
### 💖 First-time contributors
Special thanks to the following new contributors who've made the above improvements possible 💖 [@jagadeshjai](https://github.com/jagadeshjai)
As always, thanks for testing out the Steel beta. We really look forward to more of your feedback and continuing to build with this awesome, curious, and supportive community.
Got questions or want to chat? Join us on [Discord](https://discord.gg/steel-dev) or reach out on [Twitter/X](https://twitter.com/steeldotdev).
# Changelog #007
URL: /changelog/changelog-007
---
title: "Changelog #007"
sidebarTitle: "Changelog #007"
llm: false
---
import Image from 'next/image';
Hey y’all! This week's update brings an exciting new Files API for Sessions, along with several improvements to the Steel browser experience and important bugfixes to enhance stability.
### ⭐ New
#### Files API for Sessions 📂
The new Files API enables seamless file management within active browser sessions. You can now upload files from your local machine, use them in your automation workflows, and download files back when needed - perfect for testing file uploads or working with documents in your browser automation.
```typescript Typescript -wcn -f main.ts
// Upload a file to your session
const file = new File(["Hello World!"], "hello.txt", { type: "text/plain" });
const uploadedFile = await client.sessions.files.upload(session.id, { file });
// Create a CDP session to pass in some custom controls
const cdpSession = await currentContext.newCDPSession(page);
const document = await cdpSession.send("DOM.getDocument");
// We need to find the input element using the selector
const inputNode = await cdpSession.send("DOM.querySelector", {
nodeId: document.root.nodeId,
selector: "#load-file",
});
// Set the CSV file as input on the page.
await cdpSession.send("DOM.setFileInputFiles", {
files: [uploadedFile.path],
nodeId: inputNode.nodeId,
});
// Download a file from your session
const response = await client.sessions.files.download(session.id, file.id);
const downloadedFile = await response.blob();
```
[Documentation Link](https://docs.steel.dev/overview/guides/working-with-files-in-sessions) | [Steel Cookbook](https://github.com/steel-dev/steel-cookbook/tree/main/examples/steel-files-api-starter)
### 🔧 Bugfixes/Improvements
* Improved rendering of the session viewer for a slight speed bump in UI updates
* Enhanced logging system for better coverage and debugging capabilities
* Upgraded the session viewer UI on steel-browser for improved usability
* Fixed proxy usage metrics that were incorrectly over-reporting usage
* Improved the UI docker image to accept dynamic API URLs, enabling more flexible custom deployments
* +10 other small bug fixes
As always, thanks for testing out the Steel beta. We really look forward to more of your feedback and continuing to build with this awesome, curious, and supportive community.
Got questions or want to chat? Join us on [Discord](https://discord.gg/steel-dev) or reach out on [Twitter/X](https://twitter.com/steeldotdev).
# Changelog #008
URL: /changelog/changelog-008
---
title: "Changelog #008"
sidebarTitle: "Changelog #008"
llm: false
---
import Image from 'next/image';
Howdy y’all! These last few weeks brought significant improvements to session state management and browser control capabilities, along with several important bugfixes to enhance the Steel experience.
### ⭐ New
#### Enhanced Session Context Support 🔄
Session contexts have been extended to cover indexedDB and sessionStorage, providing more robust state persistence and authentication handling. This improvement allows for more reliable user sessions, especially for sites that rely heavily on client-side storage for auth tokens and application state.
```typescript Typescript -wcn -f main.ts
// Example: Working with the enhanced session context
const session = await client.sessions.create();
let browser = await chromium.connectOverCDP(
`wss://connect.steel.dev?apiKey=${process.env.STEEL_API_KEY}&sessionId=${session.id}`
);
const page = await browser.contexts()
[0].pages()
[0];
// Session now maintains indexedDB and sessionStorage state
// Perfect for sites using modern auth patterns
await page.goto('https://app.example.com/login');
await page.fill('#email', 'user@example.com');
await page.fill('#password', 'password123');
await page.click('#login-button');
const sessionContext = await client.sessions.context(session.id);
const session = await client.sessions.create({ sessionContext });
browser = await chromium.connectOverCDP(
`wss://connect.steel.dev?apiKey=${process.env.STEEL_API_KEY}&sessionId=${session.id}`
);
const page = await browser.contexts()[0].pages()[0];
// State persists across navigation
await page.goto('https://app.example.com/dashboard');
// User remains logged in!
```
[Documentation Link](https://docs.steel.dev/overview/guides/reusing-contexts-auth) | [Auth Examples](https://github.com/steel-dev/steel-cookbook/tree/main/examples/reuse_auth_context_example)
**Steel Browser Now Uses Chromium By Default 🌐**
We've upgraded Steel Browser to use Chromium as our default browser, replacing our previous Chrome implementation. While Chrome served us well for bypassing basic anti-bot measures and stealth detection, it presented compatibility challenges for M-chip Mac users.
The key issue was that Mac users running Steel Browser through Docker couldn't operate properly, as Chrome lacked distribution support for ARM Linux machines (which our Docker image utilized for Mac compatibility).
Now that we use Chromium by default (which DOES have an ARM Linux compatible distribution); all the issues that Mac users were facing should now be gone.
### 🔧 Bugfixes/Improvements
* Steel Browser is now plugin-based, allowing
* Fixed multiple UI bugs for a smoother user experience
* Resolved an issue with browser updates happening in the background causing interruptions
* Added support for custom Chrome arguments via environment variables
* Improved session stability when working with sites that use indexedDB heavily
* Fixed state synchronization issues between browser restarts
* Repaired the live viewer for Railway deployments in Steel Browser
* You can now call browser actions with existing sessions
* Improved URL and environment variable management in the open-source repository
* Custom domain support throughout steel browser
* +10 other small bugfixes all around
### 💖 First-time contributors
Special thanks to [@aspectrr](https://github.com/aspectrr) for their help on enabling custom Chrome args for Steel Browser; as well as the ability to run browser actions on current pages within a session.
As always, thanks for testing out the Steel beta. We really look forward to more of your feedback and continuing to build with this awesome, curious, and supportive community.
Got questions or want to chat? Join us on [Discord](https://discord.gg/steel-dev) or reach out on [Twitter/X](https://twitter.com/steeldotdev).
# Changelog #009
URL: /changelog/changelog-009
---
title: "Changelog #009"
sidebarTitle: "Changelog #009"
llm: false
---
import Image from 'next/image';
Hey! This week we focused on implementing some fixes and improvements to help round out Steel’s DevEx while we prepare for [REDACTED]. Let’s get into it!
### 🔧 Bugfixes/Improvements
1. _Steel Browser_
* Improved Chrome args structure and manipulation using ENV variables
* Updated Steel browser plugin so you can hook onto custom CDP lifecycle events without editing source code directly
* Separated Browser and API launch, resulting in faster API boot times
* Standardized package names in the repo for a cleaner dependency structure
2. _Steel Cloud_
* Fixes to re-render bugs that were causing some state update delays
* Fixes requests ordering from FE to preload data for a snappier UI
* New Signup / Sign-in page dropped :)
* Improved browser logs component to make them easier to understand
Thanks for reading & testing out the Steel beta. We really look forward to more of your feedback and continuing to cook for ya’ll.
# Changelog #010
URL: /changelog/changelog-010
---
title: "Changelog #010"
sidebarTitle: "Changelog #010"
llm: false
---
import Image from 'next/image';
Hey! This week we focused on implementing some fixes and improvements to help round out Steel’s DevEx while we prepare for \[REDACTED\]. Let’s get into it!
### 🔧 Bugfixes/Improvements
1. _Steel Browser_
* Improved Chrome args structure and manipulation using ENV variables
* Updated Steel browser plugin so you can hook onto custom CDP lifecycle events without editing source code directly
* Separated Browser and API launch, resulting in faster API boot times
* Standardized package names in the repo for a cleaner dependency structure
2. _Steel Cloud_
* Fixes to re-render bugs that were causing some state update delays
* Fixes requests ordering from FE to preload data for a snappier UI
* New Signup / Sign-in page dropped :)
* Improved browser logs component to make them easier to understand
Thanks for reading & testing out the Steel beta. We really look forward to more of your feedback and continuing to cook for ya’ll.
# Changelog #011
URL: /changelog/changelog-011
---
title: "Changelog #011"
sidebarTitle: "Changelog #011"
llm: false
---
import Image from 'next/image';
Sup chat. Huss here back with your roundup of Steel's first [Launch Week](https://steel.dev/launch-week). We launched new features every day last week (fully recapped below) as well as a new pricing plan.
Let's take a look! 🤸
### Day 1 - Credentials Beta
¯
Your agents can now automatically sign into password-protected websites without ever seeing your credentials. Built with enterprise-grade AES-256-GCM encryption, TOTP/2FA support, and field blurring protection.
Just store credentials via API, create sessions with credential injection enabled, and Steel will automatically authenticate to unblock your agents. Read the announcement thread here.
[Read Credentials API Docs →](/overview/credentials-api/overview)
### Day 2 - Steel Playground
**Steel Playground** is the first zero-setup tool from Steel that lets you test browser automations faster than ever, directly on the web.
Write Puppeteer, Playwright, or browser-use code and watch it execute live through an integrated session viewer, terminal, and log view. Works with both Python and TypeScript, with 1-click templates from our cookbook! Read the announcement thread here.
### Day 3 - Multi-Region Browser Deployments
At Steel, we understand that latency kills agent performance, especially with hundreds of requests across continents adding up to sluggish experiences.
We've expanded Steel Cloud to 7 global regions with automatic closest-region selection—from Los Angeles to Hong Kong, your browsers spin up wherever makes the most sense. Read the announcement thread here.
[Read Multi-Region Docs →](/overview/sessions-api/multi-region)
### Day 4 - Filesystem V2
Your agents can now upload, manage, and download files seamlessly within browser sessions, plus get persistent global storage & backups across all automations.
Upload files once and mount them to sessions anywhere, download files from online, or bulk download all artifacts from a session as zip archives. Read the announcement thread here.
### Day 5 - Starter Plan + PAYG
We're (finally) making Steel accessible to every team that wants to test and validate browser automation. There's now a perfect middle ground between tinkering and launching.
**The Starter Plan** gives you $29/month with $29 in credits, plus pay-as-you-go overages so you don't hit limits in prod.
[Go to Pricing →](https://steel.dev/#pricing)
-------------
Thanks for building with Steel! It means the world to us and we’re excited to hear your feedback on the above!
# Changelog #012
URL: /changelog/changelog-012
---
title: "Changelog #012"
sidebarTitle: "Changelog #012"
llm: false
---
import Image from 'next/image';
Clean up and fixes galore 🧹 Sometimes the best updates are the ones that make everything just _work better_ - and that's exactly what we focused on this week.
### 🔧 Bugfixes/Improvements
**Steel Cloud**
* Fixed infinite websocket connection issues for frontend logs that were causing performance degradation
* Resolved bug where recording snapshots larger than 5MB were being dropped, ensuring complete session recordings
* Fixed user agent string passing functionality that wasn't working correctly in session creation
* Patched frontend crash that occurred when clicking on newly ended sessions
* Implemented performance improvements across the dashboard for smoother and faster data fetching
* Added better error boundaries throughout the frontend for improved stability and user experience
**Steel Playground**
* Enhanced error handling for code execution, providing clearer feedback when things go wrong
* Improved animations and created a smoother terminal experience for better developer workflow
As always, thanks for testing out the Steel beta. We really look forward to more of your feedback and continuing to build with this awesome, curious, and supportive community.
# Changelog #013
URL: /changelog/changelog-013
---
title: "Changelog #013"
sidebarTitle: "Changelog #013"
llm: false
---
import Image from 'next/image'
Hey everyone! This week we pushed a handful of improvements and fixes across Steel Cloud and Steel Browser. Nothing too crazy, but some solid quality of life updates.
### ⭐ New
#### _OpenTelemetry Support 🔧_
Steel-browser now has OpenTelemetry support. You can hook logs and events to your own providers. Metrics are automatically configured. Connect your favorite providers like Sentry or Axiom and get trace visibility easier than ever.
### 🔧 Bugfixes/Improvements
* Added a feedback button to the dashboard so you can share feedback easier and quicker
* Stealth improvements on the canvas fingerprinting side and other browser leaks related to workers
* Some session player improvements - fixed issue with long sessions causing pages to crash (more improvements on the way)
* Steel Browser: fix platform details not persisting when generated for the browser,
* A couple other small UI and API fixes
As always, thanks for testing out Steel’s Beta. We really look forward to more of your feedback and continuing to build with this awesome, curious, and supportive community.
# Changelog #014
URL: /changelog/changelog-014
---
title: "Changelog #014"
sidebarTitle: "Changelog #014"
llm: false
---
import Image from 'next/image'
Hey everyone! This week we've been focused on quality-of-life improvements and expanding our CAPTCHA solving capabilities. We've also squashed a bunch of bugs to make your Steel experience smoother than ever. Let's dive in!
### ⭐ New
#### Enhanced Copy/Paste Support for Browser Control
Taking control of a browser session just got more intuitive! You can now copy and paste content when manually interacting with Steel sessions through the debug URL. This makes human-in-the-loop workflows much smoother, especially when you need to quickly input data or transfer information between applications. (huge shoutout to [@aspectrr](https://github.com/aspectrr) for implementing it!)
**_Available on:_** Steel-browser (OSS) 🛠️
### 🔧 Bugfixes/Improvements
* **Added custom WebSocket proxy handlers** for CDP service, enabling advanced traffic routing configurations _(Steel-browser)_
* **Fixed WSL2 compatibility** - resolved 0.0.0.0 host binding issues for Windows Subsystem for Linux users _(Steel-browser)_
* **Optimized session recording** **extension**, increasing coverage of events and proper length tracking
* **Fixed multi-region support** issues that were causing connectivity problems for some users
* **Resolved circular reference errors** that occasionally caused stack trace failures
* **Improved address bar behavior** in live sessions - now uses Google search for non-HTTP queries
* **Fixed race conditions** during deployment that could cause session initialization delays
* **Made API key optional** in SDK for easier local development workflows
* **Re-enabled exhaustive stealth tests** to ensure our anti-bot measures stay effective
* **Updated user agent metadata** to maintain compatibility with latest browser standards
### 🏡 Housekeeping
We've been investing heavily in our testing and monitoring infrastructure. While these changes happen behind the scenes, they help us:
* Catch and fix issues before they impact your automations
* Monitor success rates across different sites and scenarios
* Continuously improve our anti-bot detection avoidance
* Ensure Steel stays fast and reliable at scale
This foundational work might not be flashy, but it's crucial for delivering the rock-solid browser automation platform you deserve.
### 💖 First-time contributors
Special thanks to [@akarray](https://github.com/akarray) for introducing `CDP_DOMAIN` to enhance flexibility in setting the debugger's domain + fixing WSL2 compatibility issues for Windows users!
As always, thanks for testing out the Steel beta. We really look forward to more of your feedback and continuing to build with this awesome, curious, and supportive community.
# Changelog #015
URL: /changelog/changelog-015
---
title: "Changelog #015"
sidebarTitle: "Changelog #015"
llm: false
---
import Image from 'next/image'
This week brought major improvements to proxy capabilities and stealth features, alongside plugin architecture enhancements and numerous stability fixes across the Steel ecosystem.
### **⭐ New**
#### **Geographic Targeting for Proxies 🌍**
Steel-managed proxies now support targeting specific countries, states (US only), and cities. This gives you precise control over your browser session's apparent location while maintaining the quality and reliability of our residential proxy network.
```typescript Typescript -wcn -f main.ts
# Target specific country
session = client.sessions.create(
use_proxy={
"geolocation": { "country": "GB" }
}
)
# Target specific state (US only)
session = client.sessions.create(
use_proxy={
"geolocation": { "country": "US", "state": "NY" }
}
)
# Target specific city
session = client.sessions.create(
use_proxy={
"geolocation": { "city": "LOS_ANGELES" }
}
)
```
**_Available on:_** Steel Cloud ☁️
[Documentation Link](https://docs.steel.dev/overview/stealth/proxies)
#### **Humanized Mouse Movements** 🖱️
Steel Browser now implements realistic mouse trajectories by intercepting CDP commands to simulate human-like cursor movement patterns. This enhancement improves stealth capabilities by making automated interactions appear more natural.
```typescript Typescript -wcn -f main.ts
session = client.sessions.create(
StealthConfig={
humanize_interactions=True
}
)
```
**_Available on:_** Steel Cloud ☁️ | Steel-browser (OSS) 🔧
### **🐛 Bug Fixes**
* Fixed ESM import error in steel-browser build process that prevented successful module loading
* Corrected proxy traffic byte counting logic in network monitoring for accurate data reporting
* Fixed dimensions calculation error in rendering engine that caused incorrect element sizing
* Fixed region misconfiguration causing subset of session to start in non-nearest regions
### **🔧 Improvements**
* Enhanced WebSocket handling with registry and custom handler support `steel-browser`
* Exposed session service in plugin architecture for better extensibility `steel-browser`
* Added onSessionEnd hook to plugin manager for custom session termination handling
* Updated proxy handling to return user-selected proxies with improved metering accuracy
* Added API flag to skip fingerprinting when custom stealth logic is needed (use `StealthConfig={skip_fingerprint_injection=true}` flag when creating a session)
* Introduced environment variable to bypass internal hosts in proxy configuration `steel-browser`
### **🏡 Housekeeping**
* Updated steel-cookbook browser-use example to reflect recent API changes
* Added recent work by Tongyi Lab, Alibaba Group to awesome-web-agents documentation
* Updated baseURL in steel-browser README following steel-sdk upgrade from last week
Till next time 🫡
# Changelog #016
URL: /changelog/changelog-016
---
title: "Changelog #016"
sidebarTitle: "Changelog #016"
llm: false
---
import Image from 'next/image'
Short but sweet update this week while new improvements are cooking! We focused on enhancing proxy handling, browser customization, and squashing some key bugs in the steel-browser repo.
### 🔧 Improvements
* Implemented dynamic proxy factory for more reliable proxy creation and removed proxy reuse for browser actions in Steel-browser
* Added support for user-defined browser preferences in Steel API (OS & Cloud), allowing customization of browser behavior across all session types
* Patched an antibot leak by implementing async timezone fetching with parallelized context extraction and extension path validation in steel-browser
* Patched OpenAI CUA examples in steel-cookbook
### 🐛 Bug Fixes
* Fixed session recording issue in Steel Cloud that caused incomplete recordings for sessions using proxies
As always, thanks for testing out the Steel beta. We really look forward to more of your feedback and continuing to build with this awesome, curious, and supportive community.
# Changelog #017
URL: /changelog/changelog-017
---
title: "Changelog #017"
sidebarTitle: "Changelog #017"
llm: false
---
import Image from 'next/image'
This week brought a ton of DevEx upgrades: the Steel CLI, OpenAI Computer-use integration, and a major Steel Browser release with centralized code templates across our entire ecosystem.
### ⭐ New
#### Steel CLI
The fastest way to execute browser agents from the command line just dropped. Run any agent from our cookbook with zero setup - no environment files, no forking, no version management required.
```bash Terminal -wc
# Execute any task with a single command
steel run browser-use -t "find the latest Python releases" -o
# Build from ready-to-use templates
steel forge browser-use
steel forge oai-cua
steel forge playwright
# Authenticate once, run everywhere
steel login
```
The CLI handles Steel authentication automatically and works with every agent in our cookbook. You can even skip installation entirely by using `npx @steel-dev/cli` for any command.
[CLI Repository](https://github.com/steel-dev/cli)
#### OpenAI Computer-Use Integration
OpenAI's Computer-use agents can now run directly on Steel infrastructure with ready-to-use starter kits. TypeScript and Python implementations are available across the Cookbook, Steel Playground, and CLI.
```bash Terminal -wc
# Get started with OAI CUA on Steel in minutes
steel forge oai-cua
```
[Cookbook Example (TS)](https://github.com/steel-dev/steel-cookbook/tree/main/examples/steel-oai-computer-use-node-starter) | [Cookbook Example (Python)](https://github.com/steel-dev/steel-cookbook/tree/main/examples/steel-oai-computer-use-python-starter) | [Docs](https://docs.steel.dev/overview/integrations/openai-computer-use/overview)
#### Steel Browser 0.2.0-beta Release
Steel Browser has been upgraded from 0.1.3-beta to 0.2.0-beta with significant architecture improvements, ARM64 Docker support, and enhanced fingerprinting solutions.
[**Release Notes**](https://github.com/steel-dev/steel-browser/releases/tag/v0.2.0-beta)
#### Centralized Code Registry
All code templates and examples are now centralized into a unified registry system. This ensures consistent, up-to-date code across the Cookbook, onboarding flows, documentation, playground, and CLI - no more version drift between different code examples.
### 🔧 Improvements
* Added ARM64 architecture support in Docker builds while removing problematic UI build changes in steel-browser
* Added automatic release generation for pull requests in steel-browser repo
* Updated browser-use version and code to newest version across all assets
* Standardized styling across all example components for consistent visual presentation
* Added MDX pipeline support for enhanced docs rendering
* Updated steel-browser readme with direct links to API docs and OpenAPI specs
* Enhanced metadata handling across all session types for improved data consistency
* Updated CDN links for core Steel components to improve loading efficiency
### 🐛 Bug Fixes
* Fixed intermediate fingerprinting issues by adding solver and filtering security components
* Corrected environment variable usage in Steel API configuration
* Corrected metadata definitions to ensure accurate API documentation compliance
* Replaced deletion method with timestamp-based deletion across all session types
### 💖 First-time contributors
Special thanks to [@robbwdoering](https://github.com/robbwdoering) for improving our documentation and SDK references!
As always, thanks for testing out the Steel beta. We really look forward to more of your feedback and continuing to build with this awesome, curious, and supportive community.
# Changelog #018
URL: /changelog/changelog-018
---
title: "Changelog #018"
sidebarTitle: "Changelog #018"
llm: false
---
import Image from 'next/image';
Chrome extension support, enhanced scraping capabilities, and improved reliability across the platform with 25+ bug fixes.
### ⭐ New
#### Chrome Extension Support
Steel now supports the ability to customize your browser sessions with Chrome Extensions. You can upload and use extensions from files or directly from the Chrome Web Store. Extensions are stored globally per organization and can be injected into any session using extension IDs or the `all_ext` parameter.
```typescript Typescript -wcn -f main.ts
# Upload extension from Chrome Web Store
response = client.extensions.upload_from_store(
url="https://chromewebstore.google.com/detail/..."
)
# Inject extensions into session
session = client.sessions.create(
extension_ids=['all_ext'] # or specific extension IDs
)
```
Extensions integrate with Steel's browser sessions through the Chrome DevTools Protocol and are initialized when sessions start.
**_Available on:_** Steel Cloud ☁️ | Steel-browser (OSS) 🔧
[Documentation Link](https://docs.steel.dev/overview/extensions-api/overview)
#### Enhanced HTML to Markdown Conversion
Improved scraping algorithms on the `/scrape` endpoint now include HTML sanitization before markdown conversion and other reliability improvements, ensuring cleaner output and preventing rendering issues across all session types.
**_Available on:_** Steel Cloud ☁️ | Steel-browser (OSS) 🔧
### 🔧 Improvements
* Added .env keys management to playground for easier usage
* Updated logging mechanisms for better test execution visibility and debugging
* Improved extension loading with corrected path resolution and naming conventions
### 🐛 Bug Fixes
* Fixed Puppeteer context evaluation errors with \_\_name polyfill
* Resolved device inconsistencies and enabled web security by default
* Fixed deployment configuration for improved connectivity
* 25+ additional bug fixes across Steel Cloud and steel-browser
As always, thanks for testing out the Steel beta. We really look forward to more of your feedback and continuing to build with this awesome, curious, and supportive community.
# Changelog #019
URL: /changelog/changelog-019
---
title: "Changelog #019"
sidebarTitle: "Changelog #019"
llm: false
---
import Image from 'next/image';
This week brought some open-source improvements and enhanced developer experience across Steel's ecosystem. We focused on improving onboarding, docS and fixing critical session management issues.
### ⭐ New
#### Steel CAPTCHAs API
Launched a complete CAPTCHAs API with real-time visibility and control over CAPTCHA detection, solving progress, and completion status. The API provides two powerful capabilities: status monitoring for tracking all CAPTCHAs across pages in real-time, and direct solving of image CAPTCHAs using XPath selectors for precise control over the solving process. No more waiting blindly or checking the DOM repeatedly - you get instant visibility into what CAPTCHAs are active, which are being solved, and exactly how long each task is taking.
```typescript Typescript -wcn -f main.ts
# Solving an image captcha, common on legacy sites like govt portals
const response = await client.sessions.captchas.solveImage('sessionId', {
imageXPath: '//img[@id="captcha-image"]',
inputXPath: '//input[@name="captcha"]',
});
```
**_Available on:_** Steel Cloud ☁️
[Captcha API Overview Docs](https://docs.steel.dev/overview/captchas-api/overview)
### 🔧 Improvements
* Revamped Quickstart page in Steel Cloud dashboard with new examples, CLI instructions, and a refreshed design for smoother onboarding/building
* Shipped integrations with Magnitude, Claude CUA, and Notte
* Enhanced Steel CLI with multiple fixes and stability improvements
* Added body validation compiler to improve request validation and error handling
* Streamlined extensions starter template with improved documentation and configuration
* Updated documentation across steel-browser repo for better clarity and accessibility
* Improved cross-platform compatibility by replacing bash scripts with text-based commands in steel-browser
* Enhanced session management patterns in cookbook examples
* Added comprehensive links to API documentation for better developer resources
### 🐛 Bug Fixes
* Fixed Redis TTL session storage that was causing premature session expirations
* Resolved Puppeteer page mismatch issue that affected session control reliability
* Corrected extension ID mismatch in the list extensions component
* Fixed memory allocation issues for worker machines in the Steel API
* Fixed onboarding scroll behavior that caused navigation issues
* Corrected formatting and syntax errors in multiple code blocks across steel-browser repo
* Fixed missing package lock file issues in session management
As always, thanks for testing out Steel. We really look forward to more of your feedback and continuing to build with this awesome, curious, and supportive community.
# Changelog #020
URL: /changelog/changelog-020
---
title: "Changelog #020"
sidebarTitle: "Changelog #020"
llm: false
---
import Image from 'next/image';
Hey everyone! This week was a quite one with a number fixes and qol improvements while we iron out kinks in a larger upgrade we’re bumped to share with you soon.
**🔧 Improvements**
* Added a Steel Extensions examples to Steel cookbook showcasing an e2e usecase visualizing Github profile Stats: [Link](https://github.com/steel-dev/steel-cookbook/tree/main/examples/steel-extensions-starter)
* Added onBrowserReady hook to CDP plugin manager for improved plugin initialization timing on steel-browser
* Shipped UI updates for improved load speed and interaction clarity
* Updated extensions demo to utilize GitHub's isometric design for enhanced visual consistency
* Added internal gateway for whitelisting Session IPs in the Steel browser API
**_🐛 Bug Fixes_**
* Adjusted timeout duration before executing machine checks to improve reliability in Steel Cloud
* Pushed updates to various examples in the Steel cookbook
* Smoothed over fixes with selenium, Notte, & Playwright examples in Steel Playground
As always, thanks for testing out Steel. Can’t wait to show you what we’ve been cooking next week.
# Changelog #021
URL: /changelog/changelog-021
---
title: "Changelog #021"
sidebarTitle: "Changelog #021"
llm: false
---
import Image from 'next/image';
Hey everyone! This week we focused on streamlining deployments and fixing a bunch of extension API issues that were causing headaches. Plus some solid infrastructure improvements across the board.
### ⭐ New
#### Unified UI/API in Steel Browser
Steel-browser now combines the UI and API deployment into a single application setup with a centralized Dockerfile. This makes it much easier to deploy and run Steel across different cloud environments without managing separate services.
**_Available on:_** Steel-browser (OSS) 🔧
### 🐛 Bug Fixes
* Fixed extension existence checks in steel-browser API to improve compatibility with existing extensions
* Resolved extension management conflicts during session initialization
* Corrected extension removal process to ensure clean installations in steel-browser API
* Fixed null videocard handling in fingerprint generation that caused browser session initialization errors
* Resolved extension client testing framework issues for better error reporting
### 🔧 Improvements
* Centralized error handling and standardized linting rules across the Steel API
* Updated dependency versions for improved stability across steel-browser
* Enhanced retry logic in network request handling for better reliability
* Improved element locators for more accurate browser interactions
* Streamlined build process by removing lockfile check logic
* Added environment variable for configuring userDataDir path
* Enabled organization editing functionality in Steel Cloud dashboard
# Auth Context Starter
URL: /cookbook/auth-context-starter
---
title: Auth Context Starter
sidebarTitle: Auth Context Starter
isLink: true
llm: false
---
# Credentials API Starter
URL: /cookbook/credentials-starter
---
title: Credentials API Starter
sidebarTitle: Credentials API Starter
isLink: true
llm: false
---
# Extensions API Starter
URL: /cookbook/extensions-starter
---
title: Extensions API Starter
sidebarTitle: Extensions API Starter
isLink: true
llm: false
---
# Files API Starter
URL: /cookbook/files-starter
---
title: Files API Starter
sidebarTitle: Files API Starter
isLink: true
llm: false
---
# Playwright
URL: /cookbook/playwright
---
title: Playwright
sidebarTitle: Playwright
isLink: true
llm: false
---
# Puppeteer
URL: /cookbook/puppeteer
---
title: Puppeteer
sidebarTitle: Puppeteer
isLink: true
llm: false
---
# Selenium
URL: /cookbook/selenium
---
title: Selenium
sidebarTitle: Selenium
isLink: true
llm: false
---
# Stagehand (Python)
URL: /cookbook/stagehand-py
---
title: Stagehand (Python)
sidebarTitle: Stagehand (Python)
isLink: true
llm: false
---
# Stagehand (Typescript)
URL: /cookbook/stagehand-ts
---
title: Stagehand (Typescript)
sidebarTitle: Stagehand (Typescript)
isLink: true
llm: false
---
# Intro to Steel
URL: /overview/intro-to-steel
---
title: Intro to Steel
description: Humans use Chrome, Agents use Steel.
sidebarTitle: Intro to Steel
llm: true
---
import Image from 'next/image'
### **Getting LLMs to use the web is _hard_**
We want AI products that can book us a flight, find us a sublet, buy us a prom suit, and get us an interview.
But if you’ve ever tried to build an AI app that can interact with the web today, you know the headaches:
* **Dynamic Content:** Modern sites heavily rely on client-side rendering and lazy loading, requiring scrapers to wait for page hydration and execute JS to access the full content.
* **Complex Navigation:** Reaching desired data often involves multi-step flows, simulating user actions like clicks, typing, and handling CAPTCHAs.
* **Authentication:** High-value data and functionality frequently sits behind auth walls, necessitating robust identity management and auto-login capabilities.
* **Infrastructure Overhead:** Efficiently scaling and managing headless browser fleets is complex, with issues like cold starts, resource contention, and reliability eating up valuable dev cycles.
* **Lack of Web APIs:** Many critical sites still lack API access, forcing teams to build and maintain brittle custom scrapers for each target.
This is by design. Most of the web is designed to be anti-bot and human friendly.
But what if we flipped that?
### [****](https://steel.dev/introduction#a-better-way-to-take-your-llms-online)**A better way to take your LLMs online**
Steel is a headless browser API that lets AI engineers:
* Control fleets of browser sessions in the cloud via API or Python/Node SDKs
* Easily extract page data as cleaned HTML, markdown, PDFs, or screenshots
* Access data behind logins with persistent cookies and automatic sign-in
* Render complex client-side content with JavaScript execution
* Bypass anti-bot measures with rotating proxies, stealth configs, and CAPTCHA solving
* Reduce token usage and costs by up to 80% with optimized page formats
* Reuse session and cookie data across multiple runs
* Debug with ease using live session viewers, replays, and embeddings
All fully managed, and ready to scale, so you can focus on building shipping product, not babysitting browsers.
Under the hood, Steel’s cloud-native platform handles all the headaches of browser infrastructure:
* Executing JavaScript to load and hydrate pages
* Managing credentials, sign-in flows, proxies, CAPTCHAs, and cookies
* Horizontal browser scaling and recovering from failures
* Optimizing data formats to reduce LLM token usage
### Get started with Sessions API
- [Overview](/overview/sessions-api/overview)
- [Quickstart](/overview/sessions-api/quickstart)
- [Connect with Puppeteer](/cookbook/puppeteer)
- [Connect with Playwright](/cookbook/playwright)
- [Connect with Selenium](/cookbook/selenium)
### Reference
- [API Reference](/api-reference)
- [Python SDK Reference](/steel-python-sdk)
- [Node SDK Reference](/steel-js-sdk)
# Legal
URL: /overview/legal
---
title: Legal
description: This page outlines the legal terms and conditions for using Steel.
sidebarTitle: Legal
isSeperator: true
llm: true
---
Please visit our latest [Terms of Service](https://docs.google.com/document/d/1VuaLxBq150cR9vyiir9B4GUsvqSu0Rd64Vtu-HiSqp8/edit?tab=t.0#heading=h.nf9mun4iq7m9)
Please visit our latest [Privacy Policy](https://docs.google.com/document/d/1q3QBkFm4ke-_oqEO3wyP5yi64TazRBt6wbvIE_Zx69A/edit?usp=sharing)
# llms-full.txt
URL: /overview/llms-full.txt
---
title: llms-full.txt
sidebarTitle: llms-full.txt
isSeperator: true
---
# Need Help?
URL: /overview/need-help
---
title: Need Help?
description: Need help with Steel? Check out our documentation or reach out to use on Discord.
sidebarTitle: Need Help?
llm: true
---
- [Overview](/overview)
- [Changelog](/changelog)
- [API Reference](/api-reference)
- [Cookbook](https://github.com/steel-dev/steel-cookbook/)
- [Playground](/playground)
- [Discord](https://discord.gg/steel-dev)
- [Github](https://github.com/steel-dev)
- [Dashboard](https://app.steel.dev/)
We’re here to support in any way we can!
You can connect with us on:
- [Discord](https://discord.gg/steel-dev)
- [GitHub](https://github.com/steel-dev)
or send an email to our team support at [team@steel.dev](mailto:team@steel.dev?subject=Steel%20Support%20Issue)
# Pricing/Limits
URL: /overview/pricing
---
title: Pricing/Limits
description: This page outlines the current pricing breakdown between free/paid plans on Steel.
sidebarTitle: Pricing/Limits
llm: true
---
**Last Edit:** May 30th, 2025
### Pricing Table
| Feature | Hobby ($0) | Starter ($29) | Developer ($99) | Pro ($499/m) | Enterprise |
|----------------------------------|----------------|---------------|-----------------|--------------|------------|
| **Rates: Browser Hour** | $0.10/hour | $0.10/hour | $0.08/hour | $0.05/hour | custom |
| **Rates: Captcha Solves** | — | $4/1k | $3.5/1k | $3/1k | custom |
| **Rates: Proxy Bandwidth** | — | $10/GB | $8/GB | $5/GB | custom |
| **Limits: Daily Requests** | 500 | 1,000 | unlimited | unlimited | unlimited |
| **Limits: Requests per second** | 1 | 2 | 5 | 10 | custom |
| **Limits: Concurrent Sessions** | 2 | 5 | 10 | 50 | custom |
| **Limits: Data Retention** | 24 hours | 2 days | 7 days | 14 days | unlimited |
| **Limits: Max Session Time** | 15 minutes | 30 minutes | 1 hour | 24 hours | custom |
| **Support: Community support** | ✅ | ✅ | ✅ | ✅ | ✅ |
| **Support: Email support** | — | ✅ | ✅ | ✅ | ✅ |
| **Support: Dedicated Slack** | — | — | — | ✅ | ✅ |
| **Team members per account** | unlimited | unlimited | unlimited | unlimited | unlimited |
\* Browser hours are billed by the minute, rounded up.
### How Credits Work
Each plan's cost goes towards your credits within the platform. For example, if you're on the Developer Plan, every time your subscription renews, you will have $99 worth of credits to use within the platform.
Different plans offer different rates for actions within Steel, with each plan progressively getting more efficient (bigger plans = more bang for your buck).
### Pay-as-You-Go Overages
All paid plans (Starter, Developer, Pro) include pay-as-you-go overages to prevent workflow interruptions:
* **Overage Limit:** Use up to 3x your monthly credit allocation
* **Billing:** Overages are billed at your plan's rates at the end of each billing cycle
* **No Interruption:** Continue building without upgrade pressure or hitting hard limits
**Example:** On the Starter Plan ($29), you can use up to $87 worth of services in a month. Your first $29 is covered by your subscription, and any usage from $29-$87 is billed as overages at Starter rates.
### Credit Equivalents by Plan
Here's roughly\* what you'd get if you spent all of your base credits on a given service:
#### Hobby Plan ($10 free credits)
* 100 browser hours
#### Starter Plan ($29 in credits)
* 290 browser hours
* 2.9GB proxy bandwidth
* 7,250 captcha solves
#### Developer Plan ($99 in credits)
* 1,238 browser hours
* 12 GB proxy bandwidth
* 28k captcha solves
#### Pro Plan ($499 in credits)
* 9,980 browser hours
* 166 GB proxy bandwidth
* 166k captcha solves
\* We say roughly because in practice you couldn't spend all your credits on one thing other than browser hours, since you need to be in a session to use proxies or captcha solves.
**_Enterprise plans offer even further cost efficiency with an annual commitment._**
[Talk to the founders](https://cal.com/hussien-hussien-fjxt3x/intro-chat-w-steel-founders)
# Steel CLI
URL: /overview/steel-cli
---
title: Steel CLI
sidebarTitle: Steel CLI
isLink: true
llm: false
---
# Overview
URL: /integrations/agentkit/agentkit-overview
---
title: Overview
sidebarTitle: Overview
description: AgentKit is a TypeScript library for creating and orchestrating AI agents, from single-model calls to multi-agent networks with deterministic routing, shared state, and rich tooling via MCP.
llm: true
---
#### Overview
The AgentKit integration connects Steel’s cloud browser sessions with AgentKit’s **Networks**, **Routers**, and **Agents**, so you can:
* Drive Steel browsers from AgentKit agents and tools (navigate, search, fill forms, extract results)
* Orchestrate multi-agent **Networks** with shared **State** and code/LLM-based **Routers**
* Plug in MCP servers as tools for powerful real-world actions (DBs, apps, services)
* Stream live tokens/steps to your UI and capture traces locally during development
* Mix deterministic flows with autonomous handoffs for reliable, production-grade automations
Combined, Steel + AgentKit gives you scalable web automation with sandboxed, anti-bot capable browsers and fault-tolerant orchestration.
#### Requirements
* **Steel API Key**: Active Steel subscription to create/manage browser sessions
* **Node.js**: v20+ recommended
* **Package Setup**: `npm i @inngest/agent-kit inngest` (AgentKit ≥ v0.9.0 requires `inngest` alongside)
* **Model Providers**: OpenAI, Anthropic, Google Gemini, and OpenAI-compatible endpoints
* **Optional**: MCP servers (e.g., via Smithery), search tools, vector stores, observability
#### Documentation
[Quickstart Guide](/integrations/agentkit/quickstart) → Build a simple AgentKit **Network** that routes tasks and controls a Steel browser session end-to-end.
#### Additional Resources
* [AgentKit Documentation](https://agentkit.inngest.com/overview) – Concepts for Agents, Networks, State, and Routers
* [Examples Gallery](https://agentkit.inngest.com/examples/overview) – Starter projects (support agent, SWE-bench, coding agent, web search)
* [LLMs Docs Bundle](https://agentkit.inngest.com/llms-full.txt) – Markdown doc set for IDEs/LLMs
* [Inngest Dev Server (local tracing)](https://agentkit.inngest.com/getting-started/local-development) – Live traces and I/O logs
* [Steel Sessions API Reference](https://docs.steel.dev/api-reference) – Programmatic session control for Steel browsers
* [Community Discord](https://www.inngest.com/discord) – Discuss MCP, routing patterns, and production setups
# Quickstart
URL: /integrations/agentkit/quickstart
---
title: Quickstart
sidebarTitle: Quickstart
description: This guide shows how to use AgentKit with Steel to build a small network that browses Hacker News in a live cloud browser via CDP, filters stories by topic, and returns concise picks.
llm: true
---
import PlaygroundButton from "components/playground-button.tsx";
#### Prerequisites
:::prerequisites
* Node.js **v20+**
* Steel API key (get one at [app.steel.dev](http://app.steel.dev/))
* OpenAI API key (get one at [platform.openai.com](http://platform.openai.com/))
:::
#### Step 1: Project Setup
Create a Typescript project and starter files.
```bash Terminal -wc
mkdir steel-agentkit-hn && \
cd steel-agentkit-hn && \
npm init -y && \
npm install -D typescript @types/node ts-node && \
npx tsc --init && \
npm pkg set scripts.start="ts-node index.ts" && \
touch index.ts .env
npm install steel-sdk @inngest/agent-kit zod playwright dotenv
```
Add your API keys to `.env`:
```env ENV -wcn -f .env
STEEL_API_KEY=your-steel-api-key-here
OPENAI_API_KEY=your-openai-api-key-here
```
#### Step 2: Create a browsing tool
We’ll define a custom **AgentKit tool**
```typescript Typescript -wcn -f index.ts
import dotenv from "dotenv";
dotenv.config();
import { z } from "zod";
import { chromium } from "playwright";
import Steel from "steel-sdk";
import {
openai,
createAgent,
createNetwork,
createTool,
} from "@inngest/agent-kit";
const STEEL_API_KEY = process.env.STEEL_API_KEY || "your-steel-api-key-here";
const OPENAI_API_KEY = process.env.OPENAI_API_KEY || "your-openai-api-key-here";
const client = new Steel({ steelAPIKey: STEEL_API_KEY });
const browseHackerNews = createTool({
name: "browse_hacker_news",
description:
"Fetch Hacker News stories (top/best/new) and optionally filter by topics",
parameters: z.object({
section: z.enum(["top", "best", "new"]).default("top"),
topics: z.array(z.string()).optional(),
limit: z.number().int().min(1).max(20).default(5),
}),
handler: async ({ section, topics, limit }, { step }) => {
if (STEEL_API_KEY === "your-steel-api-key-here") {
throw new Error("Set STEEL_API_KEY");
}
return await step?.run("browse-hn", async () => {
const session = await client.sessions.create({});
const browser = await chromium.connectOverCDP(
`${session.websocketUrl}&apiKey=${STEEL_API_KEY}`
);
try {
const context = browser.contexts()[0];
const page = context.pages()[0];
const base = "https://news.ycombinator.com";
const url =
section === "best"
? `${base}/best`
: section === "new"
? `${base}/newest`
: base;
await page.goto(url, { waitUntil: "domcontentloaded", timeout: 30000 });
// Extract rows client-side for speed & resilience
const items = await page.evaluate((maxItems: number) => {
const rows = Array.from(document.querySelectorAll("tr.athing"));
const take = Math.min(maxItems * 2, rows.length);
const out = [] as Array<{
rank: number;
title: string;
url: string;
site: string | null;
points: number;
comments: number;
itemId: string;
}>;
for (let i = 0; i < take; i++) {
const row = rows[i] as HTMLElement;
const titleEl = row.querySelector(
".titleline > a"
) as HTMLAnchorElement | null;
const sub = row.nextElementSibling as HTMLElement | null;
const scoreEl = sub?.querySelector(".score");
const commentsLink = sub?.querySelector(
'a[href*="item?id="]:last-child'
) as HTMLAnchorElement | null;
const rankText = row.querySelector(".rank")?.textContent || "";
const rank =
parseInt(rankText.replace(".", "").trim(), 10) || i + 1;
const title = titleEl?.textContent?.trim() || "";
const url = titleEl?.getAttribute("href") || "";
const site = row.querySelector(".sitestr")?.textContent || null;
const points = scoreEl?.textContent
? parseInt(scoreEl.textContent, 10)
: 0;
const commentsText = commentsLink?.textContent || "";
const commentsNum = /\d+/.test(commentsText)
? parseInt((commentsText.match(/\d+/) || ["0"])[0], 10)
: 0;
const itemId = row.getAttribute("id") || "";
out.push({ rank, title, url, site, points, comments: commentsNum, itemId });
}
return out;
}, limit);
// Optional topic filtering, then dedupe + cap
const filtered =
topics && topics.length > 0
? items.filter((it) => {
const t = it.title.toLowerCase();
return topics.some((kw) => t.includes(kw.toLowerCase()));
})
: items;
const deduped: typeof filtered = [];
const seen = new Set();
for (const it of filtered) {
const key = `${it.title}|${it.url}`;
if (!seen.has(key)) {
seen.add(key);
deduped.push(it);
}
if (deduped.length >= limit) break;
}
return deduped.slice(0, limit);
} finally {
// Always clean up cloud resources
try {
await browser.close();
} finally {
await client.sessions.release(session.id);
}
}
});
},
});
```
#### Step 3: Build the Agenth & Network
Wire the tool into an agent and run it inside a small network with your default model.
```typescript Typescript -wcn -f index.ts
const hnAgent = createAgent({
name: "hn_curator",
description: "Curates interesting Hacker News stories by topic",
system:
"Surface novel, high-signal Hacker News stories. Favor technical depth, originality, and relevance to requested topics. Use the tool to browse and return concise picks.",
tools: [browseHackerNews],
});
const hnNetwork = createNetwork({
name: "hacker-news-network",
description: "Network for curating Hacker News stories",
agents: [hnAgent],
maxIter: 2,
defaultModel: openai({
model: "gpt-4o-mini",
}),
});
```
#### Step 5: Run the network
Add a small `main()` that checks env vars, runs the network, and prints results.
```typescript Typescript -wcn -f index.ts
async function main() {
console.log("🚀 Steel + Agent Kit Starter");
console.log("=".repeat(60));
if (STEEL_API_KEY === "your-steel-api-key-here") {
console.warn("⚠️ WARNING: Please replace 'your-steel-api-key-here' with your actual Steel API key");
console.warn(" Get your API key at: https://app.steel.dev/settings/api-keys");
return;
}
if (OPENAI_API_KEY === "your-openai-api-key-here") {
console.warn("⚠️ WARNING: Please replace 'your-openai-api-key-here' with your actual OpenAI API key");
console.warn(" Get your API key at: https://platform.openai.com/api-keys");
return;
}
try {
console.log("\nRunning HN curation...");
const run = await hnNetwork.run(
"Curate 5 interesting Hacker News stories about AI, TypeScript, and tooling. Prefer 'best' if relevant. Return title, url, points."
);
const results = (run as any).state?.results ?? [];
console.log("\nResults:\n" + JSON.stringify(results, null, 2));
} catch (err) {
console.error("An error occurred:", err);
} finally {
console.log("Done!");
}
}
main();
```
#### Run it:
Open your console output to see your curated results. You can also watch the live Steel session from your Steel dashboard.
#### Complete Example
Paste the full **index.ts** below and run `npm run start`:
```typescript Typescript -wcn -f index.ts
import dotenv from "dotenv";
dotenv.config();
import { z } from "zod";
import { chromium } from "playwright";
import Steel from "steel-sdk";
import {
openai,
createAgent,
createNetwork,
createTool,
} from "@inngest/agent-kit";
// Replace with your own API keys
const STEEL_API_KEY = process.env.STEEL_API_KEY || "your-steel-api-key-here";
const OPENAI_API_KEY = process.env.OPENAI_API_KEY || "your-openai-api-key-here";
const client = new Steel({ steelAPIKey: STEEL_API_KEY });
const browseHackerNews = createTool({
name: "browse_hacker_news",
description:
"Fetch Hacker News stories (top/best/new) and optionally filter by topics",
parameters: z.object({
section: z.enum(["top", "best", "new"]).default("top"),
topics: z.array(z.string()).optional(),
limit: z.number().int().min(1).max(20).default(5),
}),
handler: async ({ section, topics, limit }, { step }) => {
if (STEEL_API_KEY === "your-steel-api-key-here") {
throw new Error("Set STEEL_API_KEY");
}
return await step?.run("browse-hn", async () => {
const session = await client.sessions.create({});
const browser = await chromium.connectOverCDP(
`${session.websocketUrl}&apiKey=${STEEL_API_KEY}`
);
try {
const context = browser.contexts()[0];
const page = context.pages()[0];
const base = "https://news.ycombinator.com";
const url =
section === "best"
? `${base}/best`
: section === "new"
? `${base}/newest`
: base;
await page.goto(url, { waitUntil: "domcontentloaded", timeout: 30000 });
const items = await page.evaluate((maxItems: number) => {
const rows = Array.from(document.querySelectorAll("tr.athing"));
const take = Math.min(maxItems * 2, rows.length);
const out = [] as Array<{
rank: number;
title: string;
url: string;
site: string | null;
points: number;
comments: number;
itemId: string;
}>;
for (let i = 0; i < take; i++) {
const row = rows[i] as HTMLElement;
const titleEl = row.querySelector(
".titleline > a"
) as HTMLAnchorElement | null;
const sub = row.nextElementSibling as HTMLElement | null;
const scoreEl = sub?.querySelector(".score");
const commentsLink = sub?.querySelector(
'a[href*="item?id="]:last-child'
) as HTMLAnchorElement | null;
const rankText = row.querySelector(".rank")?.textContent || "";
const rank =
parseInt(rankText.replace(".", "").trim(), 10) || i + 1;
const title = titleEl?.textContent?.trim() || "";
const url = titleEl?.getAttribute("href") || "";
const site = row.querySelector(".sitestr")?.textContent || null;
const points = scoreEl?.textContent
? parseInt(scoreEl.textContent, 10)
: 0;
const commentsText = commentsLink?.textContent || "";
const commentsNum = /\d+/.test(commentsText)
? parseInt((commentsText.match(/\d+/) || ["0"])[0], 10)
: 0;
const itemId = row.getAttribute("id") || "";
out.push({
rank,
title,
url,
site,
points,
comments: commentsNum,
itemId,
});
}
return out;
}, limit);
const filtered =
topics && topics.length > 0
? items.filter((it) => {
const t = it.title.toLowerCase();
return topics.some((kw) => t.includes(kw.toLowerCase()));
})
: items;
const deduped = [] as typeof filtered;
const seen = new Set();
for (const it of filtered) {
const key = `${it.title}|${it.url}`;
if (!seen.has(key)) {
seen.add(key);
deduped.push(it);
}
if (deduped.length >= limit) break;
}
return deduped.slice(0, limit);
} finally {
try {
await browser.close();
} finally {
await client.sessions.release(session.id);
}
}
});
},
});
const hnAgent = createAgent({
name: "hn_curator",
description: "Curates interesting Hacker News stories by topic",
system:
"Surface novel, high-signal Hacker News stories. Favor technical depth, originality, and relevance to requested topics. Use the tool to browse and return concise picks.",
tools: [browseHackerNews],
});
const hnNetwork = createNetwork({
name: "hacker-news-network",
description: "Network for curating Hacker News stories",
agents: [hnAgent],
maxIter: 2,
defaultModel: openai({
model: "gpt-4o-mini",
}),
});
async function main() {
console.log("🚀 Steel + Agent Kit Starter");
console.log("=".repeat(60));
if (STEEL_API_KEY === "your-steel-api-key-here") {
console.warn(
"⚠️ WARNING: Please replace 'your-steel-api-key-here' with your actual Steel API key"
);
console.warn(
" Get your API key at: https://app.steel.dev/settings/api-keys"
);
return;
}
if (OPENAI_API_KEY === "your-openai-api-key-here") {
console.warn(
"⚠️ WARNING: Please replace 'your-openai-api-key-here' with your actual OpenAI API key"
);
console.warn(
" Get your API key at: https://platform.openai.com/api-keys"
);
return;
}
try {
console.log("\nRunning HN curation...");
const run = await hnNetwork.run(
"Curate 5 interesting Hacker News stories about AI, TypeScript, and tooling. Prefer 'best' if relevant. Return title, url, points."
);
const results = (run as any).state?.results ?? [];
console.log("\nResults:\n" + JSON.stringify(results, null, 2));
} catch (err) {
console.error("An error occurred:", err);
} finally {
console.log("Done!");
}
}
main();
```
#### Customize the prompt
Try adjusting the network input:
```typescript Typescript -wcn -f main.ts
await hnNetwork.run(
"Curate 8 stories about WebAssembly, Edge runtimes, and performance. Use 'new' if there are fresh posts. Return title, url, site, points, comments."
);
```
#### Next steps
* AgentKit Docs: [https://agentkit.inngest.com/overview](https://agentkit.inngest.com/overview)
* Examples Gallery: [https://agentkit.inngest.com/examples/overview](https://agentkit.inngest.com/examples/overview)
* Steel Sessions API: [/overview/sessions-api/overview](/overview/sessions-api/overview)
* Session Lifecycle: [https://docs.steel.dev/overview/sessions-api/session-lifecycle](/overview/sessions-api/session-lifecycle)
* Steel Node SDK: [https://github.com/steel-dev/steel-node](https://github.com/steel-dev/steel-node)
# Overview
URL: /integrations/agno/agno-overview
---
title: Overview
sidebarTitle: Overview
description: Agno is a full-stack framework for building multi-agent systems with shared memory, knowledge, and reasoning.
llm: true
---
#### Overview
The Agno integration connects Steel’s cloud browser infrastructure with Agno’s agent and team architecture, so you can:
* Launch and control Steel browser sessions as Agno tools inside single agents or coordinated agent teams
* Automate multi-step web workflows (navigate, search, fill forms, extract data) with shared context and memory
* Combine Agentic RAG and web automation for up-to-date answers using your preferred vector stores
* Use reasoning (reasoning models or Agno’s ReasoningTools) for more reliable plans and actions
* Return structured outputs (JSON/typed) and monitor runs end-to-end
Agno is model-agnostic (23+ providers supported) and natively multi-modal, which pairs well with Steel’s reliable, sandboxed browsers, proxy management, and anti-bot capabilities.
#### Requirements
* **Steel API Key**: Active Steel subscription to create and manage browser sessions
* **Model Provider Key(s)**: e.g., OpenAI, Anthropic, etc. (Agno supports many providers)
* **Python Environment**: Agno is Python-first (works great with modern Python runtimes)
* **Optional Storage**: Vector DB + memory/session storage for Agentic RAG and long-term memory
#### Documentation
[Quickstart Guide](/integrations/agno/quickstart) → Build your first Agno agent that controls a Steel browser session and returns structured results.
#### Additional Resources
* [Agno Documentation](https://docs.agno.com/) – Concepts, APIs, and examples for agents, teams, memory, and reasoning
* [Steel Sessions API Reference](/api-reference) – Manage Steel browser sessions programmatically
* [Community Discord](https://discord.gg/steel-dev) – Get help, share recipes, and discuss best practices
# Quickstart
URL: /integrations/agno/quickstart
---
title: Quickstart
sidebarTitle: Quickstart
description: This guide walks you through connecting Agno with Steel by adding a Playwright-powered Steel toolkit and running an agent that browses and extracts content from live websites.
llm: true
---
import PlaygroundButton from "components/playground-button.tsx";
#### Prerequisites
Make sure you have:
* Python **3.11+**
* Steel API key (get one at [**app.steel.dev**](http://app.steel.dev/))
* (Optional) OpenAI API key if your Agno setup uses OpenAI models
#### Step 1: Project setup
Create and activate a virtual environment, then install dependencies:
```bash Terminal -wc
# Create project
mkdir steel-agno-starter
cd steel-agno-starter
# (Recommended) Create & activate a virtual environment
python3 -m venv .venv
source .venv/bin/activate # On Windows: .venv\Scripts\activate
# Create files
touch main.py .env
# Install dependencies
pip install agno steel-sdk python-dotenv playwright
```
Create a `.env` file with your keys and a default task:
```env ENV -wcn -f .env
STEEL_API_KEY=your_steel_api_key_here
OPENAI_API_KEY=your_openai_api_key_here # optional, if your Agno model needs it
TASK=Go to https://quotes.toscrape.com and: 1. Get the first 3 quotes with authors 2. Navigate to page 2 3. Get 2 more quotes from page 2
```
#### Step 2: Add a Steel toolkit and run an Agno Agent
First, define a toolkit that wraps Steel’s browser sessions and Playwright.
```python Python -wcn -f main.py
import os
import json
from typing import Any, Dict, List, Optional
from agno.tools import Toolkit
from agno.utils.log import log_debug, logger
from playwright.sync_api import sync_playwright
from steel import Steel
class SteelTools(Toolkit):
def __init__(
self,
api_key: Optional[str] = None,
**kwargs,
):
"""Initialize SteelTools.
Args:
api_key (str, optional): Steel API key (defaults to STEEL_API_KEY env var).
"""
self.api_key = api_key or os.getenv("STEEL_API_KEY")
if not self.api_key:
raise ValueError(
"STEEL_API_KEY is required. Please set the STEEL_API_KEY environment variable."
)
self.client = Steel(steel_api_key=self.api_key)
self._playwright = None
self._browser = None
self._page = None
self._session = None
self._connect_url = None
tools: List[Any] = []
tools.append(self.navigate_to)
tools.append(self.screenshot)
tools.append(self.get_page_content)
tools.append(self.close_session)
super().__init__(name="steel_tools", tools=tools, **kwargs)
def _ensure_session(self):
"""Ensures a Steel session exists, creating one if needed."""
if not self._session:
try:
self._session = self.client.sessions.create() # type: ignore
if self._session:
self._connect_url = f"{self._session.websocket_url}&apiKey={self.api_key}" # type: ignore
log_debug(f"Created new Steel session with ID: {self._session.id}")
except Exception as e:
logger.error(f"Failed to create Steel session: {str(e)}")
raise
def _initialize_browser(self, connect_url: Optional[str] = None):
"""
Initialize browser connection if not already initialized.
Use provided connect_url or ensure we have a session with a connect_url
"""
if connect_url:
self._connect_url = connect_url if connect_url else "" # type: ignore
elif not self._connect_url:
self._ensure_session()
if not self._playwright:
self._playwright = sync_playwright().start() # type: ignore
if self._playwright:
self._browser = self._playwright.chromium.connect_over_cdp(self._connect_url)
context = self._browser.contexts[0] if self._browser else ""
self._page = context.pages[0] or context.new_page() # type: ignore
def _cleanup(self):
"""Clean up browser resources."""
if self._browser:
self._browser.close()
self._browser = None
if self._playwright:
self._playwright.stop()
self._playwright = None
self._page = None
def _create_session(self) -> Dict[str, str]:
"""Creates a new Steel browser session.
Returns:
Dictionary containing session details including session_id and connect_url.
"""
self._ensure_session()
return {
"session_id": self._session.id if self._session else "",
"connect_url": self._connect_url or "",
}
def navigate_to(self, url: str, connect_url: Optional[str] = None) -> str:
"""Navigates to a URL.
Args:
url (str): The URL to navigate to
connect_url (str, optional): The connection URL from an existing session
Returns:
JSON string with navigation status
"""
try:
self._initialize_browser(connect_url)
if self._page:
self._page.goto(url, wait_until="networkidle")
result = {"status": "complete", "title": self._page.title() if self._page else "", "url": url}
return json.dumps(result)
except Exception as e:
self._cleanup()
raise e
def screenshot(self, path: str, full_page: bool = True, connect_url: Optional[str] = None) -> str:
"""Takes a screenshot of the current page.
Args:
path (str): Where to save the screenshot
full_page (bool): Whether to capture the full page
connect_url (str, optional): The connection URL from an existing session
Returns:
JSON string confirming screenshot was saved
"""
try:
self._initialize_browser(connect_url)
if self._page:
self._page.screenshot(path=path, full_page=full_page)
return json.dumps({"status": "success", "path": path})
except Exception as e:
self._cleanup()
raise e
def get_page_content(self, connect_url: Optional[str] = None) -> str:
"""Gets the HTML content of the current page.
Args:
connect_url (str, optional): The connection URL from an existing session
Returns:
The page HTML content
"""
try:
self._initialize_browser(connect_url)
return self._page.content() if self._page else ""
except Exception as e:
self._cleanup()
raise e
def close_session(self) -> str:
"""Closes the current Steel browser session and cleans up resources.
Returns:
JSON string with closure status
"""
try:
self._cleanup()
try:
if self._session:
self.client.sessions.release(self._session.id) # type: ignore
except Exception as release_error:
logger.warning(f"Failed to release Steel session: {str(release_error)}")
self._session = None
self._connect_url = None
return json.dumps(
{
"status": "closed",
"message": "Browser resources cleaned up. Steel session released if active.",
}
)
except Exception as e:
return json.dumps({"status": "warning", "message": f"Cleanup completed with warning: {str(e)}"})
```
#### Step 3: Register a Steel toolkit and run an Agno Agent
Create an **Agent** that uses your toolkit to perform multi-step tasks.
```python Python -wcn -f main.py
import os
from dotenv import load_dotenv
from agno.agent import Agent
from steel_tools import SteelTools
load_dotenv()
STEEL_API_KEY = os.getenv("STEEL_API_KEY") or "your-steel-api-key-here"
TASK = os.getenv("TASK") or "Go to https://quotes.toscrape.com and get some quotes"
def main():
tools = SteelTools(api_key=STEEL_API_KEY)
agent = Agent(
name="Web Scraper",
tools=[tools],
instructions=[
"Use the tools to browse and extract content.",
"Format results cleanly as markdown.",
"Always close sessions when done.",
],
markdown=True,
)
response = agent.run(TASK)
print("\nResults:\n")
print(response.content)
tools.close_session()
if __name__ == "__main__":
main()
```
#### Run it:
You’ll see the agent connect to a live Steel browser via CDP, navigate to the site, and extract content. A session viewer URL is printed in your Steel dashboard for live/replay views.
#### Complete Example
Paste the full script below into `main.py` and run:
```python Python -wcn -f main.py
import json
import os
from typing import Any, Dict, List, Optional
from agno.tools import Toolkit
from agno.utils.log import log_debug, logger
from agno.agent import Agent
from playwright.sync_api import sync_playwright
from steel import Steel
from dotenv import load_dotenv
load_dotenv()
# Replace with your own API keys
STEEL_API_KEY = os.getenv("STEEL_API_KEY") or "your-steel-api-key-here"
# Replace with your own task
TASK = os.getenv("TASK") or "Go to https://quotes.toscrape.com and: 1. Get the first 3 quotes with authors 2. Navigate to page 2 3. Get 2 more quotes from page 2"
class SteelTools(Toolkit):
def __init__(
self,
api_key: Optional[str] = None,
**kwargs,
):
"""Initialize SteelTools.
Args:
api_key (str, optional): Steel API key (defaults to STEEL_API_KEY env var).
"""
self.api_key = api_key or os.getenv("STEEL_API_KEY")
if not self.api_key:
raise ValueError(
"STEEL_API_KEY is required. Please set the STEEL_API_KEY environment variable."
)
self.client = Steel(steel_api_key=self.api_key)
self._playwright = None
self._browser = None
self._page = None
self._session = None
self._connect_url = None
tools: List[Any] = []
tools.append(self.navigate_to)
tools.append(self.screenshot)
tools.append(self.get_page_content)
tools.append(self.close_session)
super().__init__(name="steel_tools", tools=tools, **kwargs)
def _ensure_session(self):
"""Ensures a Steel session exists, creating one if needed."""
if not self._session:
try:
self._session = self.client.sessions.create() # type: ignore
if self._session:
self._connect_url = f"{self._session.websocket_url}&apiKey={self.api_key}" # type: ignore
log_debug(f"Created new Steel session with ID: {self._session.id}")
except Exception as e:
logger.error(f"Failed to create Steel session: {str(e)}")
raise
def _initialize_browser(self, connect_url: Optional[str] = None):
"""
Initialize browser connection if not already initialized.
Use provided connect_url or ensure we have a session with a connect_url
"""
if connect_url:
self._connect_url = connect_url if connect_url else "" # type: ignore
elif not self._connect_url:
self._ensure_session()
if not self._playwright:
self._playwright = sync_playwright().start() # type: ignore
if self._playwright:
self._browser = self._playwright.chromium.connect_over_cdp(self._connect_url)
context = self._browser.contexts[0] if self._browser else ""
self._page = context.pages[0] or context.new_page() # type: ignore
def _cleanup(self):
"""Clean up browser resources."""
if self._browser:
self._browser.close()
self._browser = None
if self._playwright:
self._playwright.stop()
self._playwright = None
self._page = None
def _create_session(self) -> Dict[str, str]:
"""Creates a new Steel browser session.
Returns:
Dictionary containing session details including session_id and connect_url.
"""
self._ensure_session()
return {
"session_id": self._session.id if self._session else "",
"connect_url": self._connect_url or "",
}
def navigate_to(self, url: str, connect_url: Optional[str] = None) -> str:
"""Navigates to a URL.
Args:
url (str): The URL to navigate to
connect_url (str, optional): The connection URL from an existing session
Returns:
JSON string with navigation status
"""
try:
self._initialize_browser(connect_url)
if self._page:
self._page.goto(url, wait_until="networkidle")
result = {"status": "complete", "title": self._page.title() if self._page else "", "url": url}
return json.dumps(result)
except Exception as e:
self._cleanup()
raise e
def screenshot(self, path: str, full_page: bool = True, connect_url: Optional[str] = None) -> str:
"""Takes a screenshot of the current page.
Args:
path (str): Where to save the screenshot
full_page (bool): Whether to capture the full page
connect_url (str, optional): The connection URL from an existing session
Returns:
JSON string confirming screenshot was saved
"""
try:
self._initialize_browser(connect_url)
if self._page:
self._page.screenshot(path=path, full_page=full_page)
return json.dumps({"status": "success", "path": path})
except Exception as e:
self._cleanup()
raise e
def get_page_content(self, connect_url: Optional[str] = None) -> str:
"""Gets the HTML content of the current page.
Args:
connect_url (str, optional): The connection URL from an existing session
Returns:
The page HTML content
"""
try:
self._initialize_browser(connect_url)
return self._page.content() if self._page else ""
except Exception as e:
self._cleanup()
raise e
def close_session(self) -> str:
"""Closes the current Steel browser session and cleans up resources.
Returns:
JSON string with closure status
"""
try:
self._cleanup()
try:
if self._session:
self.client.sessions.release(self._session.id) # type: ignore
except Exception as release_error:
logger.warning(f"Failed to release Steel session: {str(release_error)}")
self._session = None
self._connect_url = None
return json.dumps(
{
"status": "closed",
"message": "Browser resources cleaned up. Steel session released if active.",
}
)
except Exception as e:
return json.dumps({"status": "warning", "message": f"Cleanup completed with warning: {str(e)}"})
def main():
print("🚀 Steel + Agno Starter")
print("=" * 60)
if STEEL_API_KEY == "your-steel-api-key-here":
print("⚠️ WARNING: Please replace 'your-steel-api-key-here' with your actual Steel API key")
print(" Get your API key at: https://app.steel.dev/settings/api-keys")
return
tools = SteelTools(api_key=STEEL_API_KEY)
agent = Agent(
name="Web Scraper",
tools=[tools],
instructions=[
"Extract content clearly and format nicely",
"Always close sessions when done",
],
markdown=True,
)
try:
response = agent.run(TASK)
print("\nResults:\n")
print(response.content)
except Exception as e:
print(f"An error occurred: {e}")
finally:
tools.close_session()
print("Done!")
if __name__ == "__main__":
main()
```
#### Customizing your agent’s task
Try modifying the `TASK` in your `.env`:
```env ENV -wcn -f .env
# Crawl a product page and extract specs
TASK=Go to https://example.com/product/123 and extract the product name, price, and 5 key specs.
# Capture a screenshot-only workflow
TASK=Go to https://news.ycombinator.com, take a full-page screenshot, and return the page title.
# Multi-step navigation
TASK=Open https://docs.steel.dev, search for "session lifecycle", and summarize the key steps with anchors.
```
#### Next Steps
* **Agno Docs**: [https://docs.agno.com](https://docs.agno.com/)
* **Session Lifecycles**: [https://docs.steel.dev/overview/sessions-api/session-lifecycle](/overview/sessions-api/session-lifecycle)
* **Steel Sessions API**: [https://docs.steel.dev/overview/sessions-api/overview](/overview/sessions-api/overview)
* **Steel Python SDK**: [https://github.com/steel-dev/steel-python](https://github.com/steel-dev/steel-python)
* **Playwright Docs**: [https://playwright.dev/python/](https://playwright.dev/python/)
# Captcha Solving
URL: /integrations/browser-use/captcha-solving
---
title: Captcha Solving
sidebarTitle: Captcha Solving
description: A step-by-step guide to connecting Steel with Browser-use and solving captchas.
llm: true
---
This guide walks you through connecting a Steel cloud browser session with the browser-use framework, enabling an AI agent to interact with websites.
#### Prerequisites
Ensure you have the following:
* Python 3.11 or higher
* Steel API key (sign up at [app.steel.dev](https://app.steel.dev/))
* OpenAI API key (sign up at [platform.openai.com](https://platform.openai.com/))
#### Step 1: Set up your environment
First, create a project directory, set up a virtual environment, and install the required packages:
```bash Terminal -wc
# Create a project directory
mkdir steel-browser-use-agent
cd steel-browser-use-agent
# Recommended: Create and activate a virtual environment
uv venv
source .venv/bin/activate # On Windows, use: .venv\Scripts\activate
# Install required packages
pip install steel-sdk browser-use python-dotenv
```
Create a `.env` file with your API keys:
```env ENV -wcn -f .env
STEEL_API_KEY=your_steel_api_key_here
OPENAI_API_KEY=your_openai_api_key_here
TASK=Go to Wikipedia and search for machine learning
```
#### Step 2: Create a Steel browser session and initialize Tools and Session Cache
Use the Steel SDK to start a new browser session for your agent:
```python Python -wcn -f main.py
import os
from steel import Steel
from dotenv import load_dotenv
# Load environment variables
load_dotenv()
STEEL_API_KEY = os.getenv("STEEL_API_KEY") or "your-steel-api-key-here"
# Validate API key
if STEEL_API_KEY == "your-steel-api-key-here":
print("⚠️ WARNING: Please replace with your actual Steel API key")
print(" Get your API key at: https://app.steel.dev/settings/api-keys")
return
# Create a Steel browser session and initialize Tools and Session Cache
tools = Tools()
client = Steel(steel_api_key=STEEL_API_KEY)
SESSION_CACHE: Dict[str, Any] = {}
session = client.sessions.create()
print("✅ Steel browser session started!")
print(f"View live session at: {session.session_viewer_url}")
```
This creates a new browser session in Steel's cloud. The session\_viewer\_url allows you to watch your agent's actions in real-time.
#### Step 3: Define the Captcha Solving tools available to the Agent
```python Python -wcn -f main.py
def _has_active_captcha(states: List[Dict[str, Any]]) -> bool:
for state in states:
if bool(state.get("isSolvingCaptcha")):
return True
return False
def _summarize_states(states: List[Dict[str, Any]]) -> Dict[str, Any]:
summary: Dict[str, Any] = {
"pages": [],
"active_pages": 0,
"total_tasks": 0,
"solving_tasks": 0,
"solved_tasks": 0,
"failed_tasks": 0,
}
for state in states:
tasks = state.get("tasks", []) or []
solving = sum(1 for t in tasks if t.get("status") == "solving")
solved = sum(1 for t in tasks if t.get("status") == "solved")
failed = sum(
1
for t in tasks
if t.get("status") in ("failed_to_detect", "failed_to_solve")
)
summary["pages"].append(
{
"pageId": state.get("pageId"),
"url": state.get("url"),
"isSolvingCaptcha": bool(state.get("isSolvingCaptcha")),
"taskCounts": {
"total": len(tasks),
"solving": solving,
"solved": solved,
"failed": failed,
},
}
)
summary["active_pages"] += 1 if bool(state.get("isSolvingCaptcha")) else 0
summary["total_tasks"] += len(tasks)
summary["solving_tasks"] += solving
summary["solved_tasks"] += solved
summary["failed_tasks"] += failed
return summary
@tools.action(
description=(
"You need to invoke this tool when you encounter a CAPTCHA. It will get a human to solve the CAPTCHA and wait until the CAPTCHA is solved."
)
)
def wait_for_captcha_solution() -> Dict[str, Any]:
session_id = SESSION_CACHE.get("session_id")
timeout_ms = 60000
poll_interval_ms = 1000
start = time.monotonic()
end_deadline = start + (timeout_ms / 1000.0)
last_states: List[Dict[str, Any]] = []
while True:
now = time.monotonic()
if now > end_deadline:
duration_ms = int((now - start) * 1000)
return {
"success": False,
"message": "Timeout waiting for CAPTCHAs to be solved",
"duration_ms": duration_ms,
"last_status": _summarize_states(last_states) if last_states else {},
}
try:
# Convert CapchaStatusResponseItems to dict
last_states = [
state.to_dict() for state in client.sessions.captchas.status(session_id)
]
except Exception:
duration_ms = int((time.monotonic() - start) * 1000)
print(
{
"success": False,
"message": "Failed to get CAPTCHA status; please try again",
"duration_ms": duration_ms,
"last_status": {},
}
)
return "Failed to get CAPTCHA status; please try again"
if not last_states:
duration_ms = int((time.monotonic() - start) * 1000)
print(
{
"success": True,
"message": "No active CAPTCHAs",
"duration_ms": duration_ms,
"last_status": {},
}
)
return "No active CAPTCHAs"
if not _has_active_captcha(last_states):
duration_ms = int((time.monotonic() - start) * 1000)
print(
{
"success": True,
"message": "All CAPTCHAs solved",
"duration_ms": duration_ms,
"last_status": _summarize_states(last_states),
}
)
return "All CAPTCHAs solved"
time.sleep(poll_interval_ms / 1000.0)
```
#### Step 4: Define Your Browser Session
Connect the browser-use BrowserSession class to your Steel session using the CDP URL:
```python Python -wcn -f main.py
from browser_use import Agent, BrowserSession
# Connect browser-use to the Steel session
cdp_url = f"wss://connect.steel.dev?apiKey={STEEL_API_KEY}&sessionId={session.id}"
browser_session = BrowserSession(cdp_url=cdp_url)
```
#### Step 5: Define your AI Agent
Here we bring it all together by defining our agent with what browser, browser context, task, and LLM to use.
```python Python -wcn -f main.py
# After setting up the browser session
from browser_use import Agent
from browser_use.llm import ChatOpenAI
# Create a ChatOpenAI model for agent reasoning
model = ChatOpenAI(
model="gpt-4o",
temperature=0.3,
api_key=os.getenv('OPENAI_API_KEY')
)
# Define the task for the agent
task = os.getenv("TASK") or "Go to Wikipedia and search for machine learning"
# Create the agent with the task, model, browser session, and tools
agent = Agent(
task=task,
llm=model,
browser_session=browser_session,
tools=tools,
)
```
This configures the AI agent with:
* An OpenAI model for reasoning
* The browser session instance from Step 3
* A specific task to perform
**Models:**
This example uses **GPT-4o**, but you can use any browser-use compatible models like Anthropic, DeepSeek, or Gemini. See the full list of supported models here.
#### Step 6: Run your Agent
```python Python -wcn -f main.py
import time
# Define the main function with the agent execution
async def main():
try:
start_time = time.time()
print(f"🎯 Executing task: {task}")
print("=" * 60)
# Run the agent
result = await agent.run()
duration = f"{(time.time() - start_time):.1f}"
print("\n" + "=" * 60)
print("🎉 TASK EXECUTION COMPLETED")
print("=" * 60)
print(f"⏱️ Duration: {duration} seconds")
print(f"🎯 Task: {task}")
if result:
print(f"📋 Result:\n{result}")
print("=" * 60)
except Exception as e:
print(f"❌ Task execution failed: {e}")
finally:
# Clean up resources
if session:
print("Releasing Steel session...")
client.sessions.release(session.id)
print(f"Session completed. View replay at {session.session_viewer_url}")
print("Done!")
# Run the async main function
if __name__ == '__main__':
asyncio.run(main())
```
The agent will spin up a steel browser session and interact with it to complete the task. After completion, it's important to properly close the browser and release the Steel session.
#### Complete example
Here's the complete script that puts all steps together:
```python Python -wcn -f main.py
"""
AI-powered browser automation using browser-use library with Steel browsers.
https://github.com/steel-dev/steel-cookbook/tree/main/examples/steel-browser-use-starter
"""
import os
import time
import asyncio
from dotenv import load_dotenv
from steel import Steel
from browser_use import Agent, BrowserSession
from browser_use.llm import ChatOpenAI
load_dotenv()
# Replace with your own API keys
STEEL_API_KEY = os.getenv("STEEL_API_KEY") or "your-steel-api-key-here"
OPENAI_API_KEY = os.getenv("OPENAI_API_KEY") or "your-openai-api-key-here"
# Replace with your own task
TASK = os.getenv("TASK") or "Go to Wikipedia and search for machine learning"
tools = Tools()
client = Steel(steel_api_key=STEEL_API_KEY)
SESSION_CACHE: Dict[str, Any] = {}
def _has_active_captcha(states: List[Dict[str, Any]]) -> bool:
for state in states:
if bool(state.get("isSolvingCaptcha")):
return True
return False
def _summarize_states(states: List[Dict[str, Any]]) -> Dict[str, Any]:
summary: Dict[str, Any] = {
"pages": [],
"active_pages": 0,
"total_tasks": 0,
"solving_tasks": 0,
"solved_tasks": 0,
"failed_tasks": 0,
}
for state in states:
tasks = state.get("tasks", []) or []
solving = sum(1 for t in tasks if t.get("status") == "solving")
solved = sum(1 for t in tasks if t.get("status") == "solved")
failed = sum(
1
for t in tasks
if t.get("status") in ("failed_to_detect", "failed_to_solve")
)
summary["pages"].append(
{
"pageId": state.get("pageId"),
"url": state.get("url"),
"isSolvingCaptcha": bool(state.get("isSolvingCaptcha")),
"taskCounts": {
"total": len(tasks),
"solving": solving,
"solved": solved,
"failed": failed,
},
}
)
summary["active_pages"] += 1 if bool(state.get("isSolvingCaptcha")) else 0
summary["total_tasks"] += len(tasks)
summary["solving_tasks"] += solving
summary["solved_tasks"] += solved
summary["failed_tasks"] += failed
return summary
@tools.action(
description=(
"You need to invoke this tool when you encounter a CAPTCHA. It will get a human to solve the CAPTCHA and wait until the CAPTCHA is solved."
)
)
def wait_for_captcha_solution() -> Dict[str, Any]:
session_id = SESSION_CACHE.get("session_id")
timeout_ms = 60000
poll_interval_ms = 1000
start = time.monotonic()
end_deadline = start + (timeout_ms / 1000.0)
last_states: List[Dict[str, Any]] = []
while True:
now = time.monotonic()
if now > end_deadline:
duration_ms = int((now - start) * 1000)
return {
"success": False,
"message": "Timeout waiting for CAPTCHAs to be solved",
"duration_ms": duration_ms,
"last_status": _summarize_states(last_states) if last_states else {},
}
try:
# Convert CapchaStatusResponseItems to dict
last_states = [
state.to_dict() for state in client.sessions.captchas.status(session_id)
]
except Exception:
duration_ms = int((time.monotonic() - start) * 1000)
print(
{
"success": False,
"message": "Failed to get CAPTCHA status; please try again",
"duration_ms": duration_ms,
"last_status": {},
}
)
return "Failed to get CAPTCHA status; please try again"
if not last_states:
duration_ms = int((time.monotonic() - start) * 1000)
print(
{
"success": True,
"message": "No active CAPTCHAs",
"duration_ms": duration_ms,
"last_status": {},
}
)
return "No active CAPTCHAs"
if not _has_active_captcha(last_states):
duration_ms = int((time.monotonic() - start) * 1000)
print(
{
"success": True,
"message": "All CAPTCHAs solved",
"duration_ms": duration_ms,
"last_status": _summarize_states(last_states),
}
)
return "All CAPTCHAs solved"
time.sleep(poll_interval_ms / 1000.0)
async def main():
print("🚀 Steel + Browser Use Assistant")
print("=" * 60)
if STEEL_API_KEY == "your-steel-api-key-here":
print("⚠️ WARNING: Please replace 'your-steel-api-key-here' with your actual Steel API key")
print(" Get your API key at: https://app.steel.dev/settings/api-keys")
return
if OPENAI_API_KEY == "your-openai-api-key-here":
print("⚠️ WARNING: Please replace 'your-openai-api-key-here' with your actual OpenAI API key")
print(" Get your API key at: https://platform.openai.com/api-keys")
return
print("\nStarting Steel browser session...")
try:
session = client.sessions.create()
print("✅ Steel browser session started!")
print(f"View live session at: {session.session_viewer_url}")
print(
f"\033[1;93mSteel Session created!\033[0m\n"
f"View session at \033[1;37m{session.session_viewer_url}\033[0m\n"
)
cdp_url = f"wss://connect.steel.dev?apiKey={STEEL_API_KEY}&sessionId={session.id}"
model = ChatOpenAI(model="gpt-4o", temperature=0.3, api_key=OPENAI_API_KEY)
agent = Agent(task=TASK, llm=model, browser_session=BrowserSession(cdp_url=cdp_url), tools=tools)
start_time = time.time()
print(f"🎯 Executing task: {TASK}")
print("=" * 60)
try:
result = await agent.run()
duration = f"{(time.time() - start_time):.1f}"
print("\n" + "=" * 60)
print("🎉 TASK EXECUTION COMPLETED")
print("=" * 60)
print(f"⏱️ Duration: {duration} seconds")
print(f"🎯 Task: {TASK}")
if result:
print(f"📋 Result:\n{result}")
print("=" * 60)
except Exception as e:
print(f"❌ Task execution failed: {e}")
finally:
if session:
print("Releasing Steel session...")
client.sessions.release(session.id)
print(f"Session completed. View replay at {session.session_viewer_url}")
print("Done!")
except Exception as e:
print(f"❌ Failed to start Steel browser: {e}")
print("Please check your STEEL_API_KEY and internet connection.")
if __name__ == "__main__":
asyncio.run(main())
```
Save this as main.py and run it with:
#### Customizing your agent's task
Try modifying the task to make your agent perform different actions:
```python Python -wcn -f main.py
TASK="""
1. Go to https://recaptcha-demo.appspot.com/recaptcha-v2-checkbox.php
2. If you see a CAPTCHA box, use the wait_for_captcha_solution tool to solve it
3. Once the CAPTCHA is solved, submit the form
4. Return the result
"""
```
Congratulations! You've successfully connected a Steel browser session with browser-use to solve a CAPTCHA.
# Overview
URL: /integrations/browser-use/integrations-overview
---
title: Overview
sidebarTitle: Overview
description: Browser-Use is an open-source library that enables AI agents to control and interact with browsers programmatically. This integration connects Browser-Use with Steel's infrastructure, allowing for seamless automation of web tasks and workflows.
llm: false
---
### Overview
The Browser-Use integration connects Steel's browser infrastructure with the Browser-Use agent framework, enabling AI models to perform complex web interactions. Agents can navigate websites, fill forms, click buttons, extract data, and complete multi-step tasks - all while leveraging Steel's reliable cloud-based browsers for execution. This integration bridges the gap between AI capabilities and real-world web applications without requiring custom API development.
### Requirements & Limitations
* **Python Version**: Requires Python 3.11 or higher
* **Dependencies**: Requires Playwright-python and certain Langchain chat modules
* **Supported Models**: Works best with vision-capable models (GPT-4o, Claude 3)
* **Limitations**: Performance depends on the underlying LLM's ability to understand visual context
### Documentation
[Quickstart Guide](/integrations/browser-use/quickstart) → Quickstart step-by-step guide how to install browser-use, configure your environment, and create your first agent to interact with websites through Steel.
### Additional Resources
* [Example Repository](https://github.com/browser-use/browser-use/tree/main/examples) - Working example implementations for various use cases
* [Discord Community](https://link.browser-use.com/discord) - Join discussions and get support
* [Browser-Use Documentation](https://docs.browser-use.com/) - Comprehensive guide to the browser-use library
# Quickstart
URL: /integrations/browser-use/quickstart
---
title: Quickstart
sidebarTitle: Quickstart
description: A step-by-step guide to connecting Steel with Browser-use.
llm: true
---
import PlaygroundButton from "components/playground-button.tsx";
This guide walks you through connecting a Steel cloud browser session with the browser-use framework, enabling an AI agent to interact with websites.
#### Prerequisites
Ensure you have the following:
* Python 3.11 or higher
* Steel API key (sign up at [app.steel.dev](https://app.steel.dev/))
* OpenAI API key (sign up at [platform.openai.com](https://platform.openai.com/))
#### Step 1: Set up your environment
First, create a project directory, set up a virtual environment, and install the required packages:
```bash Terminal -wc
# Create a project directory
mkdir steel-browser-use-agent
cd steel-browser-use-agent
# Recommended: Create and activate a virtual environment
uv venv
source .venv/bin/activate # On Windows, use: .venv\Scripts\activate
# Install required packages
pip install steel-sdk browser-use python-dotenv
```
Create a `.env` file with your API keys:
```env ENV -wcn -f .env
STEEL_API_KEY=your_steel_api_key_here
OPENAI_API_KEY=your_openai_api_key_here
TASK=Go to Wikipedia and search for machine learning
```
#### Step 2: Create a Steel browser session
Use the Steel SDK to start a new browser session for your agent:
```python Python -wcn -f main.py
import os
from steel import Steel
from dotenv import load_dotenv
# Load environment variables
load_dotenv()
STEEL_API_KEY = os.getenv("STEEL_API_KEY") or "your-steel-api-key-here"
# Validate API key
if STEEL_API_KEY == "your-steel-api-key-here":
print("⚠️ WARNING: Please replace with your actual Steel API key")
print(" Get your API key at: https://app.steel.dev/settings/api-keys")
return
# Create a Steel browser session
client = Steel(steel_api_key=STEEL_API_KEY)
session = client.sessions.create()
print("✅ Steel browser session started!")
print(f"View live session at: {session.session_viewer_url}")
```
This creates a new browser session in Steel's cloud. The session\_viewer\_url allows you to watch your agent's actions in real-time.
#### Step 3: Define Your Browser Session
Connect the browser-use BrowserSession class to your Steel session using the CDP URL:
```python Python -wcn -f main.py
from browser_use import Agent, BrowserSession
# Connect browser-use to the Steel session
cdp_url = f"wss://connect.steel.dev?apiKey={STEEL_API_KEY}&sessionId={session.id}"
browser_session = BrowserSession(cdp_url=cdp_url)
```
#### Step 4: Define your AI Agent
Here we bring it all together by defining our agent with what browser, browser context, task, and LLM to use.
```python Python -wcn -f main.py
# After setting up the browser session
from browser_use import Agent
from browser_use.llm import ChatOpenAI
# Create a ChatOpenAI model for agent reasoning
model = ChatOpenAI(
model="gpt-4o",
temperature=0.3,
api_key=os.getenv('OPENAI_API_KEY')
)
# Define the task for the agent
task = os.getenv("TASK") or "Go to Wikipedia and search for machine learning"
# Create the agent with the task, model, and browser session
agent = Agent(
task=task,
llm=model,
browser_session=browser_session,
)
```
This configures the AI agent with:
* An OpenAI model for reasoning
* The browser session instance from Step 3
* A specific task to perform
**Models:**
This example uses **GPT-4o**, but you can use any browser-use compatible models like Anthropic, DeepSeek, or Gemini. See the full list of supported models here.
#### Step 5: Run your Agent
```python Python -wcn -f main.py
import time
# Define the main function with the agent execution
async def main():
try:
start_time = time.time()
print(f"🎯 Executing task: {task}")
print("=" * 60)
# Run the agent
result = await agent.run()
duration = f"{(time.time() - start_time):.1f}"
print("\n" + "=" * 60)
print("🎉 TASK EXECUTION COMPLETED")
print("=" * 60)
print(f"⏱️ Duration: {duration} seconds")
print(f"🎯 Task: {task}")
if result:
print(f"📋 Result:\n{result}")
print("=" * 60)
except Exception as e:
print(f"❌ Task execution failed: {e}")
finally:
# Clean up resources
if session:
print("Releasing Steel session...")
client.sessions.release(session.id)
print(f"Session completed. View replay at {session.session_viewer_url}")
print("Done!")
# Run the async main function
if __name__ == '__main__':
asyncio.run(main())
```
The agent will spin up a steel browser session and interact with it to complete the task. After completion, it's important to properly close the browser and release the Steel session.
#### Complete example
Here's the complete script that puts all steps together:
```python Python -wcn -f main.py
"""
AI-powered browser automation using browser-use library with Steel browsers.
https://github.com/steel-dev/steel-cookbook/tree/main/examples/steel-browser-use-starter
"""
import os
import time
import asyncio
from dotenv import load_dotenv
from steel import Steel
from browser_use import Agent, BrowserSession
from browser_use.llm import ChatOpenAI
load_dotenv()
# Replace with your own API keys
STEEL_API_KEY = os.getenv("STEEL_API_KEY") or "your-steel-api-key-here"
OPENAI_API_KEY = os.getenv("OPENAI_API_KEY") or "your-openai-api-key-here"
# Replace with your own task
TASK = os.getenv("TASK") or "Go to Wikipedia and search for machine learning"
async def main():
print("🚀 Steel + Browser Use Assistant")
print("=" * 60)
if STEEL_API_KEY == "your-steel-api-key-here":
print("⚠️ WARNING: Please replace 'your-steel-api-key-here' with your actual Steel API key")
print(" Get your API key at: https://app.steel.dev/settings/api-keys")
return
if OPENAI_API_KEY == "your-openai-api-key-here":
print("⚠️ WARNING: Please replace 'your-openai-api-key-here' with your actual OpenAI API key")
print(" Get your API key at: https://platform.openai.com/api-keys")
return
print("\nStarting Steel browser session...")
client = Steel(steel_api_key=STEEL_API_KEY)
try:
session = client.sessions.create()
print("✅ Steel browser session started!")
print(f"View live session at: {session.session_viewer_url}")
print(
f"\033[1;93mSteel Session created!\033[0m\n"
f"View session at \033[1;37m{session.session_viewer_url}\033[0m\n"
)
cdp_url = f"wss://connect.steel.dev?apiKey={STEEL_API_KEY}&sessionId={session.id}"
model = ChatOpenAI(model="gpt-4o", temperature=0.3, api_key=OPENAI_API_KEY)
agent = Agent(task=TASK, llm=model, browser_session=BrowserSession(cdp_url=cdp_url))
start_time = time.time()
print(f"🎯 Executing task: {TASK}")
print("=" * 60)
try:
result = await agent.run()
duration = f"{(time.time() - start_time):.1f}"
print("\n" + "=" * 60)
print("🎉 TASK EXECUTION COMPLETED")
print("=" * 60)
print(f"⏱️ Duration: {duration} seconds")
print(f"🎯 Task: {TASK}")
if result:
print(f"📋 Result:\n{result}")
print("=" * 60)
except Exception as e:
print(f"❌ Task execution failed: {e}")
finally:
if session:
print("Releasing Steel session...")
client.sessions.release(session.id)
print(f"Session completed. View replay at {session.session_viewer_url}")
print("Done!")
except Exception as e:
print(f"❌ Failed to start Steel browser: {e}")
print("Please check your STEEL_API_KEY and internet connection.")
if __name__ == "__main__":
asyncio.run(main())
```
Save this as main.py and run it with:
#### Customizing your agent's task
Try modifying the task to make your agent perform different actions:
```env ENV -wcn -f .env
# Search for weather information
TASK = "Go to https://weather.com, search for 'San Francisco', and tell me today's forecast."
# Research product information
TASK = "Go to https://www.amazon.com, search for 'wireless headphones', and summarize the features of the first product."
# Visit a documentation site
TASK = "Go to https://docs.steel.dev, find information about the Steel API, and summarize the key features."
```
Congratulations! You've successfully connected a Steel browser session with browser-use to automate a task with AI.
# Overview
URL: /integrations/claude-computer-use/integrations-overview
---
title: Overview
sidebarTitle: Overview
description: Claude Computer Use employs vision-based AI to control browsers by continuously analyzing visual feedback, making decisions, and taking actions in a dynamic loop until the task is completed or a certain threshold is reached.
llm: false
---
#### Overview
The Claude Computer Use integration connects Claude 3.5 Sonnet (and newer models) with Steel's browser infrastructure. This integration enables AI agents to:
* Control Steel browser sessions via Claude's Computer Use API
* Execute browser actions like clicking, typing, and scrolling
* Automate complex web tasks and multi-step workflows
* Process visual feedback from screenshots
* Implement human verification for sensitive operations
Combining Claude's Computer Use with Steel gives you reliable automation with anti-bot capabilities, proxy support, and sandboxed environments.
#### Requirements & Limitations
* **Anthropic API Key**: Access to Claude 3.5 Sonnet or newer models
* **Steel API Key**: Active subscription to Steel
* **Python or Node.js Environment**: Support for API clients for both services
* **Supported Environments**: Works best with Steel's browser environment
* **Beta Status**: Computer Use is currently in beta with some limitations
#### Documentation
[Quickstart Guide (Python)](/integrations/claude-computer-use/quickstart-py) → Step-by-step guide to building Claude Computer Use agents with Steel sessions in Python.
[Quickstart Guide (Node.js)](/integrations/claude-computer-use/quickstart-ts) → Step-by-step guide to building Claude Computer Use agents with Steel sessions in TypeScript & Node.js.
#### Additional Resources
[Anthropic Computer Use Documentation](https://docs.anthropic.com/en/docs/build-with-claude/computer-use) - Official documentation from Anthropic
[Steel Sessions API Reference](/api-reference) - Technical details for managing Steel browser sessions
[Cookbook Recipe (Python)](https://github.com/steel-dev/steel-cookbook/tree/main/examples/steel-claude-computer-use-python-starter) - Working, forkable examples of the integration in Python
[Cookbook Recipe (Node.js)](https://github.com/steel-dev/steel-cookbook/tree/main/examples/steel-claude-computer-use-node-starter) - Working, forkable examples of the integration in Node.js
[Community Discord](https://discord.gg/steel-dev) - Get help and share your implementations
# Quickstart (Python)
URL: /integrations/claude-computer-use/quickstart-py
---
title: Quickstart (Python)
sidebarTitle: Quickstart (Python)
description: How to use Claude Computer Use with Steel
llm: true
---
import PlaygroundButton from "components/playground-button.tsx";
This guide shows you how to use Claude models with computer use capabilities and Steel browsers to create AI agents that navigate the web.
We'll build a Claude Computer Use loop that enables autonomous web task execution through iterative screenshot analysis and action planning.
#### Prerequisites
* Python 3.11+
* A Steel API key ([sign up here](https://app.steel.dev/))
* An Anthropic API key with access to Claude models
#### Step 1: Setup and Dependencies
First, create a project directory, set up a virtual environment, and install the required packages:
```bash Terminal -wc
# Create a project directory
mkdir steel-claude-computer-use
cd steel-claude-computer-use
# Recommended: Create and activate a virtual environment
python -m venv venv
source venv/bin/activate # On Windows, use: venv\Scripts\activate
# Install required packages
pip install steel-sdk anthropic playwright python-dotenv pillow
```
Create a `.env` file with your API keys:
```env ENV -wcn -f .env
STEEL_API_KEY=your_steel_api_key_here
ANTHROPIC_API_KEY=your_anthropic_api_key_here
TASK=Go to Wikipedia and search for machine learning
```
#### Step 2: Create Helper Functions
```python Python -wcn -f utils.py
import os
import time
import base64
import json
import re
from typing import List, Dict
from urllib.parse import urlparse
from dotenv import load_dotenv
from PIL import Image
from io import BytesIO
from playwright.sync_api import sync_playwright, Error as PlaywrightError
from steel import Steel
from anthropic import Anthropic
from anthropic.types.beta import BetaMessageParam
load_dotenv(override=True)
# Replace with your own API keys
STEEL_API_KEY = os.getenv("STEEL_API_KEY") or "your-steel-api-key-here"
ANTHROPIC_API_KEY = os.getenv("ANTHROPIC_API_KEY") or "your-anthropic-api-key-here"
# Replace with your own task
TASK = os.getenv("TASK") or "Go to Wikipedia and search for machine learning"
SYSTEM_PROMPT = """You are an expert browser automation assistant operating in an iterative execution loop. Your goal is to efficiently complete tasks using a Chrome browser with full internet access.
* You control a Chrome browser tab and can navigate to any website
* You can click, type, scroll, take screenshots, and interact with web elements
* You have full internet access and can visit any public website
* You can read content, fill forms, search for information, and perform complex multi-step tasks
* After each action, you receive a screenshot showing the current state
* The browser viewport has specific dimensions that you must respect
* All coordinates (x, y) must be within the viewport bounds
* X coordinates must be between 0 and the display width (inclusive)
* Y coordinates must be between 0 and the display height (inclusive)
* Always ensure your click, move, scroll, and drag coordinates are within these bounds
* If you're unsure about element locations, take a screenshot first to see the current state
* Work completely independently - make decisions and act immediately without asking questions
* Never request clarification, present options, or ask for permission
* Make intelligent assumptions based on task context
* If something is ambiguous, choose the most logical interpretation and proceed
* Take immediate action rather than explaining what you might do
* When the task objective is achieved, immediately declare "TASK_COMPLETED:" - do not provide commentary or ask questions
For each step, you must reason systematically:
* Analyze your previous action's success/failure and current state
* Identify what specific progress has been made toward the goal
* Determine the next immediate objective and how to achieve it
* Choose the most efficient action sequence to make progress
* Combine related actions when possible rather than single-step execution
* Navigate directly to relevant websites without unnecessary exploration
* Use screenshots strategically to understand page state before acting
* Be persistent with alternative approaches if initial attempts fail
* Focus on the specific information or outcome requested
* MANDATORY: When you complete the task, your final message MUST start with "TASK_COMPLETED: [brief summary]"
* MANDATORY: If technical issues prevent completion, your final message MUST start with "TASK_FAILED: [reason]"
* MANDATORY: If you abandon the task, your final message MUST start with "TASK_ABANDONED: [explanation]"
* Do not write anything after completing the task except the required completion message
* Do not ask questions, provide commentary, or offer additional help after task completion
* The completion message is the end of the interaction - nothing else should follow
* This is fully automated execution - work completely independently
* Start by taking a screenshot to understand the current state
* Never click on browser UI elements
* Always respect coordinate boundaries - invalid coordinates will fail
* Recognize when the stated objective has been achieved and declare completion immediately
* Focus on the explicit task given, not implied or potential follow-up tasks
Remember: Be thorough but focused. Complete the specific task requested efficiently and provide clear results."""
BLOCKED_DOMAINS = [
"maliciousbook.com",
"evilvideos.com",
"darkwebforum.com",
"shadytok.com",
"suspiciouspins.com",
"ilanbigio.com",
]
MODEL_CONFIGS = {
"claude-3-5-sonnet-20241022": {
"tool_type": "computer_20241022",
"beta_flag": "computer-use-2024-10-22",
"description": "Stable Claude 3.5 Sonnet (recommended)"
},
"claude-3-7-sonnet-20250219": {
"tool_type": "computer_20250124",
"beta_flag": "computer-use-2025-01-24",
"description": "Claude 3.7 Sonnet (newer)"
},
"claude-sonnet-4-20250514": {
"tool_type": "computer_20250124",
"beta_flag": "computer-use-2025-01-24",
"description": "Claude 4 Sonnet (newest)"
},
"claude-opus-4-20250514": {
"tool_type": "computer_20250124",
"beta_flag": "computer-use-2025-01-24",
"description": "Claude 4 Opus (newest)"
}
}
CUA_KEY_TO_PLAYWRIGHT_KEY = {
"/": "Divide",
"\\": "Backslash",
"alt": "Alt",
"arrowdown": "ArrowDown",
"arrowleft": "ArrowLeft",
"arrowright": "ArrowRight",
"arrowup": "ArrowUp",
"backspace": "Backspace",
"capslock": "CapsLock",
"cmd": "Meta",
"ctrl": "Control",
"delete": "Delete",
"end": "End",
"enter": "Enter",
"esc": "Escape",
"home": "Home",
"insert": "Insert",
"option": "Alt",
"pagedown": "PageDown",
"pageup": "PageUp",
"shift": "Shift",
"space": " ",
"super": "Meta",
"tab": "Tab",
"win": "Meta",
"Return": "Enter",
"KP_Enter": "Enter",
"Escape": "Escape",
"BackSpace": "Backspace",
"Delete": "Delete",
"Tab": "Tab",
"ISO_Left_Tab": "Shift+Tab",
"Up": "ArrowUp",
"Down": "ArrowDown",
"Left": "ArrowLeft",
"Right": "ArrowRight",
"Page_Up": "PageUp",
"Page_Down": "PageDown",
"Home": "Home",
"End": "End",
"Insert": "Insert",
"F1": "F1", "F2": "F2", "F3": "F3", "F4": "F4",
"F5": "F5", "F6": "F6", "F7": "F7", "F8": "F8",
"F9": "F9", "F10": "F10", "F11": "F11", "F12": "F12",
"Shift_L": "Shift", "Shift_R": "Shift",
"Control_L": "Control", "Control_R": "Control",
"Alt_L": "Alt", "Alt_R": "Alt",
"Meta_L": "Meta", "Meta_R": "Meta",
"Super_L": "Meta", "Super_R": "Meta",
"minus": "-",
"equal": "=",
"bracketleft": "[",
"bracketright": "]",
"semicolon": ";",
"apostrophe": "'",
"grave": "`",
"comma": ",",
"period": ".",
"slash": "/",
}
def chunks(s: str, chunk_size: int) -> List[str]:
return [s[i : i + chunk_size] for i in range(0, len(s), chunk_size)]
def pp(obj):
print(json.dumps(obj, indent=2))
def show_image(base_64_image):
image_data = base64.b64decode(base_64_image)
image = Image.open(BytesIO(image_data))
image.show()
def check_blocklisted_url(url: str) -> None:
hostname = urlparse(url).hostname or ""
if any(
hostname == blocked or hostname.endswith(f".{blocked}")
for blocked in BLOCKED_DOMAINS
):
raise ValueError(f"Blocked URL: {url}")
```
#### Step 3: Create Steel Browser Integration
```python Python -wcn -f steel_browser.py
class SteelBrowser:
def __init__(
self,
width: int = 1024,
height: int = 768,
proxy: bool = False,
solve_captcha: bool = False,
virtual_mouse: bool = True,
session_timeout: int = 900000,
ad_blocker: bool = True,
start_url: str = "https://www.google.com",
):
self.client = Steel(
steel_api_key=os.getenv("STEEL_API_KEY"),
)
self.dimensions = (width, height)
self.proxy = proxy
self.solve_captcha = solve_captcha
self.virtual_mouse = virtual_mouse
self.session_timeout = session_timeout
self.ad_blocker = ad_blocker
self.start_url = start_url
self.session = None
self._playwright = None
self._browser = None
self._page = None
self._last_mouse_position = None
def get_dimensions(self):
return self.dimensions
def get_current_url(self) -> str:
return self._page.url if self._page else ""
def __enter__(self):
width, height = self.dimensions
session_params = {
"use_proxy": self.proxy,
"solve_captcha": self.solve_captcha,
"api_timeout": self.session_timeout,
"block_ads": self.ad_blocker,
"dimensions": {"width": width, "height": height}
}
self.session = self.client.sessions.create(**session_params)
print("Steel Session created successfully!")
print(f"View live session at: {self.session.session_viewer_url}")
self._playwright = sync_playwright().start()
browser = self._playwright.chromium.connect_over_cdp(
f"{self.session.websocket_url}&apiKey={os.getenv('STEEL_API_KEY')}",
timeout=60000
)
self._browser = browser
context = browser.contexts[0]
def handle_route(route, request):
url = request.url
try:
check_blocklisted_url(url)
route.continue_()
except ValueError:
print(f"Blocking URL: {url}")
route.abort()
if self.virtual_mouse:
context.add_init_script("""
if (window.self === window.top) {
function initCursor() {
const CURSOR_ID = '__cursor__';
if (document.getElementById(CURSOR_ID)) return;
const cursor = document.createElement('div');
cursor.id = CURSOR_ID;
Object.assign(cursor.style, {
position: 'fixed',
top: '0px',
left: '0px',
width: '20px',
height: '20px',
backgroundImage: 'url("data:image/svg+xml;utf8,")',
backgroundSize: 'cover',
pointerEvents: 'none',
zIndex: '99999',
transform: 'translate(-2px, -2px)',
});
document.body.appendChild(cursor);
document.addEventListener("mousemove", (e) => {
cursor.style.top = e.clientY + "px";
cursor.style.left = e.clientX + "px";
});
}
requestAnimationFrame(function checkBody() {
if (document.body) {
initCursor();
} else {
requestAnimationFrame(checkBody);
}
});
}
""")
self._page = context.pages[0]
self._page.route("**/*", handle_route)
self._page.set_viewport_size({"width": width, "height": height})
self._page.goto(self.start_url)
return self
def __exit__(self, exc_type, exc_val, exc_tb):
if self._page:
self._page.close()
if self._browser:
self._browser.close()
if self._playwright:
self._playwright.stop()
if self.session:
print("Releasing Steel session...")
self.client.sessions.release(self.session.id)
print(f"Session completed. View replay at {self.session.session_viewer_url}")
def screenshot(self) -> str:
try:
width, height = self.dimensions
png_bytes = self._page.screenshot(
full_page=False,
clip={"x": 0, "y": 0, "width": width, "height": height}
)
return base64.b64encode(png_bytes).decode("utf-8")
except PlaywrightError as error:
print(f"Screenshot failed, trying CDP fallback: {error}")
try:
cdp_session = self._page.context.new_cdp_session(self._page)
result = cdp_session.send(
"Page.captureScreenshot", {"format": "png", "fromSurface": False}
)
return result["data"]
except PlaywrightError as cdp_error:
print(f"CDP screenshot also failed: {cdp_error}")
raise error
def validate_and_get_coordinates(self, coordinate):
if not isinstance(coordinate, (list, tuple)) or len(coordinate) != 2:
raise ValueError(f"{coordinate} must be a tuple or list of length 2")
if not all(isinstance(i, int) and i >= 0 for i in coordinate):
raise ValueError(f"{coordinate} must be a tuple/list of non-negative ints")
x, y = self.clamp_coordinates(coordinate[0], coordinate[1])
return x, y
def clamp_coordinates(self, x: int, y: int):
width, height = self.dimensions
clamped_x = max(0, min(x, width - 1))
clamped_y = max(0, min(y, height - 1))
if x != clamped_x or y != clamped_y:
print(f"⚠️ Coordinate clamped: ({x}, {y}) → ({clamped_x}, {clamped_y})")
return clamped_x, clamped_y
def execute_computer_action(
self,
action: str,
text: str = None,
coordinate = None,
scroll_direction: str = None,
scroll_amount: int = None,
duration = None,
key: str = None,
**kwargs
) -> str:
if action in ("left_mouse_down", "left_mouse_up"):
if coordinate is not None:
raise ValueError(f"coordinate is not accepted for {action}")
if action == "left_mouse_down":
self._page.mouse.down()
elif action == "left_mouse_up":
self._page.mouse.up()
return self.screenshot()
if action == "scroll":
if scroll_direction is None or scroll_direction not in ("up", "down", "left", "right"):
raise ValueError("scroll_direction must be 'up', 'down', 'left', or 'right'")
if scroll_amount is None or not isinstance(scroll_amount, int) or scroll_amount < 0:
raise ValueError("scroll_amount must be a non-negative int")
if coordinate is not None:
x, y = self.validate_and_get_coordinates(coordinate)
self._page.mouse.move(x, y)
self._last_mouse_position = (x, y)
if text:
modifier_key = text
if modifier_key in CUA_KEY_TO_PLAYWRIGHT_KEY:
modifier_key = CUA_KEY_TO_PLAYWRIGHT_KEY[modifier_key]
self._page.keyboard.down(modifier_key)
scroll_mapping = {
"down": (0, 100 * scroll_amount),
"up": (0, -100 * scroll_amount),
"right": (100 * scroll_amount, 0),
"left": (-100 * scroll_amount, 0)
}
delta_x, delta_y = scroll_mapping[scroll_direction]
self._page.mouse.wheel(delta_x, delta_y)
if text:
self._page.keyboard.up(modifier_key)
return self.screenshot()
if action in ("hold_key", "wait"):
if duration is None or not isinstance(duration, (int, float)):
raise ValueError("duration must be a number")
if duration < 0:
raise ValueError("duration must be non-negative")
if duration > 100:
raise ValueError("duration is too long")
if action == "hold_key":
if text is None:
raise ValueError("text is required for hold_key")
hold_key = text
if hold_key in CUA_KEY_TO_PLAYWRIGHT_KEY:
hold_key = CUA_KEY_TO_PLAYWRIGHT_KEY[hold_key]
self._page.keyboard.down(hold_key)
time.sleep(duration)
self._page.keyboard.up(hold_key)
elif action == "wait":
time.sleep(duration)
return self.screenshot()
if action in ("left_click", "right_click", "double_click", "triple_click", "middle_click"):
if text is not None:
raise ValueError(f"text is not accepted for {action}")
if coordinate is not None:
x, y = self.validate_and_get_coordinates(coordinate)
self._page.mouse.move(x, y)
self._last_mouse_position = (x, y)
click_x, click_y = x, y
elif self._last_mouse_position:
click_x, click_y = self._last_mouse_position
else:
width, height = self.dimensions
click_x, click_y = width // 2, height // 2
if key:
modifier_key = key
if modifier_key in CUA_KEY_TO_PLAYWRIGHT_KEY:
modifier_key = CUA_KEY_TO_PLAYWRIGHT_KEY[modifier_key]
self._page.keyboard.down(modifier_key)
if action == "left_click":
self._page.mouse.click(click_x, click_y)
elif action == "right_click":
self._page.mouse.click(click_x, click_y, button="right")
elif action == "double_click":
self._page.mouse.dblclick(click_x, click_y)
elif action == "triple_click":
for _ in range(3):
self._page.mouse.click(click_x, click_y)
elif action == "middle_click":
self._page.mouse.click(click_x, click_y, button="middle")
if key:
self._page.keyboard.up(modifier_key)
return self.screenshot()
if action in ("mouse_move", "left_click_drag"):
if coordinate is None:
raise ValueError(f"coordinate is required for {action}")
if text is not None:
raise ValueError(f"text is not accepted for {action}")
x, y = self.validate_and_get_coordinates(coordinate)
if action == "mouse_move":
self._page.mouse.move(x, y)
self._last_mouse_position = (x, y)
elif action == "left_click_drag":
self._page.mouse.down()
self._page.mouse.move(x, y)
self._page.mouse.up()
self._last_mouse_position = (x, y)
return self.screenshot()
if action in ("key", "type"):
if text is None:
raise ValueError(f"text is required for {action}")
if coordinate is not None:
raise ValueError(f"coordinate is not accepted for {action}")
if action == "key":
press_key = text
if "+" in press_key:
key_parts = press_key.split("+")
modifier_keys = key_parts[:-1]
main_key = key_parts[-1]
playwright_modifiers = []
for mod in modifier_keys:
if mod.lower() in ("ctrl", "control"):
playwright_modifiers.append("Control")
elif mod.lower() in ("shift",):
playwright_modifiers.append("Shift")
elif mod.lower() in ("alt", "option"):
playwright_modifiers.append("Alt")
elif mod.lower() in ("cmd", "meta", "super"):
playwright_modifiers.append("Meta")
else:
playwright_modifiers.append(mod)
if main_key in CUA_KEY_TO_PLAYWRIGHT_KEY:
main_key = CUA_KEY_TO_PLAYWRIGHT_KEY[main_key]
press_key = "+".join(playwright_modifiers + [main_key])
else:
if press_key in CUA_KEY_TO_PLAYWRIGHT_KEY:
press_key = CUA_KEY_TO_PLAYWRIGHT_KEY[press_key]
self._page.keyboard.press(press_key)
elif action == "type":
for chunk in chunks(text, 50):
self._page.keyboard.type(chunk, delay=12)
time.sleep(0.01)
return self.screenshot()
if action in ("screenshot", "cursor_position"):
if text is not None:
raise ValueError(f"text is not accepted for {action}")
if coordinate is not None:
raise ValueError(f"coordinate is not accepted for {action}")
return self.screenshot()
raise ValueError(f"Invalid action: {action}")
```
#### Step 4: Create the Agent Class
```python Python -wcn -f claude_agent.py
class ClaudeAgent:
def __init__(self, computer = None, model: str = "claude-3-5-sonnet-20241022"):
self.client = Anthropic(api_key=os.getenv("ANTHROPIC_API_KEY"))
self.computer = computer
self.messages: List[BetaMessageParam] = []
self.model = model
if computer:
width, height = computer.get_dimensions()
self.viewport_width = width
self.viewport_height = height
self.system_prompt = SYSTEM_PROMPT.replace(
'',
f'\n* The browser viewport dimensions are {width}x{height} pixels\n* The browser viewport has specific dimensions that you must respect'
)
if model not in MODEL_CONFIGS:
raise ValueError(f"Unsupported model: {model}. Available models: {list(MODEL_CONFIGS.keys())}")
self.model_config = MODEL_CONFIGS[model]
self.tools = [{
"type": self.model_config["tool_type"],
"name": "computer",
"display_width_px": width,
"display_height_px": height,
"display_number": 1,
}]
else:
self.viewport_width = 1024
self.viewport_height = 768
self.system_prompt = SYSTEM_PROMPT
def get_viewport_info(self) -> dict:
if not self.computer or not self.computer._page:
return {}
try:
return self.computer._page.evaluate("""
() => ({
innerWidth: window.innerWidth,
innerHeight: window.innerHeight,
devicePixelRatio: window.devicePixelRatio,
screenWidth: window.screen.width,
screenHeight: window.screen.height,
scrollX: window.scrollX,
scrollY: window.scrollY
})
""")
except:
return {}
def validate_screenshot_dimensions(self, screenshot_base64: str) -> dict:
try:
image_data = base64.b64decode(screenshot_base64)
image = Image.open(BytesIO(image_data))
screenshot_width, screenshot_height = image.size
viewport_info = self.get_viewport_info()
scaling_info = {
"screenshot_size": (screenshot_width, screenshot_height),
"viewport_size": (self.viewport_width, self.viewport_height),
"actual_viewport": (viewport_info.get('innerWidth', 0), viewport_info.get('innerHeight', 0)),
"device_pixel_ratio": viewport_info.get('devicePixelRatio', 1.0),
"width_scale": screenshot_width / self.viewport_width if self.viewport_width > 0 else 1.0,
"height_scale": screenshot_height / self.viewport_height if self.viewport_height > 0 else 1.0
}
if scaling_info["width_scale"] != 1.0 or scaling_info["height_scale"] != 1.0:
print(f"⚠️ Screenshot scaling detected:")
print(f" Screenshot: {screenshot_width}x{screenshot_height}")
print(f" Expected viewport: {self.viewport_width}x{self.viewport_height}")
print(f" Actual viewport: {viewport_info.get('innerWidth', 'unknown')}x{viewport_info.get('innerHeight', 'unknown')}")
print(f" Scale factors: {scaling_info['width_scale']:.3f}x{scaling_info['height_scale']:.3f}")
return scaling_info
except Exception as e:
print(f"⚠️ Error validating screenshot dimensions: {e}")
return {}
def execute_task(
self,
task: str,
print_steps: bool = True,
debug: bool = False,
max_iterations: int = 50
) -> str:
input_items = [
{
"role": "user",
"content": task,
},
]
new_items = []
iterations = 0
consecutive_no_actions = 0
last_assistant_messages = []
print(f"🎯 Executing task: {task}")
print("=" * 60)
def is_task_complete(content: str) -> dict:
if "TASK_COMPLETED:" in content:
return {"completed": True, "reason": "explicit_completion"}
if "TASK_FAILED:" in content or "TASK_ABANDONED:" in content:
return {"completed": True, "reason": "explicit_failure"}
completion_patterns = [
r'task\s+(completed|finished|done|accomplished)',
r'successfully\s+(completed|finished|found|gathered)',
r'here\s+(is|are)\s+the\s+(results?|information|summary)',
r'to\s+summarize',
r'in\s+conclusion',
r'final\s+(answer|result|summary)'
]
failure_patterns = [
r'cannot\s+(complete|proceed|access|continue)',
r'unable\s+to\s+(complete|access|find|proceed)',
r'blocked\s+by\s+(captcha|security|authentication)',
r'giving\s+up',
r'no\s+longer\s+able',
r'have\s+tried\s+multiple\s+approaches'
]
for pattern in completion_patterns:
if re.search(pattern, content, re.IGNORECASE):
return {"completed": True, "reason": "natural_completion"}
for pattern in failure_patterns:
if re.search(pattern, content, re.IGNORECASE):
return {"completed": True, "reason": "natural_failure"}
return {"completed": False}
def detect_repetition(new_message: str) -> bool:
if len(last_assistant_messages) < 2:
return False
def similarity(str1: str, str2: str) -> float:
words1 = str1.lower().split()
words2 = str2.lower().split()
common_words = [word for word in words1 if word in words2]
return len(common_words) / max(len(words1), len(words2))
return any(similarity(new_message, prev_message) > 0.8
for prev_message in last_assistant_messages)
while iterations < max_iterations:
iterations += 1
has_actions = False
if new_items and new_items[-1].get("role") == "assistant":
last_message = new_items[-1]
if last_message.get("content") and len(last_message["content"]) > 0:
content = last_message["content"][0].get("text", "")
completion = is_task_complete(content)
if completion["completed"]:
print(f"✅ Task completed ({completion['reason']})")
break
if detect_repetition(content):
print("🔄 Repetition detected - stopping execution")
last_assistant_messages.append(content)
break
last_assistant_messages.append(content)
if len(last_assistant_messages) > 3:
last_assistant_messages.pop(0)
if debug:
pp(input_items + new_items)
try:
response = self.client.beta.messages.create(
model=self.model,
max_tokens=4096,
system=self.system_prompt,
messages=input_items + new_items,
tools=self.tools,
betas=[self.model_config["beta_flag"]]
)
if debug:
pp(response)
for block in response.content:
if block.type == "text":
print(block.text)
new_items.append({
"role": "assistant",
"content": [
{
"type": "text",
"text": block.text
}
]
})
elif block.type == "tool_use":
has_actions = True
if block.name == "computer":
tool_input = block.input
action = tool_input.get("action")
print(f"🔧 {action}({tool_input})")
screenshot_base64 = self.computer.execute_computer_action(
action=action,
text=tool_input.get("text"),
coordinate=tool_input.get("coordinate"),
scroll_direction=tool_input.get("scroll_direction"),
scroll_amount=tool_input.get("scroll_amount"),
duration=tool_input.get("duration"),
key=tool_input.get("key")
)
if action == "screenshot":
self.validate_screenshot_dimensions(screenshot_base64)
new_items.append({
"role": "assistant",
"content": [
{
"type": "tool_use",
"id": block.id,
"name": block.name,
"input": tool_input
}
]
})
current_url = self.computer.get_current_url()
check_blocklisted_url(current_url)
new_items.append({
"role": "user",
"content": [
{
"type": "tool_result",
"tool_use_id": block.id,
"content": [
{
"type": "image",
"source": {
"type": "base64",
"media_type": "image/png",
"data": screenshot_base64
}
}
]
}
]
})
if not has_actions:
consecutive_no_actions += 1
if consecutive_no_actions >= 3:
print("⚠️ No actions for 3 consecutive iterations - stopping")
break
else:
consecutive_no_actions = 0
except Exception as error:
print(f"❌ Error during task execution: {error}")
raise error
if iterations >= max_iterations:
print(f"⚠️ Task execution stopped after {max_iterations} iterations")
assistant_messages = [item for item in new_items if item.get("role") == "assistant"]
if assistant_messages:
final_message = assistant_messages[-1]
content = final_message.get("content")
if isinstance(content, list) and len(content) > 0:
for block in content:
if isinstance(block, dict) and block.get("type") == "text":
return block.get("text", "Task execution completed (no final message)")
return "Task execution completed (no final message)"
```
#### Step 5: Create the Main Script
```python Python -wcn -f main.py
def main():
print("🚀 Steel + Claude Computer Use Assistant")
print("=" * 60)
if STEEL_API_KEY == "your-steel-api-key-here":
print("⚠️ WARNING: Please replace 'your-steel-api-key-here' with your actual Steel API key")
print(" Get your API key at: https://app.steel.dev/settings/api-keys")
return
if ANTHROPIC_API_KEY == "your-anthropic-api-key-here":
print("⚠️ WARNING: Please replace 'your-anthropic-api-key-here' with your actual Anthropic API key")
print(" Get your API key at: https://console.anthropic.com/")
return
print("\nStarting Steel browser session...")
try:
with SteelBrowser() as computer:
print("✅ Steel browser session started!")
agent = ClaudeAgent(
computer=computer,
model="claude-3-5-sonnet-20241022",
)
start_time = time.time()
try:
result = agent.execute_task(
TASK,
print_steps=True,
debug=False,
max_iterations=50,
)
duration = f"{(time.time() - start_time):.1f}"
print("\n" + "=" * 60)
print("🎉 TASK EXECUTION COMPLETED")
print("=" * 60)
print(f"⏱️ Duration: {duration} seconds")
print(f"🎯 Task: {TASK}")
print(f"📋 Result:\n{result}")
print("=" * 60)
except Exception as error:
print(f"❌ Task execution failed: {error}")
exit(1)
except Exception as e:
print(f"❌ Failed to start Steel browser: {e}")
print("Please check your STEEL_API_KEY and internet connection.")
exit(1)
if __name__ == "__main__":
main()
```
#### Running Your Agent
Execute your script:
You'll see the session URL printed in the console. Open this URL to view the live browser session. The agent will execute the task defined in the `TASK` environment variable or the default task.
You can modify the task by setting the environment variable:
```bash Terminal -wc
export TASK="Search for the latest developments in artificial intelligence"
python main.py
```
#### Customizing your agent's task
Try modifying the task to make your agent perform different actions:
```env ENV -wcn -f .env
# Research specific topics
TASK = "Go to https://arxiv.org, search for 'computer vision', and summarize the latest papers."
# E-commerce tasks
TASK = "Go to https://www.amazon.com, search for 'mechanical keyboards', and compare the top 3 results."
# Information gathering
TASK = "Go to https://docs.anthropic.com, find information about Claude's capabilities, and provide a summary."
```
**Supported Models:**
This example uses **Claude 3.5 Sonnet**, but you can use any of the supported Claude models including Claude 3.7 Sonnet, Claude 4 Sonnet, or Claude 4 Opus. Update the model parameter in the ClaudeAgent constructor to switch models.
#### Next Steps
* Explore the [Steel API documentation](https://docs.steel.dev/) for more advanced features
* Check out the [Anthropic documentation](https://docs.anthropic.com/en/docs/build-with-claude/computer-use) for more information about Claude's computer use capabilities
* Add additional features like session recording or multi-session management
# Quickstart (Typescript)
URL: /integrations/claude-computer-use/quickstart-ts
---
title: Quickstart (Typescript)
sidebarTitle: Quickstart (Typescript)
description: How to use Claude Computer Use with Steel
llm: true
---
import PlaygroundButton from "components/playground-button.tsx";
This guide shows you how to create AI agents with Claude's computer use capabilities and Steel browsers for autonomous web task execution.
#### Prerequisites
* Node.js 20+
* A Steel API key ([sign up here](https://app.steel.dev/))
* An Anthropic API key with access to Claude models
#### Step 1: Setup and Dependencies
First, create a project directory and install the required packages:
```bash Terminal -wc
# Create a project directory
mkdir steel-claude-computer-use
cd steel-claude-computer-use
# Initialize package.json
npm init -y
# Install required packages
npm install steel-sdk @anthropic-ai/sdk playwright dotenv
npm install -D @types/node typescript ts-node
```
Create a `.env` file with your API keys:
```env ENV -wcn -f .env
STEEL_API_KEY=your_steel_api_key_here
ANTHROPIC_API_KEY=your_anthropic_api_key_here
TASK=Go to Wikipedia and search for machine learning
```
#### Step 2: Create Helper Functions
```typescript Typescript -wcn -f utils.ts
import { chromium } from "playwright";
import type { Browser, Page } from "playwright";
import { Steel } from "steel-sdk";
import * as dotenv from "dotenv";
import Anthropic from "@anthropic-ai/sdk";
import type {
MessageParam,
ToolResultBlockParam,
Message,
} from "@anthropic-ai/sdk/resources/messages";
dotenv.config();
// Replace with your own API keys
export const STEEL_API_KEY =
process.env.STEEL_API_KEY || "your-steel-api-key-here";
export const ANTHROPIC_API_KEY =
process.env.ANTHROPIC_API_KEY || "your-anthropic-api-key-here";
// Replace with your own task
export const TASK =
process.env.TASK || "Go to Wikipedia and search for machine learning";
export const SYSTEM_PROMPT = `You are an expert browser automation assistant operating in an iterative execution loop. Your goal is to efficiently complete tasks using a Chrome browser with full internet access.
* You control a Chrome browser tab and can navigate to any website
* You can click, type, scroll, take screenshots, and interact with web elements
* You have full internet access and can visit any public website
* You can read content, fill forms, search for information, and perform complex multi-step tasks
* After each action, you receive a screenshot showing the current state
* The browser viewport has specific dimensions that you must respect
* All coordinates (x, y) must be within the viewport bounds
* X coordinates must be between 0 and the display width (inclusive)
* Y coordinates must be between 0 and the display height (inclusive)
* Always ensure your click, move, scroll, and drag coordinates are within these bounds
* If you're unsure about element locations, take a screenshot first to see the current state
* Work completely independently - make decisions and act immediately without asking questions
* Never request clarification, present options, or ask for permission
* Make intelligent assumptions based on task context
* If something is ambiguous, choose the most logical interpretation and proceed
* Take immediate action rather than explaining what you might do
* When the task objective is achieved, immediately declare "TASK_COMPLETED:" - do not provide commentary or ask questions
For each step, you must reason systematically:
* Analyze your previous action's success/failure and current state
* Identify what specific progress has been made toward the goal
* Determine the next immediate objective and how to achieve it
* Choose the most efficient action sequence to make progress
* Combine related actions when possible rather than single-step execution
* Navigate directly to relevant websites without unnecessary exploration
* Use screenshots strategically to understand page state before acting
* Be persistent with alternative approaches if initial attempts fail
* Focus on the specific information or outcome requested
* MANDATORY: When you complete the task, your final message MUST start with "TASK_COMPLETED: [brief summary]"
* MANDATORY: If technical issues prevent completion, your final message MUST start with "TASK_FAILED: [reason]"
* MANDATORY: If you abandon the task, your final message MUST start with "TASK_ABANDONED: [explanation]"
* Do not write anything after completing the task except the required completion message
* Do not ask questions, provide commentary, or offer additional help after task completion
* The completion message is the end of the interaction - nothing else should follow
* This is fully automated execution - work completely independently
* Start by taking a screenshot to understand the current state
* Never click on browser UI elements
* Always respect coordinate boundaries - invalid coordinates will fail
* Recognize when the stated objective has been achieved and declare completion immediately
* Focus on the explicit task given, not implied or potential follow-up tasks
Remember: Be thorough but focused. Complete the specific task requested efficiently and provide clear results.`;
export const BLOCKED_DOMAINS = [
"maliciousbook.com",
"evilvideos.com",
"darkwebforum.com",
"shadytok.com",
"suspiciouspins.com",
"ilanbigio.com",
];
export const MODEL_CONFIGS = {
"claude-3-5-sonnet-20241022": {
toolType: "computer_20241022",
betaFlag: "computer-use-2024-10-22",
description: "Stable Claude 3.5 Sonnet (recommended)",
},
"claude-3-7-sonnet-20250219": {
toolType: "computer_20250124",
betaFlag: "computer-use-2025-01-24",
description: "Claude 3.7 Sonnet (newer)",
},
"claude-sonnet-4-20250514": {
toolType: "computer_20250124",
betaFlag: "computer-use-2025-01-24",
description: "Claude 4 Sonnet (newest)",
},
"claude-opus-4-20250514": {
toolType: "computer_20250124",
betaFlag: "computer-use-2025-01-24",
description: "Claude 4 Opus (newest)",
},
};
export const CUA_KEY_TO_PLAYWRIGHT_KEY: Record = {
"/": "Divide",
"\\": "Backslash",
alt: "Alt",
arrowdown: "ArrowDown",
arrowleft: "ArrowLeft",
arrowright: "ArrowRight",
arrowup: "ArrowUp",
backspace: "Backspace",
capslock: "CapsLock",
cmd: "Meta",
ctrl: "Control",
delete: "Delete",
end: "End",
enter: "Enter",
esc: "Escape",
home: "Home",
insert: "Insert",
option: "Alt",
pagedown: "PageDown",
pageup: "PageUp",
shift: "Shift",
space: " ",
super: "Meta",
tab: "Tab",
win: "Meta",
Return: "Enter",
KP_Enter: "Enter",
Escape: "Escape",
BackSpace: "Backspace",
Delete: "Delete",
Tab: "Tab",
ISO_Left_Tab: "Shift+Tab",
Up: "ArrowUp",
Down: "ArrowDown",
Left: "ArrowLeft",
Right: "ArrowRight",
Page_Up: "PageUp",
Page_Down: "PageDown",
Home: "Home",
End: "End",
Insert: "Insert",
F1: "F1",
F2: "F2",
F3: "F3",
F4: "F4",
F5: "F5",
F6: "F6",
F7: "F7",
F8: "F8",
F9: "F9",
F10: "F10",
F11: "F11",
F12: "F12",
Shift_L: "Shift",
Shift_R: "Shift",
Control_L: "Control",
Control_R: "Control",
Alt_L: "Alt",
Alt_R: "Alt",
Meta_L: "Meta",
Meta_R: "Meta",
Super_L: "Meta",
Super_R: "Meta",
minus: "-",
equal: "=",
bracketleft: "[",
bracketright: "]",
semicolon: ";",
apostrophe: "'",
grave: "`",
comma: ",",
period: ".",
slash: "/",
};
type ModelName = keyof typeof MODEL_CONFIGS;
interface ModelConfig {
toolType: string;
betaFlag: string;
description: string;
}
export function chunks(s: string, chunkSize: number): string[] {
const result: string[] = [];
for (let i = 0; i < s.length; i += chunkSize) {
result.push(s.slice(i, i + chunkSize));
}
return result;
}
export function pp(obj: any): void {
console.log(JSON.stringify(obj, null, 2));
}
export function checkBlocklistedUrl(url: string): void {
try {
const hostname = new URL(url).hostname || "";
const isBlocked = BLOCKED_DOMAINS.some(
(blocked) => hostname === blocked || hostname.endsWith(`.${blocked}`)
);
if (isBlocked) {
throw new Error(`Blocked URL: ${url}`);
}
} catch (error) {
if (error instanceof Error && error.message.startsWith("Blocked URL:")) {
throw error;
}
}
}
```
#### Step 3: Create Steel Browser Integration
```typescript Typescript -wcn -f steelBrowser.ts
const TYPING_DELAY_MS = 12;
const TYPING_GROUP_SIZE = 50;
export class SteelBrowser {
private client: Steel;
private session: any;
private browser: Browser | null = null;
private page: Page | null = null;
private dimensions: [number, number];
private proxy: boolean;
private solveCaptcha: boolean;
private virtualMouse: boolean;
private sessionTimeout: number;
private adBlocker: boolean;
private startUrl: string;
private lastMousePosition: [number, number] | null = null;
constructor(
width: number = 1024,
height: number = 768,
proxy: boolean = false,
solveCaptcha: boolean = false,
virtualMouse: boolean = true,
sessionTimeout: number = 900000,
adBlocker: boolean = true,
startUrl: string = "https://www.google.com"
) {
this.client = new Steel({
steelAPIKey: process.env.STEEL_API_KEY!,
});
this.dimensions = [width, height];
this.proxy = proxy;
this.solveCaptcha = solveCaptcha;
this.virtualMouse = virtualMouse;
this.sessionTimeout = sessionTimeout;
this.adBlocker = adBlocker;
this.startUrl = startUrl;
}
getDimensions(): [number, number] {
return this.dimensions;
}
getCurrentUrl(): string {
return this.page?.url() || "";
}
async initialize(): Promise {
const [width, height] = this.dimensions;
const sessionParams = {
useProxy: this.proxy,
solveCaptcha: this.solveCaptcha,
apiTimeout: this.sessionTimeout,
blockAds: this.adBlocker,
dimensions: { width, height },
};
this.session = await this.client.sessions.create(sessionParams);
console.log("Steel Session created successfully!");
console.log(`View live session at: ${this.session.sessionViewerUrl}`);
const cdpUrl = `${this.session.websocketUrl}&apiKey=${process.env.STEEL_API_KEY}`;
this.browser = await chromium.connectOverCDP(cdpUrl, {
timeout: 60000,
});
const context = this.browser.contexts()
[0];
await context.route("**/*", async (route, request) => {
const url = request.url();
try {
checkBlocklistedUrl(url);
await route.continue();
} catch (error) {
console.log(`Blocking URL: ${url}`);
await route.abort();
}
});
if (this.virtualMouse) {
await context.addInitScript(`
if (window.self === window.top) {
function initCursor() {
const CURSOR_ID = '__cursor__';
if (document.getElementById(CURSOR_ID)) return;
const cursor = document.createElement('div');
cursor.id = CURSOR_ID;
Object.assign(cursor.style, {
position: 'fixed',
top: '0px',
left: '0px',
width: '20px',
height: '20px',
backgroundImage: 'url("data:image/svg+xml;utf8,")',
backgroundSize: 'cover',
pointerEvents: 'none',
zIndex: '99999',
transform: 'translate(-2px, -2px)',
});
document.body.appendChild(cursor);
document.addEventListener("mousemove", (e) => {
cursor.style.top = e.clientY + "px";
cursor.style.left = e.clientX + "px";
});
}
function checkBody() {
if (document.body) {
initCursor();
} else {
requestAnimationFrame(checkBody);
}
}
requestAnimationFrame(checkBody);
}
`);
}
this.page = context.pages()
[0];
const [viewportWidth, viewportHeight] = this.dimensions;
await this.page.setViewportSize({
width: viewportWidth,
height: viewportHeight,
});
await this.page.goto(this.startUrl);
}
async cleanup(): Promise {
if (this.page) {
await this.page.close();
}
if (this.browser) {
await this.browser.close();
}
if (this.session) {
console.log("Releasing Steel session...");
await this.client.sessions.release(this.session.id);
console.log(
`Session completed. View replay at ${this.session.sessionViewerUrl}`
);
}
}
async screenshot(): Promise {
if (!this.page) throw new Error("Page not initialized");
try {
const [width, height] = this.dimensions;
const buffer = await this.page.screenshot({
fullPage: false,
clip: { x: 0, y: 0, width, height },
});
return buffer.toString("base64");
} catch (error) {
console.log(`Screenshot failed, trying CDP fallback: ${error}`);
try {
const cdpSession = await this.page.context().newCDPSession(this.page);
const result = await cdpSession.send("Page.captureScreenshot", {
format: "png",
fromSurface: false,
});
await cdpSession.detach();
return result.data;
} catch (cdpError) {
console.log(`CDP screenshot also failed: ${cdpError}`);
throw error;
}
}
}
private validateAndGetCoordinates(
coordinate: [number, number] | number[]
): [number, number] {
if (!Array.isArray(coordinate) || coordinate.length !== 2) {
throw new Error(`${coordinate} must be a tuple or list of length 2`);
}
if (!coordinate.every((i) => typeof i === "number" && i >= 0)) {
throw new Error(
`${coordinate} must be a tuple/list of non-negative numbers`
);
}
const [x, y] = this.clampCoordinates(coordinate[0], coordinate[1]);
return [x, y];
}
private clampCoordinates(x: number, y: number): [number, number] {
const [width, height] = this.dimensions;
const clampedX = Math.max(0, Math.min(x, width - 1));
const clampedY = Math.max(0, Math.min(y, height - 1));
if (x !== clampedX || y !== clampedY) {
console.log(
`⚠️ Coordinate clamped: (${x}, ${y}) → (${clampedX}, ${clampedY})`
);
}
return [clampedX, clampedY];
}
async executeComputerAction(
action: string,
text?: string,
coordinate?: [number, number] | number[],
scrollDirection?: "up" | "down" | "left" | "right",
scrollAmount?: number,
duration?: number,
key?: string
): Promise {
if (!this.page) throw new Error("Page not initialized");
if (action === "left_mouse_down" || action === "left_mouse_up") {
if (coordinate !== undefined) {
throw new Error(`coordinate is not accepted for ${action}`);
}
if (action === "left_mouse_down") {
await this.page.mouse.down();
} else {
await this.page.mouse.up();
}
return this.screenshot();
}
if (action === "scroll") {
if (
!scrollDirection ||
!["up", "down", "left", "right"].includes(scrollDirection)
) {
throw new Error(
"scroll_direction must be 'up', 'down', 'left', or 'right'"
);
}
if (scrollAmount === undefined || scrollAmount < 0) {
throw new Error("scroll_amount must be a non-negative number");
}
if (coordinate !== undefined) {
const [x, y] = this.validateAndGetCoordinates(coordinate);
await this.page.mouse.move(x, y);
this.lastMousePosition = [x, y];
}
if (text) {
let modifierKey = text;
if (modifierKey in CUA_KEY_TO_PLAYWRIGHT_KEY) {
modifierKey = CUA_KEY_TO_PLAYWRIGHT_KEY[modifierKey];
}
await this.page.keyboard.down(modifierKey);
}
const scrollMapping = {
down: [0, 100 * scrollAmount],
up: [0, -100 * scrollAmount],
right: [100 * scrollAmount, 0],
left: [-100 * scrollAmount, 0],
};
const [deltaX, deltaY] = scrollMapping[scrollDirection];
await this.page.mouse.wheel(deltaX, deltaY);
if (text) {
let modifierKey = text;
if (modifierKey in CUA_KEY_TO_PLAYWRIGHT_KEY) {
modifierKey = CUA_KEY_TO_PLAYWRIGHT_KEY[modifierKey];
}
await this.page.keyboard.up(modifierKey);
}
return this.screenshot();
}
if (action === "hold_key" || action === "wait") {
if (duration === undefined || duration < 0) {
throw new Error("duration must be a non-negative number");
}
if (duration > 100) {
throw new Error("duration is too long");
}
if (action === "hold_key") {
if (text === undefined) {
throw new Error("text is required for hold_key");
}
let holdKey = text;
if (holdKey in CUA_KEY_TO_PLAYWRIGHT_KEY) {
holdKey = CUA_KEY_TO_PLAYWRIGHT_KEY[holdKey];
}
await this.page.keyboard.down(holdKey);
await new Promise((resolve) => setTimeout(resolve, duration * 1000));
await this.page.keyboard.up(holdKey);
} else if (action === "wait") {
await new Promise((resolve) => setTimeout(resolve, duration * 1000));
}
return this.screenshot();
}
if (
[
"left_click",
"right_click",
"double_click",
"triple_click",
"middle_click",
].includes(action)
) {
if (text !== undefined) {
throw new Error(`text is not accepted for ${action}`);
}
let clickX: number, clickY: number;
if (coordinate !== undefined) {
const [x, y] = this.validateAndGetCoordinates(coordinate);
await this.page.mouse.move(x, y);
this.lastMousePosition = [x, y];
clickX = x;
clickY = y;
} else if (this.lastMousePosition) {
[clickX, clickY] = this.lastMousePosition;
} else {
const [width, height] = this.dimensions;
clickX = Math.floor(width / 2);
clickY = Math.floor(height / 2);
}
if (key) {
let modifierKey = key;
if (modifierKey in CUA_KEY_TO_PLAYWRIGHT_KEY) {
modifierKey = CUA_KEY_TO_PLAYWRIGHT_KEY[modifierKey];
}
await this.page.keyboard.down(modifierKey);
}
if (action === "left_click") {
await this.page.mouse.click(clickX, clickY);
} else if (action === "right_click") {
await this.page.mouse.click(clickX, clickY, { button: "right" });
} else if (action === "double_click") {
await this.page.mouse.dblclick(clickX, clickY);
} else if (action === "triple_click") {
for (let i = 0; i < 3; i++) {
await this.page.mouse.click(clickX, clickY);
}
} else if (action === "middle_click") {
await this.page.mouse.click(clickX, clickY, { button: "middle" });
}
if (key) {
let modifierKey = key;
if (modifierKey in CUA_KEY_TO_PLAYWRIGHT_KEY) {
modifierKey = CUA_KEY_TO_PLAYWRIGHT_KEY[modifierKey];
}
await this.page.keyboard.up(modifierKey);
}
return this.screenshot();
}
if (action === "mouse_move" || action === "left_click_drag") {
if (coordinate === undefined) {
throw new Error(`coordinate is required for ${action}`);
}
if (text !== undefined) {
throw new Error(`text is not accepted for ${action}`);
}
const [x, y] = this.validateAndGetCoordinates(coordinate);
if (action === "mouse_move") {
await this.page.mouse.move(x, y);
this.lastMousePosition = [x, y];
} else if (action === "left_click_drag") {
await this.page.mouse.down();
await this.page.mouse.move(x, y);
await this.page.mouse.up();
this.lastMousePosition = [x, y];
}
return this.screenshot();
}
if (action === "key" || action === "type") {
if (text === undefined) {
throw new Error(`text is required for ${action}`);
}
if (coordinate !== undefined) {
throw new Error(`coordinate is not accepted for ${action}`);
}
if (action === "key") {
let pressKey = text;
if (pressKey.includes("+")) {
const keyParts = pressKey.split("+");
const modifierKeys = keyParts.slice(0, -1);
const mainKey = keyParts[keyParts.length - 1];
const playwrightModifiers: string[] = [];
for (const mod of modifierKeys) {
if (["ctrl", "control"].includes(mod.toLowerCase())) {
playwrightModifiers.push("Control");
} else if (mod.toLowerCase() === "shift") {
playwrightModifiers.push("Shift");
} else if (["alt", "option"].includes(mod.toLowerCase())) {
playwrightModifiers.push("Alt");
} else if (["cmd", "meta", "super"].includes(mod.toLowerCase())) {
playwrightModifiers.push("Meta");
} else {
playwrightModifiers.push(mod);
}
}
let finalMainKey = mainKey;
if (mainKey in CUA_KEY_TO_PLAYWRIGHT_KEY) {
finalMainKey = CUA_KEY_TO_PLAYWRIGHT_KEY[mainKey];
}
pressKey = [...playwrightModifiers, finalMainKey].join("+");
} else {
if (pressKey in CUA_KEY_TO_PLAYWRIGHT_KEY) {
pressKey = CUA_KEY_TO_PLAYWRIGHT_KEY[pressKey];
}
}
await this.page.keyboard.press(pressKey);
} else if (action === "type") {
for (const chunk of chunks(text, TYPING_GROUP_SIZE)) {
await this.page.keyboard.type(chunk, { delay: TYPING_DELAY_MS });
await new Promise((resolve) => setTimeout(resolve, 10));
}
}
return this.screenshot();
}
if (action === "screenshot" || action === "cursor_position") {
if (text !== undefined) {
throw new Error(`text is not accepted for ${action}`);
}
if (coordinate !== undefined) {
throw new Error(`coordinate is not accepted for ${action}`);
}
return this.screenshot();
}
throw new Error(`Invalid action: ${action}`);
}
}
```
#### Step 4: Create the Agent Class
```typescript Typescript -wcn -f claudeAgent.ts
type ModelName = keyof typeof MODEL_CONFIGS;
interface ModelConfig {
toolType: string;
betaFlag: string;
description: string;
}
export class ClaudeAgent {
private client: Anthropic;
private computer: SteelBrowser;
private messages: MessageParam[];
private model: ModelName;
private modelConfig: ModelConfig;
private tools: any[];
private systemPrompt: string;
private viewportWidth: number;
private viewportHeight: number;
constructor(
computer: SteelBrowser,
model: ModelName = "claude-3-5-sonnet-20241022"
) {
this.client = new Anthropic({
apiKey: process.env.ANTHROPIC_API_KEY!,
});
this.computer = computer;
this.model = model;
this.messages = [];
if (!(model in MODEL_CONFIGS)) {
throw new Error(
`Unsupported model: ${model}. Available models: ${Object.keys(
MODEL_CONFIGS
)}`
);
}
this.modelConfig = MODEL_CONFIGS[model];
const [width, height] = computer.getDimensions();
this.viewportWidth = width;
this.viewportHeight = height;
this.systemPrompt = SYSTEM_PROMPT.replace(
"",
`
* The browser viewport dimensions are ${width}x${height} pixels
* The browser viewport has specific dimensions that you must respect`
);
this.tools = [
{
type: this.modelConfig.toolType,
name: "computer",
display_width_px: width,
display_height_px: height,
display_number: 1,
},
];
}
getViewportInfo(): any {
return {
innerWidth: this.viewportWidth,
innerHeight: this.viewportHeight,
devicePixelRatio: 1.0,
screenWidth: this.viewportWidth,
screenHeight: this.viewportHeight,
scrollX: 0,
scrollY: 0,
};
}
validateScreenshotDimensions(screenshotBase64: string): any {
try {
const imageBuffer = Buffer.from(screenshotBase64, "base64");
if (imageBuffer.length === 0) {
console.log("⚠️ Empty screenshot data");
return {};
}
const viewportInfo = this.getViewportInfo();
const scalingInfo = {
screenshot_size: ["unknown", "unknown"],
viewport_size: [this.viewportWidth, this.viewportHeight],
actual_viewport: [viewportInfo.innerWidth, viewportInfo.innerHeight],
device_pixel_ratio: viewportInfo.devicePixelRatio,
width_scale: 1.0,
height_scale: 1.0,
};
return scalingInfo;
} catch (e) {
console.log(`⚠️ Error validating screenshot dimensions: ${e}`);
return {};
}
}
async processResponse(message: Message): Promise {
let responseText = "";
for (const block of message.content) {
if (block.type === "text") {
responseText += block.text;
console.log(block.text);
} else if (block.type === "tool_use") {
const toolName = block.name;
const toolInput = block.input as any;
console.log(`🔧 ${toolName}(${JSON.stringify(toolInput)})`);
if (toolName === "computer") {
const action = toolInput.action;
const params = {
text: toolInput.text,
coordinate: toolInput.coordinate,
scrollDirection: toolInput.scroll_direction,
scrollAmount: toolInput.scroll_amount,
duration: toolInput.duration,
key: toolInput.key,
};
try {
const screenshotBase64 = await this.computer.executeComputerAction(
action,
params.text,
params.coordinate,
params.scrollDirection,
params.scrollAmount,
params.duration,
params.key
);
if (action === "screenshot") {
this.validateScreenshotDimensions(screenshotBase64);
}
const toolResult: ToolResultBlockParam = {
type: "tool_result",
tool_use_id: block.id,
content: [
{
type: "image",
source: {
type: "base64",
media_type: "image/png",
data: screenshotBase64,
},
},
],
};
this.messages.push({
role: "assistant",
content: [block],
});
this.messages.push({
role: "user",
content: [toolResult],
});
return this.getClaudeResponse();
} catch (error) {
console.log(`❌ Error executing ${action}: ${error}`);
const toolResult: ToolResultBlockParam = {
type: "tool_result",
tool_use_id: block.id,
content: `Error executing ${action}: ${String(error)}`,
is_error: true,
};
this.messages.push({
role: "assistant",
content: [block],
});
this.messages.push({
role: "user",
content: [toolResult],
});
return this.getClaudeResponse();
}
}
}
}
if (
responseText &&
!message.content.some((block) => block.type === "tool_use")
) {
this.messages.push({
role: "assistant",
content: responseText,
});
}
return responseText;
}
async getClaudeResponse(): Promise {
try {
const response = await this.client.beta.messages.create(
{
model: this.model,
max_tokens: 4096,
messages: this.messages,
tools: this.tools,
},
{
headers: {
"anthropic-beta": this.modelConfig.betaFlag,
},
}
);
return this.processResponse(response);
} catch (error) {
const errorMsg = `Error communicating with Claude: ${error}`;
console.log(`❌ ${errorMsg}`);
return errorMsg;
}
}
async executeTask(
task: string,
printSteps: boolean = true,
debug: boolean = false,
maxIterations: number = 50
): Promise {
this.messages = [
{
role: "user",
content: this.systemPrompt,
},
{
role: "user",
content: task,
},
];
let iterations = 0;
let consecutiveNoActions = 0;
let lastAssistantMessages: string[] = [];
console.log(`🎯 Executing task: ${task}`);
console.log("=".repeat(60));
const isTaskComplete = (
content: string
): { completed: boolean; reason?: string } => {
if (content.includes("TASK_COMPLETED:")) {
return { completed: true, reason: "explicit_completion" };
}
if (
content.includes("TASK_FAILED:") ||
content.includes("TASK_ABANDONED:")
) {
return { completed: true, reason: "explicit_failure" };
}
const completionPatterns = [
/task\s+(completed|finished|done|accomplished)/i,
/successfully\s+(completed|finished|found|gathered)/i,
/here\s+(is|are)\s+the\s+(results?|information|summary)/i,
/to\s+summarize/i,
/in\s+conclusion/i,
/final\s+(answer|result|summary)/i,
];
const failurePatterns = [
/cannot\s+(complete|proceed|access|continue)/i,
/unable\s+to\s+(complete|access|find|proceed)/i,
/blocked\s+by\s+(captcha|security|authentication)/i,
/giving\s+up/i,
/no\s+longer\s+able/i,
/have\s+tried\s+multiple\s+approaches/i,
];
if (completionPatterns.some((pattern) => pattern.test(content))) {
return { completed: true, reason: "natural_completion" };
}
if (failurePatterns.some((pattern) => pattern.test(content))) {
return { completed: true, reason: "natural_failure" };
}
return { completed: false };
};
const detectRepetition = (newMessage: string): boolean => {
if (lastAssistantMessages.length < 2) return false;
const similarity = (str1: string, str2: string): number => {
const words1 = str1.toLowerCase().split(/\s+/);
const words2 = str2.toLowerCase().split(/\s+/);
const commonWords = words1.filter((word) => words2.includes(word));
return commonWords.length / Math.max(words1.length, words2.length);
};
return lastAssistantMessages.some(
(prevMessage) => similarity(newMessage, prevMessage) > 0.8
);
};
while (iterations < maxIterations) {
iterations++;
let hasActions = false;
if (this.messages.length > 0) {
const lastMessage = this.messages[this.messages.length - 1];
if (
lastMessage?.role === "assistant" &&
typeof lastMessage.content === "string"
) {
const content = lastMessage.content;
const completion = isTaskComplete(content);
if (completion.completed) {
console.log(`✅ Task completed (${completion.reason})`);
break;
}
if (detectRepetition(content)) {
console.log("🔄 Repetition detected - stopping execution");
lastAssistantMessages.push(content);
break;
}
lastAssistantMessages.push(content);
if (lastAssistantMessages.length > 3) {
lastAssistantMessages.shift();
}
}
}
if (debug) {
pp(this.messages);
}
try {
const response = await this.client.beta.messages.create(
{
model: this.model,
max_tokens: 4096,
messages: this.messages,
tools: this.tools,
},
{
headers: {
"anthropic-beta": this.modelConfig.betaFlag,
},
}
);
if (debug) {
pp(response);
}
for (const block of response.content) {
if (block.type === "tool_use") {
hasActions = true;
}
}
await this.processResponse(response);
if (!hasActions) {
consecutiveNoActions++;
if (consecutiveNoActions >= 3) {
console.log(
"⚠️ No actions for 3 consecutive iterations - stopping"
);
break;
}
} else {
consecutiveNoActions = 0;
}
} catch (error) {
console.error(`❌ Error during task execution: ${error}`);
throw error;
}
}
if (iterations >= maxIterations) {
console.warn(
`⚠️ Task execution stopped after ${maxIterations} iterations`
);
}
const assistantMessages = this.messages.filter(
(item) => item.role === "assistant"
);
const finalMessage = assistantMessages[assistantMessages.length - 1];
if (finalMessage && typeof finalMessage.content === "string") {
return finalMessage.content;
}
return "Task execution completed (no final message)";
}
}
```
#### Step 5: Create the Main Script
```typescript Typescript -wcn -f main.ts
async function main(): Promise {
console.log("🚀 Steel + Claude Computer Use Assistant");
console.log("=".repeat(60));
if (STEEL_API_KEY === "your-steel-api-key-here") {
console.warn(
"⚠️ WARNING: Please replace 'your-steel-api-key-here' with your actual Steel API key"
);
console.warn(
" Get your API key at: https://app.steel.dev/settings/api-keys"
);
return;
}
if (ANTHROPIC_API_KEY === "your-anthropic-api-key-here") {
console.warn(
"⚠️ WARNING: Please replace 'your-anthropic-api-key-here' with your actual Anthropic API key"
);
console.warn(" Get your API key at: https://console.anthropic.com/");
return;
}
console.log("\nStarting Steel browser session...");
const computer = new SteelBrowser();
try {
await computer.initialize();
console.log("✅ Steel browser session started!");
const agent = new ClaudeAgent(computer, "claude-3-5-sonnet-20241022");
const startTime = Date.now();
try {
const result = await agent.executeTask(TASK, true, false, 50);
const duration = ((Date.now() - startTime) / 1000).toFixed(1);
console.log("\n" + "=".repeat(60));
console.log("🎉 TASK EXECUTION COMPLETED");
console.log("=".repeat(60));
console.log(`⏱️ Duration: ${duration} seconds`);
console.log(`🎯 Task: ${TASK}`);
console.log(`📋 Result:\n${result}`);
console.log("=".repeat(60));
} catch (error) {
console.error(`❌ Task execution failed: ${error}`);
process.exit(1);
}
} catch (error) {
console.log(`❌ Failed to start Steel browser: ${error}`);
console.log("Please check your STEEL_API_KEY and internet connection.");
process.exit(1);
} finally {
await computer.cleanup();
}
}
main().catch(console.error);
```
#### Running Your Agent
Execute your script:
You'll see the session URL printed in the console. Open this URL to view the live browser session.
The agent will execute the task defined in the `TASK` environment variable or the default task.
You can modify the task by setting the environment variable:
```bash Terminal -wc
export TASK="Research the latest developments in artificial intelligence"
npx ts-node main.ts
```
#### Customizing your agent's task
Try modifying the task to make your agent perform different actions:
```env ENV -wcn -f .env
// Research specific topics
TASK = "Go to https://arxiv.org, search for 'machine learning', and summarize the latest papers.";
// E-commerce tasks
TASK = "Go to https://www.amazon.com, search for 'wireless headphones', and compare the top 3 results.";
// Information gathering
TASK = "Go to https://docs.anthropic.com, find information about Claude's capabilities, and provide a summary.";
```
**Supported Models:**
This example uses **Claude 3.5 Sonnet**, but you can use any of the supported Claude models including Claude 3.7 Sonnet, Claude 4 Sonnet, or Claude 4 Opus. Update the model parameter in the ClaudeAgent constructor to switch models.
#### Next Steps
* Explore the [Steel API documentation](https://docs.steel.dev/) for more advanced features
* Check out the [Anthropic documentation](https://docs.anthropic.com/en/docs/build-with-claude/computer-use) for more information about Claude's computer use capabilities
* Add additional features like session recording or multi-session management
# Overview
URL: /integrations/crewai/integrations-overview
---
title: Overview
sidebarTitle: Overview
description: CrewAI is a lean, lightning-fast Python framework for orchestrating autonomous, multi-agent systems, built from scratch and independent of other agent frameworks.
llm: true
---
#### Overview
The CrewAI integration connects Steel’s reliable cloud browsers with CrewAI’s **Crews** (autonomous agent teams) and **Flows** (event-driven orchestration). This lets you:
* Launch & control Steel browser sessions from CrewAI agents and tasks
* Automate complex web workflows (search, navigate, form-fill, extract, validate) with agent collaboration
* Mix autonomy (Crews) with precise control (Flows) for production-grade pipelines
* Share memory/state across steps and return structured outputs (JSON/typed)
* Add human-in-the-loop checkpoints for sensitive actions and final reviews
Together, CrewAI + Steel deliver scalable, enterprise-ready web automation with proxies, sandboxed isolation, and anti-bot options.
#### Requirements
* **Steel API Key**: Active Steel subscription to create/manage browser sessions
* **LLM API Key(s)**: e.g., OpenAI (or your preferred provider/local runtime)
* **Python**: 3.10–3.13 recommended
* **Optional Tools**: Search (e.g., [Serper.dev](http://serper.dev/)), vector stores, and custom tools as needed
#### Documentation
[Quickstart Guide](/integrations/crewai/quickstart) → Build your first Crew (or Flow) that drives a Steel browser session end-to-end.
#### Additional Resources
* [CrewAI Documentation](https://docs.crewai.com/) – Concepts for Crews, Flows, agents, and processes
* [CrewAI Examples Repo](https://github.com/crewAIInc/crewAI-examples) – Real-world starter crews (trip planner, stock analysis, job posts)
* [Steel Sessions API Reference](/api-reference) – Programmatically manage Steel browser sessions
* [Community Discord](https://discord.gg/steel-dev) – Share recipes and get help
# Quickstart
URL: /integrations/crewai/quickstart
---
title: Quickstart
sidebarTitle: Quickstart
description: This guide walks you through wiring a CrewAI multi-agent workflow to Steel so your agents can research the web and produce a structured report.
llm: true
---
import PlaygroundButton from "components/playground-button.tsx";
#### Prerequisites
Make sure you have:
* Python **3.11+**
* **Steel API key** (get one at [app.steel.dev](http://app.steel.dev/))
* (Optional) any LLM provider keys CrewAI will use (e.g., OpenAI). CrewAI can run with your default env/provider setup.
#### Step 1: Project setup
Create and activate a virtual environment, then install dependencies:
```bash Terminal -wc
# Create project
mkdir steel-crewai-starter
cd steel-crewai-starter
# (Recommended) Create & activate a virtual environment
python3 -m venv .venv
source .venv/bin/activate # On Windows: .venv\Scripts\activate
# Create files
touch main.py .env
# Install dependencies
pip install crewai[tools] steel-sdk python-dotenv pydantic
```
Create a `.env` file with your keys and a default task:
```env ENV -wcn -f .env
STEEL_API_KEY=your-steel-api-key-here
OPENAI_API_KEY=your-openai-api-key-here
TASK=Research AI LLMs and summarize key developments
```
#### Step 2: Define a Steel-powered web tool for CrewAI
Create a minimal CrewAI `BaseTool` that calls Steel’s scraping API. This tool will let agents fetch page content (e.g., as Markdown) during a task
```python Python -wcn -f main.py
import os
from typing import List, Optional, Type
from pydantic import BaseModel, Field, ConfigDict, PrivateAttr
from crewai.tools import BaseTool, EnvVar
from steel import Steel
class SteelScrapeWebsiteToolSchema(BaseModel):
url: str = Field(description="Website URL to scrape")
class SteelScrapeWebsiteTool(BaseTool):
model_config = ConfigDict(arbitrary_types_allowed=True, validate_assignment=True, frozen=False)
name: str = "Steel web scrape tool"
description: str = "Scrape webpages using Steel and return the contents"
args_schema: Type[BaseModel] = SteelScrapeWebsiteToolSchema
api_key: Optional[str] = None
formats: Optional[List[str]] = None
proxy: Optional[bool] = None
_steel: Optional[Steel] = PrivateAttr(None)
# For CrewAI’s packaging & env var hints
package_dependencies: List[str] = ["steel-sdk"]
env_vars: List[EnvVar] = [
EnvVar(name="STEEL_API_KEY", description="API key for Steel services", required=True),
]
def __init__(self, api_key: Optional[str] = None, formats: Optional[List[str]] = None,
proxy: Optional[bool] = None, **kwargs):
super().__init__(**kwargs)
self.api_key = api_key or os.getenv("STEEL_API_KEY")
if not self.api_key:
raise EnvironmentError("STEEL_API_KEY environment variable or api_key is required")
self._steel = Steel(steel_api_key=self.api_key)
self.formats = formats or ["markdown"] # return content as Markdown by default
self.proxy = proxy
def _run(self, url: str):
if not self._steel:
raise RuntimeError("Steel not properly initialized")
# You can set region/proxy based on your needs
return self._steel.scrape(url=url, use_proxy=self.proxy, format=self.formats, region="iad")
```
#### Step 3: Define your Crew (agents + tasks)
Wire the tool into a **researcher** and a **reporting\_analyst** agent, then compose two tasks into a sequential process.
```python Python -wcn -f main.py
import warnings
from datetime import datetime
from textwrap import dedent
from typing import List
from dotenv import load_dotenv
from crewai import Agent, Process, Task
from crewai import Crew as CrewAI
from crewai.agents.agent_builder.base_agent import BaseAgent
from crewai.project import CrewBase, agent, crew, task
warnings.filterwarnings("ignore", category=SyntaxWarning, module="pysbd")
load_dotenv()
TASK = os.getenv("TASK") or "Research AI LLMs and summarize key developments"
@CrewBase
class Crew():
"""Steel + CrewAI example crew"""
agents: List[BaseAgent]
tasks: List[Task]
@agent
def researcher(self) -> Agent:
return Agent(
role="Instruction-Following Web Researcher",
goal="Understand and execute: {task}. Find, verify, and extract the most relevant information using the web.",
backstory=(
"You specialize in decomposing and executing complex instructions like '{task}', "
"using web research, verification, and synthesis to produce precise, actionable findings."
),
tools=[SteelScrapeWebsiteTool()],
verbose=True,
)
@agent
def reporting_analyst(self) -> Agent:
return Agent(
role="Instruction-Following Reporting Analyst",
goal="Transform research outputs into a clear, complete report that fulfills: {task}",
backstory=(
"You convert research into exhaustive, well-structured reports that directly address "
"the original instruction '{task}', ensuring completeness and clarity."
),
tools=[SteelScrapeWebsiteTool()],
verbose=True,
)
@task
def research_task(self) -> Task:
return Task(
description=dedent("""
Interpret and execute the following instruction: {task}
Use the web as needed. Cite and include key sources.
Consider the current year: {current_year}.
"""),
expected_output="A structured set of findings and sources that directly satisfy the instruction: {task}",
agent=self.researcher(),
)
@task
def reporting_task(self) -> Task:
return Task(
description=dedent("""
Review the research context and produce a complete report that fulfills the instruction.
Ensure completeness, accuracy, and clear structure. Include citations.
"""),
expected_output=(
"A comprehensive markdown report that satisfies the instruction: {task}. "
"Formatted as markdown without '```'"
),
agent=self.reporting_analyst(),
)
@crew
def crew(self) -> CrewAI:
"""Creates the sequential crew pipeline"""
return CrewAI(
agents=self.agents,
tasks=self.tasks,
process=Process.sequential,
verbose=True,
)
```
#### Step 4: Run your crew
Add a simple `main()` to validate API keys, pass inputs, and execute.
```python Python -wcn -f main.py
def main():
print("🚀 Steel + CrewAI Starter")
print("=" * 60)
if not os.getenv("STEEL_API_KEY") or os.getenv("STEEL_API_KEY") == "your-steel-api-key-here":
print("⚠️ WARNING: Please set STEEL_API_KEY in your .env")
print(" Get your key at: https://app.steel.dev/settings/api-keys")
return
inputs = {
"task": TASK,
"current_year": str(datetime.now().year),
}
try:
print("Running crew...")
Crew().crew().kickoff(inputs=inputs)
print("\n✅ Done. (If your task wrote to a file, check your project folder.)")
except Exception as e:
print(f"❌ Error while running the crew: {e}")
if __name__ == "__main__":
main()
```
#### Run it:
The **researcher** will use the Steel tool to fetch web content; the **reporting\_analyst** will turn the context into a final report.
#### Full Example
Complete `main.py` you can paste and run:
```python Python -wcn -f main.py
import os
import warnings
from datetime import datetime
from textwrap import dedent
from typing import List, Optional, Type
from crewai import Agent, Process, Task
from crewai import Crew as CrewAI
from crewai.agents.agent_builder.base_agent import BaseAgent
from crewai.project import CrewBase, agent, crew, task
from crewai.tools import BaseTool, EnvVar
from dotenv import load_dotenv
from pydantic import BaseModel, ConfigDict, Field, PrivateAttr
from steel import Steel
warnings.filterwarnings("ignore", category=SyntaxWarning, module="pysbd")
load_dotenv()
# Replace with your own API keys
STEEL_API_KEY = os.getenv('STEEL_API_KEY') or "your-steel-api-key-here"
# Replace with your own task
TASK = os.getenv('TASK') or 'Research AI LLMs and summarize key developments'
class SteelScrapeWebsiteToolSchema(BaseModel):
url: str = Field(description="Website URL")
class SteelScrapeWebsiteTool(BaseTool):
model_config = ConfigDict(arbitrary_types_allowed=True, validate_assignment=True, frozen=False)
name: str = "Steel web scrape tool"
description: str = "Scrape webpages using Steel and return the contents"
args_schema: Type[BaseModel] = SteelScrapeWebsiteToolSchema
api_key: Optional[str] = None
formats: Optional[List[str]] = None
proxy: Optional[bool] = None
_steel: Optional[Steel] = PrivateAttr(None)
package_dependencies: List[str] = ["steel-sdk"]
env_vars: List[EnvVar] = [
EnvVar(name="STEEL_API_KEY", description="API key for Steel services", required=True),
]
def __init__(self, api_key: Optional[str] = None, formats: Optional[List[str]] = None,
proxy: Optional[bool] = None, **kwargs):
super().__init__(**kwargs)
self.api_key = api_key or os.getenv("STEEL_API_KEY")
if not self.api_key:
raise EnvironmentError("STEEL_API_KEY environment variable or api_key is required")
self._steel = Steel(steel_api_key=self.api_key)
self.formats = formats or ["markdown"]
self.proxy = proxy
def _run(self, url: str):
if not self._steel:
raise RuntimeError("Steel not properly initialized")
return self._steel.scrape(url=url, use_proxy=self.proxy, format=self.formats, region="iad")
@CrewBase
class Crew():
"""Crew crew"""
agents: List[BaseAgent]
tasks: List[Task]
@agent
def researcher(self) -> Agent:
return Agent(
role="Instruction-Following Web Researcher",
goal="Understand and execute: {task}. Find, verify, and extract the most relevant information using the web.",
backstory=(
"You specialize in decomposing and executing complex instructions like '{task}', "
"using web research, verification, and synthesis to produce precise, actionable findings."
),
tools=[SteelScrapeWebsiteTool()],
verbose=True
)
@agent
def reporting_analyst(self) -> Agent:
return Agent(
role="Instruction-Following Reporting Analyst",
goal="Transform research outputs into a clear, complete report that fulfills: {task}",
backstory=(
"You convert research into exhaustive, well-structured reports that directly address "
"the original instruction '{task}', ensuring completeness and clarity."
),
tools=[SteelScrapeWebsiteTool()],
verbose=True
)
@task
def research_task(self) -> Task:
return Task(
description=dedent("""
Interpret and execute the following instruction: {task}
Use the web as needed. Cite and include key sources.
Consider the current year: {current_year}.
"""),
expected_output="A structured set of findings and sources that directly satisfy the instruction: {task}",
agent=self.researcher()
)
@task
def reporting_task(self) -> Task:
return Task(
description=dedent("""
Review the research context and produce a complete report that fulfills the instruction.
Ensure completeness, accuracy, and clear structure. Include citations.
"""),
expected_output="A comprehensive markdown report that satisfies the instruction: {task}. Formatted as markdown without '```'",
agent=self.reporting_analyst(),
)
@crew
def crew(self) -> CrewAI:
"""Creates the Crew crew"""
return CrewAI(
agents=self.agents,
tasks=self.tasks,
process=Process.sequential,
verbose=True,
)
def main():
print("🚀 Steel + CrewAI Starter")
print("=" * 60)
if STEEL_API_KEY == "your-steel-api-key-here":
print("⚠️ WARNING: Please replace 'your-steel-api-key-here' with your actual Steel API key")
print(" Get your API key at: https://app.steel.dev/settings/api-keys")
return
inputs = {
'task': TASK,
'current_year': str(datetime.now().year)
}
try:
print("Running crew...")
Crew().crew().kickoff(inputs=inputs)
print("\n✅ Crew finished.")
except Exception as e:
print(f"❌ An error occurred while running the crew: {e}")
if __name__ == "__main__":
main()
```
#### Customizing your crew’s task
Try changing the `TASK` to drive different behaviors:
```env ENV -wcn -f .env
TASK = "Visit https://docs.steel.dev and summarize the Sessions API lifecycle with citations."
# or
TASK = "Find the latest research trends in open-weights LLMs and produce a bullet summary with 5 sources."
# or
TASK = "Compare two AI agent frameworks and write a short pros/cons table with links."
```
#### Next steps
* Session Lifecycles: [https://docs.steel.dev/overview/sessions-api/session-lifecycle](https://docs.steel.dev/overview/sessions-api/session-lifecycle)
* Steel Sessions API: [https://docs.steel.dev/overview/sessions-api/overview](https://docs.steel.dev/overview/sessions-api/overview)
* Steel Python SDK: [https://github.com/steel-dev/steel-python](https://github.com/steel-dev/steel-python)
* CrewAI Docs: [https://docs.crewai.com](https://docs.crewai.com/)
# Quickstart
URL: /integrations/magnitude/quickstart
---
title: Quickstart
sidebarTitle: Quickstart
description: This guide shows how to use Magnitude with Steel to create an AI browser agent that visits the Steel leaderboard Github repo, extracts the details behind the latest commit, and if associated with a pull request, it will summarize the details.
llm: true
---
import PlaygroundButton from "components/playground-button.tsx";
Scroll to the bottom to see a full example!
### Requirements
* **Anthropic API Key**
* **Steel API Key**
* **Node.js 20+**
### Step 1: Project Setup
Create a new TypeScript project and basic script:
```bash Terminal -wc
mkdir steel-magnitude && \
cd steel-magnitude && \
npm init -y && \
npm install -D typescript @types/node ts-node && \
npx tsc --init && \
npm pkg set scripts.start="ts-node index.ts" && \
touch index.ts .env
```
### Step 2: Install Dependencies
```package-install
steel-sdk magnitude-core zod dotenv
```
### Step 3: Environment Variables
Create a `.env` file with your API keys:
```env ENV -wcn -f .env
STEEL_API_KEY=your-steel-api-key-here
ANTHROPIC_API_KEY=your-anthropic-api-key-here
```
### Step 4: Initialize Steel & Magnitude
Set up Steel, load env vars, and prepare to start the Magnitude agent.
```typescript Typescript -wcn -f index.ts
import * as dotenv from "dotenv";
import { Steel } from "steel-sdk";
import { startBrowserAgent } from "magnitude-core";
import { z } from "zod";
dotenv.config();
const STEEL_API_KEY = process.env.STEEL_API_KEY || "your-steel-api-key-here";
const ANTHROPIC_API_KEY = process.env.ANTHROPIC_API_KEY || "your-anthropic-api-key-here";
const client = new Steel({ steelAPIKey: STEEL_API_KEY });
```
### Step 5: Create a Steel Session & Start the Agent
Create a Steel session, then connect Magnitude via **CDP**. Turn on `narrate` for easy debugging.
```typescript Typescript -wcn -f index.ts
async function main() {
console.log("🚀 Steel + Magnitude Node Starter");
console.log("=".repeat(60));
if (STEEL_API_KEY === "your-steel-api-key-here") {
console.warn("⚠️ Please set STEEL_API_KEY in your .env");
console.warn(" Get one at https://app.steel.dev/settings/api-keys");
return;
}
if (ANTHROPIC_API_KEY === "your-anthropic-api-key-here") {
console.warn("⚠️ Please set ANTHROPIC_API_KEY in your .env");
console.warn(" Get one at https://console.anthropic.com/");
return;
}
let session: any;
let agent: any;
try {
console.log("\nCreating Steel session...");
session = await client.sessions.create({
// Optional knobs:
// useProxy: true,
// proxyUrl: 'http://user:pass@host:port',
// solveCaptcha: true,
// sessionTimeout: 1800000, // ms
// userAgent: 'custom-ua'
});
console.log(`Steel session created!`);
console.log(`View session at: ${session.sessionViewerUrl}`);
agent = await startBrowserAgent({
url: "https://github.com/steel-dev/leaderboard",
narrate: true,
llm: {
provider: "anthropic",
options: {
model: "claude-3-7-sonnet-latest",
apiKey: process.env.ANTHROPIC_API_KEY,
},
},
browser: {
cdp: `${session.websocketUrl}&apiKey=${STEEL_API_KEY}`,
},
});
console.log("Connected to browser via Magnitude");
```
Use Magnitude’s `agent.extract` to pull structured data (user behind commit + commit itself) using a Zod schema.
```typescript Typescript -wcn -f index.ts
console.log("Looking for commits");
const mostRecentCommitter = await agent.extract(
"Find the user with the most recent commit",
z.object({
user: z.string(),
commit: z.string(),
})
);
console.log("\n\x1b[1;92mMost recent committer:\x1b[0m");
console.log(`${mostRecentCommitter.user} has the most recent commit`);
```
### Step 7: Perform Natural-Language Actions
Use `agent.act` to summarize the pull request (if there’s a pull request behind the commit).
```typescript Typescript -wcn -f index.ts
console.log("\nLooking for pull request behind the most recent commit\x1b[0m");
try {
await agent.act(
"Find the pull request behind the most recent commit if there is one"
);
console.log("Found pull request!");
const pullRequest = await agent.extract(
"What was added in this pull request?",
z.object({
summary: z.string(),
})
);
console.log("Pull request found!");
console.log(`${pullRequest.summary}`);
} catch (error) {
console.log("No pull request found or accessible");
}
await new Promise((resolve) => setTimeout(resolve, 2000));
console.log("\nAutomation completed successfully!");
```
### Step 8: Clean Up
Stop the agent and release the Steel session.
```typescript Typescript -wcn -f index.ts
} catch (error) {
console.error("Error during automation:", error);
} finally {
if (agent) {
console.log("Stopping Magnitude agent...");
try {
await agent.stop();
} catch (error) {
console.error("Error stopping agent:", error);
}
}
if (session) {
console.log("Releasing Steel session...");
try {
await client.sessions.release(session.id);
console.log("Steel session released successfully");
} catch (error) {
console.error("Error releasing session:", error);
}
}
}
}
main().catch((error) => {
console.error("Unhandled error:", error);
process.exit(1);
});
```
#### Run It
You’ll see a **session viewer URL** in your console, open it to watch the automation live.
### Full Example
Complete `index.ts` you can paste and run:
```typescript Typescript -wcn -f index.ts
/*
* AI-powered browser automation using Magnitude with Steel browsers.
* https://github.com/steel-dev/steel-cookbook/tree/main/examples/steel-magnitude-starter
*/
import * as dotenv from "dotenv";
import { Steel } from "steel-sdk";
import { z } from "zod";
import { startBrowserAgent } from "magnitude-core";
dotenv.config();
// Replace with your own API keys
const STEEL_API_KEY = process.env.STEEL_API_KEY || "your-steel-api-key-here";
const ANTHROPIC_API_KEY = process.env.ANTHROPIC_API_KEY || "your-anthropic-api-key-here";
// Initialize Steel client with the API key from environment variables
const client = new Steel({ steelAPIKey: STEEL_API_KEY });
async function main() {
console.log("🚀 Steel + Magnitude Node Starter");
console.log("=".repeat(60));
if (STEEL_API_KEY === "your-steel-api-key-here") {
console.warn("⚠️ WARNING: Please replace 'your-steel-api-key-here' with your actual Steel API key");
console.warn(" Get your API key at: https://app.steel.dev/settings/api-keys");
return;
}
if (ANTHROPIC_API_KEY === "your-anthropic-api-key-here") {
console.warn("⚠️ WARNING: Please replace 'your-anthropic-api-key-here' with your actual Anthropic API key");
console.warn(" Get your API key at: https://console.anthropic.com/");
return;
}
let session: any;
let agent: any;
try {
console.log("\nCreating Steel session...");
session = await client.sessions.create({
// Optional knobs:
// useProxy: true,
// proxyUrl: 'http://user:pass@host:port',
// solveCaptcha: true,
// sessionTimeout: 1800000, // ms
// userAgent: 'custom-ua'
});
console.log(`Steel session created!`);
console.log(`View session at: ${session.sessionViewerUrl}`);
agent = await startBrowserAgent({
url: "https://github.com/steel-dev/leaderboard",
narrate: true,
llm: {
provider: "anthropic",
options: {
model: "claude-3-7-sonnet-latest",
apiKey: process.env.ANTHROPIC_API_KEY,
},
},
browser: {
cdp: `${session.websocketUrl}&apiKey=${STEEL_API_KEY}`,
},
});
console.log("Connected to browser via Magnitude");
console.log("Looking for commits");
const mostRecentCommitter = await agent.extract(
"Find the user with the most recent commit",
z.object({
user: z.string(),
commit: z.string(),
})
);
console.log("Most recent committer:");
console.log(`${mostRecentCommitter.user} has the most recent commit`);
console.log("\nLooking for pull request behind the most recent commit\x1b[0m");
try {
await agent.act(
"Find the pull request behind the most recent commit if there is one"
);
console.log("Found pull request!");
const pullRequest = await agent.extract(
"What was added in this pull request?",
z.object({
summary: z.string(),
})
);
console.log("Pull request found!");
console.log(`${pullRequest.summary}`);
} catch (error) {
console.log("No pull request found or accessible");
}
await new Promise((resolve) => setTimeout(resolve, 2000));
console.log("\nAutomation completed successfully!");
} catch (error) {
console.error("Error during automation:", error);
} finally {
if (agent) {
console.log("Stopping Magnitude agent...");
try {
await agent.stop();
} catch (error) {
console.error("Error stopping agent:", error);
}
}
if (session) {
console.log("Releasing Steel session...");
try {
await client.sessions.release(session.id);
console.log("Steel session released successfully");
} catch (error) {
console.error("Error releasing session:", error);
}
}
}
}
main().catch((error) => {
console.error("Unhandled error:", error);
process.exit(1);
});
```
### Next Steps
* **Magnitude Documentation**: [https://docs.magnitude.run/getting-started/introduction](https://docs.magnitude.run/getting-started/introduction)
* **Session Lifecycles**: [https://docs.steel.dev/overview/sessions-api/session-lifecycle](/overview/sessions-api/session-lifecycle)
* **Steel Sessions API**: [https://docs.steel.dev/overview/sessions-api/overview](/overview/sessions-api/overview)
* **Steel Node SDK**: [https://github.com/steel-dev/steel-node](https://github.com/steel-dev/steel-node)
* **This Example on Github**: [https://github.com/steel-dev/steel-cookbook/tree/main/examples/steel-magnitude-starter](https://github.com/steel-dev/steel-cookbook/tree/main/examples/steel-magnitude-starter)
# Quickstart
URL: /integrations/notte/quickstart
---
title: Quickstart
sidebarTitle: Quickstart
description: This guide shows how to use Notte with Steel to run a simple task in a live cloud browser, then shut everything down safely.
llm: true
---
import PlaygroundButton from "components/playground-button.tsx";
### Requirements
:::prerequisites
* **Steel API key**
* **Gemini API key**
* **Python 3.11+**
:::
### Step 1: Project Setup
Create a virtual environment and a minimal project:
```bash Terminal -wc
python3 -m venv .venv && \
source .venv/bin/activate && \
mkdir notte-steel && cd notte-steel && \
touch main.py .env
```
### Step 2: Install Dependencies
```bash Terminal -wc
pip install steel-sdk notte python-dotenv
```
### Step 3: Environment Variables
Create a `.env` file with your API keys and a default task:
```env ENV -wcn -f .env
STEEL_API_KEY=your-steel-api-key-here
GEMINI_API_KEY=your-gemini-api-key-here
TASK="Go to Wikipedia and search for machine learning"
```
### Step 4: Initialize Steel & Notte, then Connect via CDP
Set up Steel, load env vars, and prepare to start the Notte agent.
```python Python -wcn -f main.py
import os
import time
import asyncio
from dotenv import load_dotenv
from steel import Steel
import notte
load_dotenv()
# Replace with your own API keys
STEEL_API_KEY = os.getenv("STEEL_API_KEY") or "your-steel-api-key-here"
GEMINI_API_KEY = os.getenv("GEMINI_API_KEY") or "your-gemini-api-key-here"
# Replace with your own task
TASK = os.getenv("TASK") or "Go to Wikipedia and search for machine learning"
```
### Step 5: Run a Notte Agent Task
Create a Steel session, connect Notte via **CDP**, run your task, and print the result.
```python Python -wcn -f main.py
async def main():
print("🚀 Steel + Notte Assistant")
print("=" * 60)
if STEEL_API_KEY == "your-steel-api-key-here":
print("⚠️ WARNING: Please replace 'your-steel-api-key-here' with your actual Steel API key")
print(" Get your API key at: https://app.steel.dev/settings/api-keys")
return
if GEMINI_API_KEY == "your-gemini-api-key-here":
print("⚠️ WARNING: Please replace 'your-gemini-api-key-here' with your actual Gemini API key")
print(" Get your API key at: https://console.cloud.google.com/apis/credentials")
return
print("\nStarting Steel browser session...")
client = Steel(steel_api_key=STEEL_API_KEY)
try:
session = client.sessions.create()
print("✅ Steel browser session started!")
print(f"View live session at: {session.session_viewer_url}")
print(
f"\033[1;93mSteel Session created!\033[0m\n"
f"View session at \033[1;37m{session.session_viewer_url}\033[0m\n"
)
cdp_url = f"{session.websocket_url}&apiKey={STEEL_API_KEY}"
start_time = time.time()
print(f"🎯 Executing task: {TASK}")
print("=" * 60)
try:
with notte.Session(cdp_url=cdp_url) as notte_session:
agent = notte.Agent(
session=notte_session,
max_steps=5,
reasoning_model="gemini/gemini-2.0-flash"
)
response = agent.run(task=TASK)
duration = f"{(time.time() - start_time):.1f}"
print("\n" + "=" * 60)
print("🎉 TASK EXECUTION COMPLETED")
print("=" * 60)
print(f"⏱️ Duration: {duration} seconds")
print(f"🎯 Task: {TASK}")
if response:
print(f"📋 Result:\n{response.answer}")
print("=" * 60)
except Exception as e:
print(f"❌ Task execution failed: {e}")
finally:
if session:
print("Releasing Steel session...")
client.sessions.release(session.id)
print(f"Session completed. View replay at {session.session_viewer_url}")
print("Done!")
except Exception as e:
print(f"❌ Failed to start Steel browser: {e}")
print("Please check your STEEL_API_KEY and internet connection.")
if __name__ == "__main__":
asyncio.run(main())
```
#### Run It
You’ll see a **session viewer URL** in your console, open it to watch the automation live.
### Full Example
Complete `main.py` you can paste and run:
```python Python -wc -f main.py
"""
AI-powered browser automation using notte-sdk with Steel browsers.
https://github.com/steel-dev/steel-cookbook/tree/main/examples/steel-notte-starter
"""
import os
import time
import asyncio
from dotenv import load_dotenv
from steel import Steel
import notte
load_dotenv()
# Replace with your own API keys
STEEL_API_KEY = os.getenv("STEEL_API_KEY") or "your-steel-api-key-here"
GEMINI_API_KEY = os.getenv("GEMINI_API_KEY") or "your-gemini-api-key-here"
# Replace with your own task
TASK = os.getenv("TASK") or "Go to Wikipedia and search for machine learning"
async def main():
print("🚀 Steel + Notte Assistant")
print("=" * 60)
if STEEL_API_KEY == "your-steel-api-key-here":
print("⚠️ WARNING: Please replace 'your-steel-api-key-here' with your actual Steel API key")
print(" Get your API key at: https://app.steel.dev/settings/api-keys")
return
if GEMINI_API_KEY == "your-gemini-api-key-here":
print("⚠️ WARNING: Please replace 'your-gemini-api-key-here' with your actual Gemini API key")
print(" Get your API key at: https://console.cloud.google.com/apis/credentials")
return
print("\nStarting Steel browser session...")
client = Steel(steel_api_key=STEEL_API_KEY)
try:
session = client.sessions.create()
print("✅ Steel browser session started!")
print(f"View live session at: {session.session_viewer_url}")
print(
f"\033[1;93mSteel Session created!\033[0m\n"
f"View session at \033[1;37m{session.session_viewer_url}\033[0m\n"
)
cdp_url = f"{session.websocket_url}&apiKey={STEEL_API_KEY}"
start_time = time.time()
print(f"🎯 Executing task: {TASK}")
print("=" * 60)
try:
with notte.Session(cdp_url=cdp_url) as notte_session:
agent = notte.Agent(
session=notte_session,
max_steps=5,
reasoning_model="gemini/gemini-2.0-flash"
)
response = agent.run(task=TASK)
duration = f"{(time.time() - start_time):.1f}"
print("\n" + "=" * 60)
print("🎉 TASK EXECUTION COMPLETED")
print("=" * 60)
print(f"⏱️ Duration: {duration} seconds")
print(f"🎯 Task: {TASK}")
if response:
print(f"📋 Result:\n{response.answer}")
print("=" * 60)
except Exception as e:
print(f"❌ Task execution failed: {e}")
finally:
if session:
print("Releasing Steel session...")
client.sessions.release(session.id)
print(f"Session completed. View replay at {session.session_viewer_url}")
print("Done!")
except Exception as e:
print(f"❌ Failed to start Steel browser: {e}")
print("Please check your STEEL_API_KEY and internet connection.")
if __name__ == "__main__":
asyncio.run(main())
```
### Next Steps
:::next-steps
- [Session Lifecycles](/sessions-api/session-lifecycle): Sessions Lifecycle
- [Steel Sessions API](/sessions-api/overview): Sessions API Overview
:::
- **Steel Python SDK**: [https://github.com/steel-dev/steel-python](https://github.com/steel-dev/steel-python)
- **Cookbook example**: [https://github.com/steel-dev/steel-cookbook/tree/main/examples/steel-notte-starter](https://github.com/steel-dev/steel-cookbook/tree/main/examples/steel-notte-starter)
- **Notte Documentation:** [https://docs.notte.cc/intro/what-is-notte](https://docs.notte.cc/intro/what-is-notte)
# Overview
URL: /integrations/openai-computer-use/overview
---
title: Overview
sidebarTitle: Overview
description: OpenAI's Computer Use is an agent that combines vision capabilities with advanced reasoning to control computer interfaces and perform tasks on behalf of users through a continuous action loop.
llm: false
---
### Overview
The OpenAI Computer Use integration allows you to connect GPT-4o's vision and reasoning capabilities with Steel's reliable browser infrastructure. This integration enables AI agents to:
* Control Steel browser sessions via the OpenAI Responses API
* Execute real browser actions like clicking, typing, and scrolling
* Perform complex web tasks such as form filling, searching, and navigation
* Process visual feedback from screenshots to determine next actions
* Implement human-in-the-loop verification for sensitive operations
By combining OpenAI's Computer Use with Steel's cloud browser infrastructure, you can build robust, scalable web automation solutions that leverage Steel's anti-bot capabilities, proxy management, and sandboxed environments.
### Requirements & Limitations
* **OpenAI API Key**: Access to the OpenAI API with the computer-use-preview model
* **Steel API Key**: Active subscription to Steel
* **Python Environment**: Support for Python API clients for both services
* **Supported Environments**: Works best with Steel's browser environment (vs. desktop environments)
### Documentation
[Quickstart Guide (Python)](/integrations/openai-computer-use/quickstart-py) → Step-by-step guide to building a Simple CUA agent with Steel browser sessions in Python.
[Quickstart Guide (Node)](/integrations/openai-computer-use/quickstart-ts) → Step-by-step guide to building a Simple CUA agent with Steel browser sessions in Typescript & Node.
### Additional Resources
* [OpenAI Computer Use Documentation](https://platform.openai.com/docs/guides/tools-computer-use) - Official documentation from OpenAI
* [Steel Sessions API Reference](/api-reference) - Technical details for managing Steel browser sessions
* [Cookbook Recipe (Python)](https://github.com/steel-dev/steel-cookbook/tree/main/examples/steel-oai-computer-use-python-starter) - Working, forkable examples of the integration in Python
* [Cookbook Recipe (TS/Node)](https://github.com/steel-dev/steel-cookbook/tree/main/examples/steel-oai-computer-use-node-starter) - Working, forkable examples of the integration in Python
* [Community Discord](https://discord.gg/steel-dev) - Get help and share your implementations
# Quickstart (Python)
URL: /integrations/openai-computer-use/quickstart-py
---
title: Quickstart (Python)
sidebarTitle: Quickstart (Python)
description: How to use OpenAI Computer Use with Steel
llm: true
---
import PlaygroundButton from "components/playground-button.tsx";
This guide will walk you through how to use OpenAI's `computer-use-preview`model with Steel's managed remote browsers to create AI agents that can navigate the web.
We’ll be implementing a simple CUA loop that functions as described below:
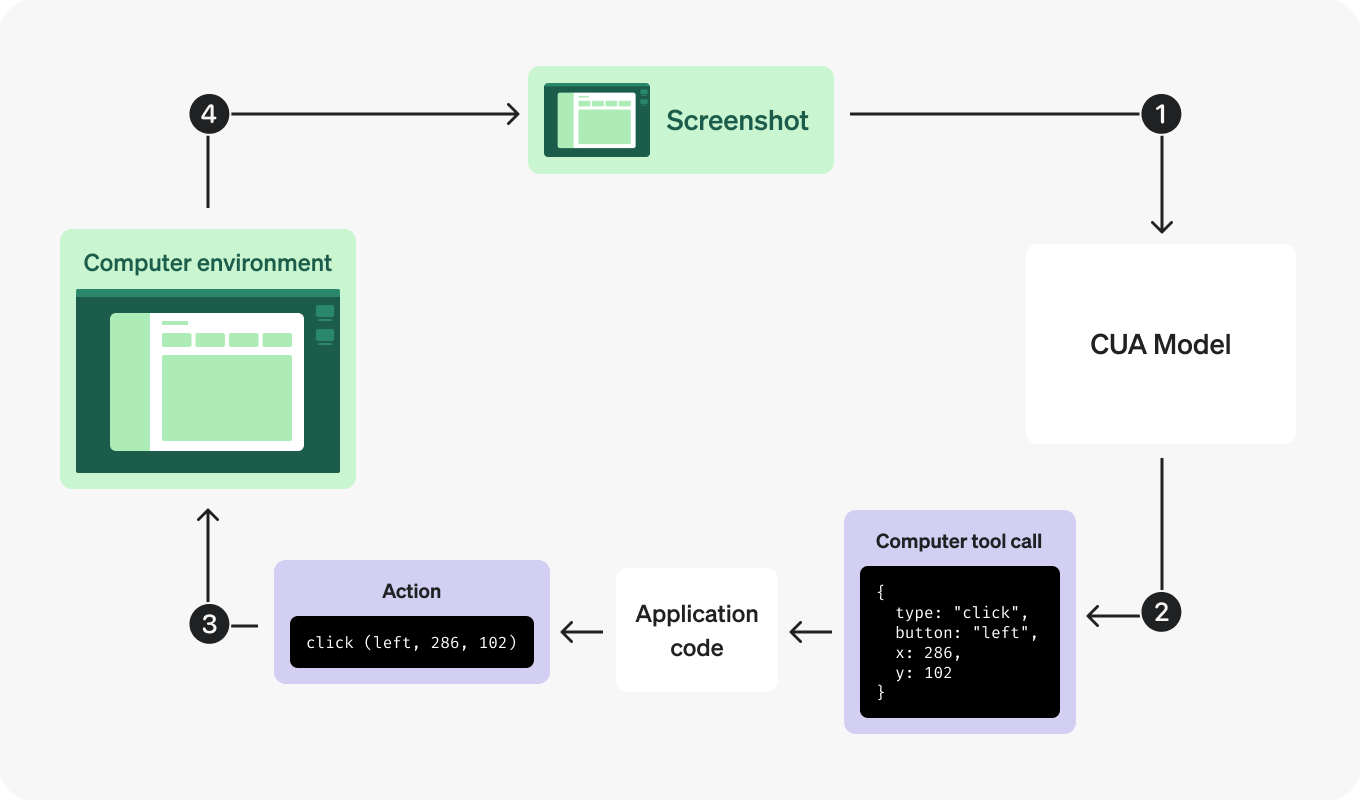
#### Prerequisites
* Python 3.8+
* A Steel API key ([sign up here](https://app.steel.dev/))
* An OpenAI API key with access to the
`computer-use-preview`
model
#### Step 1: Setup and Helper Functions
```python Python -wc -f utils.py
import os
import time
import base64
import json
import re
from typing import List, Dict
from urllib.parse import urlparse
import requests
from dotenv import load_dotenv
from PIL import Image
from io import BytesIO
load_dotenv(override=True)
# Replace with your own API keys
STEEL_API_KEY = os.getenv("STEEL_API_KEY") or "your-steel-api-key-here"
OPENAI_API_KEY = os.getenv("OPENAI_API_KEY") or "your-openai-api-key-here"
# Replace with your own task
TASK = os.getenv("TASK") or "Go to Wikipedia and search for machine learning"
SYSTEM_PROMPT = """You are an expert browser automation assistant operating in an iterative execution loop. Your goal is to efficiently complete tasks using a Chrome browser with full internet access.
* You control a Chrome browser tab and can navigate to any website
* You can click, type, scroll, take screenshots, and interact with web elements
* You have full internet access and can visit any public website
* You can read content, fill forms, search for information, and perform complex multi-step tasks
* After each action, you receive a screenshot showing the current state
* Use the goto(url) function to navigate directly to URLs - DO NOT try to click address bars or browser UI
* Use the back() function to go back to the previous page
* The browser viewport has specific dimensions that you must respect
* All coordinates (x, y) must be within the viewport bounds
* X coordinates must be between 0 and the display width (inclusive)
* Y coordinates must be between 0 and the display height (inclusive)
* Always ensure your click, move, scroll, and drag coordinates are within these bounds
* If you're unsure about element locations, take a screenshot first to see the current state
* Work completely independently - make decisions and act immediately without asking questions
* Never request clarification, present options, or ask for permission
* Make intelligent assumptions based on task context
* If something is ambiguous, choose the most logical interpretation and proceed
* Take immediate action rather than explaining what you might do
* When the task objective is achieved, immediately declare "TASK_COMPLETED:" - do not provide commentary or ask questions
For each step, you must reason systematically:
* Analyze your previous action's success/failure and current state
* Identify what specific progress has been made toward the goal
* Determine the next immediate objective and how to achieve it
* Choose the most efficient action sequence to make progress
* Combine related actions when possible rather than single-step execution
* Navigate directly to relevant websites without unnecessary exploration
* Use screenshots strategically to understand page state before acting
* Be persistent with alternative approaches if initial attempts fail
* Focus on the specific information or outcome requested
* MANDATORY: When you complete the task, your final message MUST start with "TASK_COMPLETED: [brief summary]"
* MANDATORY: If technical issues prevent completion, your final message MUST start with "TASK_FAILED: [reason]"
* MANDATORY: If you abandon the task, your final message MUST start with "TASK_ABANDONED: [explanation]"
* Do not write anything after completing the task except the required completion message
* Do not ask questions, provide commentary, or offer additional help after task completion
* The completion message is the end of the interaction - nothing else should follow
* This is fully automated execution - work completely independently
* Start by taking a screenshot to understand the current state
* Use goto(url) function for navigation - never click on browser UI elements
* Always respect coordinate boundaries - invalid coordinates will fail
* Recognize when the stated objective has been achieved and declare completion immediately
* Focus on the explicit task given, not implied or potential follow-up tasks
Remember: Be thorough but focused. Complete the specific task requested efficiently and provide clear results."""
BLOCKED_DOMAINS = [
"maliciousbook.com",
"evilvideos.com",
"darkwebforum.com",
"shadytok.com",
"suspiciouspins.com",
"ilanbigio.com",
]
CUA_KEY_TO_PLAYWRIGHT_KEY = {
"/": "Divide",
"\\": "Backslash",
"alt": "Alt",
"arrowdown": "ArrowDown",
"arrowleft": "ArrowLeft",
"arrowright": "ArrowRight",
"arrowup": "ArrowUp",
"backspace": "Backspace",
"capslock": "CapsLock",
"cmd": "Meta",
"ctrl": "Control",
"delete": "Delete",
"end": "End",
"enter": "Enter",
"esc": "Escape",
"home": "Home",
"insert": "Insert",
"option": "Alt",
"pagedown": "PageDown",
"pageup": "PageUp",
"shift": "Shift",
"space": " ",
"super": "Meta",
"tab": "Tab",
"win": "Meta",
}
def pp(obj):
print(json.dumps(obj, indent=4))
def show_image(base_64_image):
image_data = base64.b64decode(base_64_image)
image = Image.open(BytesIO(image_data))
image.show()
def sanitize_message(msg: dict) -> dict:
"""Return a copy of the message with image_url omitted for computer_call_output messages."""
if msg.get("type") == "computer_call_output":
output = msg.get("output", {})
if isinstance(output, dict):
sanitized = msg.copy()
sanitized["output"] = {**output, "image_url": "[omitted]"}
return sanitized
return msg
def create_response(**kwargs):
url = "https://api.openai.com/v1/responses"
headers = {
"Authorization": f"Bearer {os.getenv('OPENAI_API_KEY')}",
"Content-Type": "application/json"
}
openai_org = os.getenv("OPENAI_ORG")
if openai_org:
headers["Openai-Organization"] = openai_org
response = requests.post(url, headers=headers, json=kwargs)
if response.status_code != 200:
print(f"Error: {response.status_code} {response.text}")
return response.json()
def check_blocklisted_url(url: str) -> None:
"""Raise ValueError if the given URL (including subdomains) is in the blocklist."""
hostname = urlparse(url).hostname or ""
if any(
hostname == blocked or hostname.endswith(f".{blocked}")
for blocked in BLOCKED_DOMAINS
):
raise ValueError(f"Blocked URL: {url}")
```
#### Step 2: Create Steel Browser Integration
```python Python -wcn -f steel_browser.py
class SteelBrowser:
def __init__(
self,
width: int = 1024,
height: int = 768,
proxy: bool = False,
solve_captcha: bool = False,
virtual_mouse: bool = True,
session_timeout: int = 900000, # 15 minutes
ad_blocker: bool = True,
start_url: str = "https://www.google.com",
):
self.client = Steel(
steel_api_key=os.getenv("STEEL_API_KEY"),
)
self.dimensions = (width, height)
self.proxy = proxy
self.solve_captcha = solve_captcha
self.virtual_mouse = virtual_mouse
self.session_timeout = session_timeout
self.ad_blocker = ad_blocker
self.start_url = start_url
self.session = None
self._playwright = None
self._browser = None
self._page = None
def get_environment(self):
return "browser"
def get_dimensions(self):
return self.dimensions
def get_current_url(self) -> str:
return self._page.url if self._page else ""
def __enter__(self):
"""Enter context manager - create Steel session and connect browser."""
width, height = self.dimensions
session_params = {
"use_proxy": self.proxy,
"solve_captcha": self.solve_captcha,
"api_timeout": self.session_timeout,
"block_ads": self.ad_blocker,
"dimensions": {"width": width, "height": height}
}
self.session = self.client.sessions.create(**session_params)
print("Steel Session created successfully!")
print(f"View live session at: {self.session.session_viewer_url}")
self._playwright = sync_playwright().start()
browser = self._playwright.chromium.connect_over_cdp(
f"{self.session.websocket_url}&apiKey={os.getenv('STEEL_API_KEY')}",
timeout=60000
)
self._browser = browser
context = browser.contexts[0]
def handle_route(route, request):
url = request.url
try:
check_blocklisted_url(url)
route.continue_()
except ValueError:
print(f"Blocking URL: {url}")
route.abort()
if self.virtual_mouse:
context.add_init_script("""
if (window.self === window.top) {
function initCursor() {
const CURSOR_ID = '__cursor__';
if (document.getElementById(CURSOR_ID)) return;
const cursor = document.createElement('div');
cursor.id = CURSOR_ID;
Object.assign(cursor.style, {
position: 'fixed',
top: '0px',
left: '0px',
width: '20px',
height: '20px',
backgroundImage: 'url("data:image/svg+xml;utf8,")',
backgroundSize: 'cover',
pointerEvents: 'none',
zIndex: '99999',
transform: 'translate(-2px, -2px)',
});
document.body.appendChild(cursor);
document.addEventListener("mousemove", (e) => {
cursor.style.top = e.clientY + "px";
cursor.style.left = e.clientX + "px";
});
}
requestAnimationFrame(function checkBody() {
if (document.body) {
initCursor();
} else {
requestAnimationFrame(checkBody);
}
});
}
""")
self._page = context.pages[0]
self._page.route("**/*", handle_route)
self._page.set_viewport_size({"width": width, "height": height})
self._page.goto(self.start_url)
return self
def __exit__(self, exc_type, exc_val, exc_tb):
if self._page:
self._page.close()
if self._browser:
self._browser.close()
if self._playwright:
self._playwright.stop()
if self.session:
print("Releasing Steel session...")
self.client.sessions.release(self.session.id)
print(f"Session completed. View replay at {self.session.session_viewer_url}")
def screenshot(self) -> str:
"""Take a screenshot using Playwright for consistent viewport sizing."""
try:
width, height = self.dimensions
png_bytes = self._page.screenshot(
full_page=False,
clip={"x": 0, "y": 0, "width": width, "height": height}
)
return base64.b64encode(png_bytes).decode("utf-8")
except PlaywrightError as error:
print(f"Screenshot failed, trying CDP fallback: {error}")
try:
cdp_session = self._page.context.new_cdp_session(self._page)
result = cdp_session.send(
"Page.captureScreenshot", {"format": "png", "fromSurface": False}
)
return result["data"]
except PlaywrightError as cdp_error:
print(f"CDP screenshot also failed: {cdp_error}")
raise error
def click(self, x: int, y: int, button: str = "left") -> None:
if button == "back":
self.back()
elif button == "forward":
self.forward()
elif button == "wheel":
self._page.mouse.wheel(x, y)
else:
button_type = {"left": "left", "right": "right"}.get(button, "left")
self._page.mouse.click(x, y, button=button_type)
def double_click(self, x: int, y: int) -> None:
self._page.mouse.dblclick(x, y)
def scroll(self, x: int, y: int, scroll_x: int, scroll_y: int) -> None:
self._page.mouse.move(x, y)
self._page.evaluate(f"window.scrollBy({scroll_x}, {scroll_y})")
def type(self, text: str) -> None:
self._page.keyboard.type(text)
def wait(self, ms: int = 1000) -> None:
time.sleep(ms / 1000)
def move(self, x: int, y: int) -> None:
self._page.mouse.move(x, y)
def keypress(self, keys: List[str]) -> None:
"""Press keys (supports modifier combinations)."""
mapped_keys = [CUA_KEY_TO_PLAYWRIGHT_KEY.get(key.lower(), key) for key in keys]
for key in mapped_keys:
self._page.keyboard.down(key)
for key in reversed(mapped_keys):
self._page.keyboard.up(key)
def drag(self, path: List[Dict[str, int]]) -> None:
if not path:
return
start_x, start_y = path[0]["x"], path[0]["y"]
self._page.mouse.move(start_x, start_y)
self._page.mouse.down()
for point in path[1:]:
scaled_x, scaled_y = point["x"], point["y"]
self._page.mouse.move(scaled_x, scaled_y)
self._page.mouse.up()
def goto(self, url: str) -> None:
try:
self._page.goto(url)
except Exception as e:
print(f"Error navigating to {url}: {e}")
def back(self) -> None:
self._page.go_back()
def forward(self) -> None:
self._page.go_forward()
```
#### Step 3: Create the Agent Class
```python Python -wcn -f agent.py
class Agent:
def __init__(
self,
model: str = "computer-use-preview",
computer = None,
tools: List[dict] = None,
auto_acknowledge_safety: bool = True,
):
self.model = model
self.computer = computer
self.tools = tools or []
self.auto_acknowledge_safety = auto_acknowledge_safety
self.print_steps = True
self.debug = False
self.show_images = False
if computer:
scaled_width, scaled_height = computer.get_dimensions()
self.viewport_width = scaled_width
self.viewport_height = scaled_height
# Create dynamic system prompt with viewport dimensions
self.system_prompt = SYSTEM_PROMPT.replace(
'',
f'\n* The browser viewport dimensions are {scaled_width}x{scaled_height} pixels\n* The browser viewport has specific dimensions that you must respect'
)
self.tools.append({
"type": "computer-preview",
"display_width": scaled_width,
"display_height": scaled_height,
"environment": computer.get_environment(),
})
# Add goto function tool for direct URL navigation
self.tools.append({
"type": "function",
"name": "goto",
"description": "Navigate directly to a specific URL.",
"parameters": {
"type": "object",
"properties": {
"url": {
"type": "string",
"description": "Fully qualified URL to navigate to (e.g., https://example.com).",
},
},
"additionalProperties": False,
"required": ["url"],
},
})
# Add back function tool for browser navigation
self.tools.append({
"type": "function",
"name": "back",
"description": "Go back to the previous page.",
"parameters": {},
})
else:
self.viewport_width = 1024
self.viewport_height = 768
self.system_prompt = SYSTEM_PROMPT
def debug_print(self, *args):
if self.debug:
pp(*args)
def get_viewport_info(self) -> dict:
"""Get detailed viewport information for debugging."""
if not self.computer or not self.computer._page:
return {}
try:
return self.computer._page.evaluate("""
() => ({
innerWidth: window.innerWidth,
innerHeight: window.innerHeight,
devicePixelRatio: window.devicePixelRatio,
screenWidth: window.screen.width,
screenHeight: window.screen.height,
scrollX: window.scrollX,
scrollY: window.scrollY
})
""")
except:
return {}
def validate_screenshot_dimensions(self, screenshot_base64: str) -> dict:
"""Validate screenshot dimensions against viewport."""
try:
image_data = base64.b64decode(screenshot_base64)
image = Image.open(BytesIO(image_data))
screenshot_width, screenshot_height = image.size
viewport_info = self.get_viewport_info()
scaling_info = {
"screenshot_size": (screenshot_width, screenshot_height),
"viewport_size": (self.viewport_width, self.viewport_height),
"actual_viewport": (viewport_info.get('innerWidth', 0), viewport_info.get('innerHeight', 0)),
"device_pixel_ratio": viewport_info.get('devicePixelRatio', 1.0),
"width_scale": screenshot_width / self.viewport_width if self.viewport_width > 0 else 1.0,
"height_scale": screenshot_height / self.viewport_height if self.viewport_height > 0 else 1.0
}
# Warn about scaling mismatches
if scaling_info["width_scale"] != 1.0 or scaling_info["height_scale"] != 1.0:
print(f"⚠️ Screenshot scaling detected:")
print(f" Screenshot: {screenshot_width}x{screenshot_height}")
print(f" Expected viewport: {self.viewport_width}x{self.viewport_height}")
print(f" Actual viewport: {viewport_info.get('innerWidth', 'unknown')}x{viewport_info.get('innerHeight', 'unknown')}")
print(f" Scale factors: {scaling_info['width_scale']:.3f}x{scaling_info['height_scale']:.3f}")
return scaling_info
except Exception as e:
print(f"⚠️ Error validating screenshot dimensions: {e}")
return {}
def validate_coordinates(self, action_args: dict) -> dict:
"""Validate coordinates without clamping."""
validated_args = action_args.copy()
# Handle single coordinates (click, move, etc.)
if 'x' in action_args and 'y' in action_args:
validated_args['x'] = int(float(action_args['x']))
validated_args['y'] = int(float(action_args['y']))
# Handle path arrays (drag)
if 'path' in action_args and isinstance(action_args['path'], list):
validated_path = []
for point in action_args['path']:
validated_path.append({
'x': int(float(point.get('x', 0))),
'y': int(float(point.get('y', 0)))
})
validated_args['path'] = validated_path
return validated_args
def handle_item(self, item):
"""Handle each item from OpenAI response."""
if item["type"] == "message":
if self.print_steps:
print(item["content"][0]["text"])
elif item["type"] == "function_call":
name, args = item["name"], json.loads(item["arguments"])
if self.print_steps:
print(f"{name}({args})")
if hasattr(self.computer, name):
method = getattr(self.computer, name)
method(**args)
return [{
"type": "function_call_output",
"call_id": item["call_id"],
"output": "success",
}]
elif item["type"] == "computer_call":
action = item["action"]
action_type = action["type"]
action_args = {k: v for k, v in action.items() if k != "type"}
# Validate coordinates and log any issues
validated_args = self.validate_coordinates(action_args)
if self.print_steps:
print(f"{action_type}({validated_args})")
method = getattr(self.computer, action_type)
method(**validated_args)
screenshot_base64 = self.computer.screenshot()
# Validate screenshot dimensions for debugging
if action_type == "screenshot" or self.debug:
self.validate_screenshot_dimensions(screenshot_base64)
if self.show_images:
show_image(screenshot_base64)
pending_checks = item.get("pending_safety_checks", [])
for check in pending_checks:
message = check["message"]
if self.auto_acknowledge_safety:
print(f"⚠️ Auto-acknowledging safety check: {message}")
else:
raise ValueError(f"Safety check failed: {message}")
call_output = {
"type": "computer_call_output",
"call_id": item["call_id"],
"acknowledged_safety_checks": pending_checks,
"output": {
"type": "input_image",
"image_url": f"data:image/png;base64,{screenshot_base64}",
},
}
if self.computer.get_environment() == "browser":
current_url = self.computer.get_current_url()
check_blocklisted_url(current_url)
call_output["output"]["current_url"] = current_url
return [call_output]
return []
def execute_task(
self,
task: str,
print_steps: bool = True,
debug: bool = False,
max_iterations: int = 50
) -> str:
self.print_steps = print_steps
self.debug = debug
self.show_images = False
input_items = [
{
"role": "system",
"content": self.system_prompt,
},
{
"role": "user",
"content": task,
},
]
new_items = []
iterations = 0
consecutive_no_actions = 0
last_assistant_messages = []
print(f"🎯 Executing task: {task}")
print("=" * 60)
def is_task_complete(content: str) -> dict:
"""Check if the task is complete based on content patterns."""
# Explicit completion markers
if "TASK_COMPLETED:" in content:
return {"completed": True, "reason": "explicit_completion"}
if "TASK_FAILED:" in content or "TASK_ABANDONED:" in content:
return {"completed": True, "reason": "explicit_failure"}
# Natural completion patterns
completion_patterns = [
r'task\s+(completed|finished|done|accomplished)',
r'successfully\s+(completed|finished|found|gathered)',
r'here\s+(is|are)\s+the\s+(results?|information|summary)',
r'to\s+summarize',
r'in\s+conclusion',
r'final\s+(answer|result|summary)'
]
# Failure/abandonment patterns
failure_patterns = [
r'cannot\s+(complete|proceed|access|continue)',
r'unable\s+to\s+(complete|access|find|proceed)',
r'blocked\s+by\s+(captcha|security|authentication)',
r'giving\s+up',
r'no\s+longer\s+able',
r'have\s+tried\s+multiple\s+approaches'
]
for pattern in completion_patterns:
if re.search(pattern, content, re.IGNORECASE):
return {"completed": True, "reason": "natural_completion"}
for pattern in failure_patterns:
if re.search(pattern, content, re.IGNORECASE):
return {"completed": True, "reason": "natural_failure"}
return {"completed": False}
def detect_repetition(new_message: str) -> bool:
"""Detect if the message is too similar to recent messages."""
if len(last_assistant_messages) < 2:
return False
def similarity(str1: str, str2: str) -> float:
words1 = str1.lower().split()
words2 = str2.lower().split()
common_words = [word for word in words1 if word in words2]
return len(common_words) / max(len(words1), len(words2))
return any(similarity(new_message, prev_message) > 0.8
for prev_message in last_assistant_messages)
while iterations < max_iterations:
iterations += 1
has_actions = False
if new_items and new_items[-1].get("role") == "assistant":
last_message = new_items[-1]
if last_message.get("content") and len(last_message["content"]) > 0:
content = last_message["content"][0].get("text", "")
# Check for explicit completion
completion = is_task_complete(content)
if completion["completed"]:
print(f"✅ Task completed ({completion['reason']})")
break
# Check for repetition
if detect_repetition(content):
print("🔄 Repetition detected - stopping execution")
last_assistant_messages.append(content)
break
# Track assistant messages for repetition detection
last_assistant_messages.append(content)
if len(last_assistant_messages) > 3:
last_assistant_messages.pop(0) # Keep only last 3
self.debug_print([sanitize_message(msg) for msg in input_items + new_items])
try:
response = create_response(
model=self.model,
input=input_items + new_items,
tools=self.tools,
truncation="auto",
)
self.debug_print(response)
if "output" not in response:
if self.debug:
print(response)
raise ValueError("No output from model")
new_items += response["output"]
# Check if this iteration had any actions
for item in response["output"]:
if item.get("type") in ["computer_call", "function_call"]:
has_actions = True
new_items += self.handle_item(item)
# Track consecutive iterations without actions
if not has_actions:
consecutive_no_actions += 1
if consecutive_no_actions >= 3:
print("⚠️ No actions for 3 consecutive iterations - stopping")
break
else:
consecutive_no_actions = 0
except Exception as error:
print(f"❌ Error during task execution: {error}")
raise error
if iterations >= max_iterations:
print(f"⚠️ Task execution stopped after {max_iterations} iterations")
assistant_messages = [item for item in new_items if item.get("role") == "assistant"]
if assistant_messages:
final_message = assistant_messages[-1]
if final_message.get("content") and len(final_message["content"]) > 0:
return final_message["content"][0].get("text", "Task execution completed (no final message)")
return "Task execution completed (no final message)"
```
#### Step 4: Create the Main Script
```python Python -wcn -f main.py
def main():
print("🚀 Steel + OpenAI Computer Use Assistant")
print("=" * 60)
if STEEL_API_KEY == "your-steel-api-key-here":
print("⚠️ WARNING: Please replace 'your-steel-api-key-here' with your actual Steel API key")
print(" Get your API key at: https://app.steel.dev/settings/api-keys")
return
if OPENAI_API_KEY == "your-openai-api-key-here":
print("⚠️ WARNING: Please replace 'your-openai-api-key-here' with your actual OpenAI API key")
print(" Get your API key at: https://platform.openai.com/")
return
task = os.getenv("TASK") or TASK
print("\nStarting Steel browser session...")
try:
with SteelBrowser() as computer:
print("✅ Steel browser session started!")
agent = Agent(
computer=computer,
auto_acknowledge_safety=True,
)
start_time = time.time()
try:
result = agent.execute_task(
task,
print_steps=True,
debug=False,
max_iterations=50,
)
duration = f"{(time.time() - start_time):.1f}"
print("\n" + "=" * 60)
print("🎉 TASK EXECUTION COMPLETED")
print("=" * 60)
print(f"⏱️ Duration: {duration} seconds")
print(f"🎯 Task: {task}")
print(f"📋 Result:\n{result}")
print("=" * 60)
except Exception as error:
print(f"❌ Task execution failed: {error}")
exit(1)
except Exception as e:
print(f"❌ Failed to start Steel browser: {e}")
print("Please check your STEEL_API_KEY and internet connection.")
exit(1)
if __name__ == "__main__":
main()
```
#### Running Your Agent
Execute your script to start an interactive AI browser session:
You will see the session URL printed in the console. You can view the live browser session by opening this URL in your web browser.
The agent will execute the task defined in the `TASK` environment variable or the default task. You can modify the task by setting the environment variable:
```bash Terminal -wc
export TASK="Search for the latest news on artificial intelligence"
python main.py
```
#### Next Steps
* Explore the [Steel API documentation](/overview) for more advanced features
* Check out the [OpenAI documentation](https://platform.openai.com/docs/guides/tools-computer-use) for more information about the computer-use-preview model
* Add additional features like session recording or multi-session management
# Quickstart (Typescript)
URL: /integrations/openai-computer-use/quickstart-ts
---
title: Quickstart (Typescript)
sidebarTitle: Quickstart (Typescript)
description: How to use OpenAI Computer Use with Steel
llm: true
---
import PlaygroundButton from "components/playground-button.tsx";
This guide will walk you through how to use OpenAI's `computer-use-preview`model with Steel's managed remote browsers to create AI agents that can navigate the web.
We’ll be implementing a simple CUA loop that functions as described below:

#### Prerequisites
* Node.js 20+
* A Steel API key ([sign up here](https://steel.dev/))
* An OpenAI API key with access to the `computer-use-preview` model
#### Step 1: Setup and Helper Functions
```typescript Typescript -wcn -f helpers.ts
import { chromium } from "playwright";
import type { Browser, Page } from "playwright";
import { Steel } from "steel-sdk";
import * as dotenv from "dotenv";
dotenv.config();
// Replace with your own API keys
export const STEEL_API_KEY =
process.env.STEEL_API_KEY || "your-steel-api-key-here";
export const OPENAI_API_KEY =
process.env.OPENAI_API_KEY || "your-openai-api-key-here";
// Replace with your own task
export const TASK =
process.env.TASK || "Go to Wikipedia and search for machine learning";
export const SYSTEM_PROMPT = `You are an expert browser automation assistant operating in an iterative execution loop. Your goal is to efficiently complete tasks using a Chrome browser with full internet access.
* You control a Chrome browser tab and can navigate to any website
* You can click, type, scroll, take screenshots, and interact with web elements
* You have full internet access and can visit any public website
* You can read content, fill forms, search for information, and perform complex multi-step tasks
* After each action, you receive a screenshot showing the current state
* Use the goto(url) function to navigate directly to URLs - DO NOT try to click address bars or browser UI
* Use the back() function to go back to the previous page
* The browser viewport has specific dimensions that you must respect
* All coordinates (x, y) must be within the viewport bounds
* X coordinates must be between 0 and the display width (inclusive)
* Y coordinates must be between 0 and the display height (inclusive)
* Always ensure your click, move, scroll, and drag coordinates are within these bounds
* If you're unsure about element locations, take a screenshot first to see the current state
* Work completely independently - make decisions and act immediately without asking questions
* Never request clarification, present options, or ask for permission
* Make intelligent assumptions based on task context
* If something is ambiguous, choose the most logical interpretation and proceed
* Take immediate action rather than explaining what you might do
* When the task objective is achieved, immediately declare "TASK_COMPLETED:" - do not provide commentary or ask questions
For each step, you must reason systematically:
* Analyze your previous action's success/failure and current state
* Identify what specific progress has been made toward the goal
* Determine the next immediate objective and how to achieve it
* Choose the most efficient action sequence to make progress
* Combine related actions when possible rather than single-step execution
* Navigate directly to relevant websites without unnecessary exploration
* Use screenshots strategically to understand page state before acting
* Be persistent with alternative approaches if initial attempts fail
* Focus on the specific information or outcome requested
* MANDATORY: When you complete the task, your final message MUST start with "TASK_COMPLETED: [brief summary]"
* MANDATORY: If technical issues prevent completion, your final message MUST start with "TASK_FAILED: [reason]"
* MANDATORY: If you abandon the task, your final message MUST start with "TASK_ABANDONED: [explanation]"
* Do not write anything after completing the task except the required completion message
* Do not ask questions, provide commentary, or offer additional help after task completion
* The completion message is the end of the interaction - nothing else should follow
* This is fully automated execution - work completely independently
* Start by taking a screenshot to understand the current state
* Use goto(url) function for navigation - never click on browser UI elements
* Always respect coordinate boundaries - invalid coordinates will fail
* Recognize when the stated objective has been achieved and declare completion immediately
* Focus on the explicit task given, not implied or potential follow-up tasks
Remember: Be thorough but focused. Complete the specific task requested efficiently and provide clear results.`;
export const BLOCKED_DOMAINS = [
"maliciousbook.com",
"evilvideos.com",
"darkwebforum.com",
"shadytok.com",
"suspiciouspins.com",
"ilanbigio.com",
];
export const CUA_KEY_TO_PLAYWRIGHT_KEY: Record = {
"/": "Divide",
"\\": "Backslash",
alt: "Alt",
arrowdown: "ArrowDown",
arrowleft: "ArrowLeft",
arrowright: "ArrowRight",
arrowup: "ArrowUp",
backspace: "Backspace",
capslock: "CapsLock",
cmd: "Meta",
ctrl: "Control",
delete: "Delete",
end: "End",
enter: "Enter",
esc: "Escape",
home: "Home",
insert: "Insert",
option: "Alt",
pagedown: "PageDown",
pageup: "PageUp",
shift: "Shift",
space: " ",
super: "Meta",
tab: "Tab",
win: "Meta",
};
export interface MessageItem {
type: "message";
content: Array<{ text: string }>;
}
export interface FunctionCallItem {
type: "function_call";
call_id: string;
name: string;
arguments: string;
}
export interface ComputerCallItem {
type: "computer_call";
call_id: string;
action: {
type: string;
[key: string]: any;
};
pending_safety_checks?: Array<{
id: string;
message: string;
}>;
}
export interface OutputItem {
type: "computer_call_output" | "function_call_output";
call_id: string;
acknowledged_safety_checks?: Array<{
id: string;
message: string;
}>;
output?:
| {
type: string;
image_url?: string;
current_url?: string;
}
| string;
}
export interface ResponseItem {
id: string;
output: (MessageItem | FunctionCallItem | ComputerCallItem)
[];
}
export function pp(obj: any): void {
console.log(JSON.stringify(obj, null, 2));
}
export function sanitizeMessage(msg: any): any {
if (msg?.type === "computer_call_output") {
const output = msg.output || {};
if (typeof output === "object") {
return {
...msg,
output: { ...output, image_url: "[omitted]" },
};
}
}
return msg;
}
export async function createResponse(params: any): Promise {
const url = "https://api.openai.com/v1/responses";
const headers: Record = {
Authorization: `Bearer ${process.env.OPENAI_API_KEY}`,
"Content-Type": "application/json",
};
const openaiOrg = process.env.OPENAI_ORG;
if (openaiOrg) {
headers["Openai-Organization"] = openaiOrg;
}
const response = await fetch(url, {
method: "POST",
headers,
body: JSON.stringify(params),
});
if (!response.ok) {
const errorText = await response.text();
throw new Error(`OpenAI API Error: ${response.status} ${errorText}`);
}
return (await response.json()) as ResponseItem;
}
export function checkBlocklistedUrl(url: string): void {
try {
const hostname = new URL(url).hostname || "";
const isBlocked = BLOCKED_DOMAINS.some(
(blocked) => hostname === blocked || hostname.endsWith(`.${blocked}`)
);
if (isBlocked) {
throw new Error(`Blocked URL: ${url}`);
}
} catch (error) {
if (error instanceof Error && error.message.startsWith("Blocked URL:")) {
throw error;
}
}
}
```
#### Step 2: Create Steel Browser Integration
```typescript Typescript -wcn -f steelBrowser.ts
export class SteelBrowser {
private client: Steel;
private session: any;
private browser: Browser | null = null;
private page: Page | null = null;
private dimensions: [number, number];
private proxy: boolean;
private solveCaptcha: boolean;
private virtualMouse: boolean;
private sessionTimeout: number;
private adBlocker: boolean;
private startUrl: string;
constructor(
width: number = 1024,
height: number = 768,
proxy: boolean = false,
solveCaptcha: boolean = false,
virtualMouse: boolean = true,
sessionTimeout: number = 900000, // 15 minutes
adBlocker: boolean = true,
startUrl: string = "https://www.google.com"
) {
this.client = new Steel({
steelAPIKey: process.env.STEEL_API_KEY!,
});
this.dimensions = [width, height];
this.proxy = proxy;
this.solveCaptcha = solveCaptcha;
this.virtualMouse = virtualMouse;
this.sessionTimeout = sessionTimeout;
this.adBlocker = adBlocker;
this.startUrl = startUrl;
}
getEnvironment(): string {
return "browser";
}
getDimensions(): [number, number] {
return this.dimensions;
}
getCurrentUrl(): string {
return this.page?.url() || "";
}
async initialize(): Promise {
const [width, height] = this.dimensions;
const sessionParams = {
useProxy: this.proxy,
solveCaptcha: this.solveCaptcha,
apiTimeout: this.sessionTimeout,
blockAds: this.adBlocker,
dimensions: { width, height },
};
this.session = await this.client.sessions.create(sessionParams);
console.log("Steel Session created successfully!");
console.log(`View live session at: ${this.session.sessionViewerUrl}`);
const cdpUrl = `${this.session.websocketUrl}&apiKey=${process.env.STEEL_API_KEY}`;
this.browser = await chromium.connectOverCDP(cdpUrl, {
timeout: 60000,
});
const context = this.browser.contexts()
[0];
await context.route("**/*", async (route, request) => {
const url = request.url();
try {
checkBlocklistedUrl(url);
await route.continue();
} catch (error) {
console.log(`Blocking URL: ${url}`);
await route.abort();
}
});
if (this.virtualMouse) {
await context.addInitScript(`
if (window.self === window.top) {
function initCursor() {
const CURSOR_ID = '__cursor__';
if (document.getElementById(CURSOR_ID)) return;
const cursor = document.createElement('div');
cursor.id = CURSOR_ID;
Object.assign(cursor.style, {
position: 'fixed',
top: '0px',
left: '0px',
width: '20px',
height: '20px',
backgroundImage: 'url("data:image/svg+xml;utf8,")',
backgroundSize: 'cover',
pointerEvents: 'none',
zIndex: '99999',
transform: 'translate(-2px, -2px)',
});
document.body.appendChild(cursor);
document.addEventListener("mousemove", (e) => {
cursor.style.top = e.clientY + "px";
cursor.style.left = e.clientX + "px";
});
}
function checkBody() {
if (document.body) {
initCursor();
} else {
requestAnimationFrame(checkBody);
}
}
requestAnimationFrame(checkBody);
}
`);
}
this.page = context.pages()[0];
// Explicitly set viewport size to ensure it matches our expected dimensions
await this.page.setViewportSize({
width: width,
height: height,
});
await this.page.goto(this.startUrl);
}
async cleanup(): Promise {
if (this.page) {
await this.page.close();
}
if (this.browser) {
await this.browser.close();
}
if (this.session) {
console.log("Releasing Steel session...");
await this.client.sessions.release(this.session.id);
console.log(
`Session completed. View replay at ${this.session.sessionViewerUrl}`
);
}
}
async screenshot(): Promise {
if (!this.page) throw new Error("Page not initialized");
try {
// Use regular Playwright screenshot for consistent viewport sizing
const buffer = await this.page.screenshot({
fullPage: false,
clip: {
x: 0,
y: 0,
width: this.dimensions[0],
height: this.dimensions[1],
},
});
return buffer.toString("base64");
} catch (error) {
console.log(`Screenshot failed: ${error}`);
// Fallback to CDP screenshot without fromSurface
try {
const cdpSession = await this.page.context().newCDPSession(this.page);
const result = await cdpSession.send("Page.captureScreenshot", {
format: "png",
fromSurface: false,
});
return result.data;
} catch (cdpError) {
console.log(`CDP screenshot also failed: ${cdpError}`);
throw error;
}
}
}
async click(x: number, y: number, button: string = "left"): Promise {
if (!this.page) throw new Error("Page not initialized");
if (button === "back") {
await this.back();
} else if (button === "forward") {
await this.forward();
} else if (button === "wheel") {
await this.page.mouse.wheel(x, y);
} else {
const buttonType = { left: "left", right: "right" }[button] || "left";
await this.page.mouse.click(x, y, {
button: buttonType as any,
});
}
}
async doubleClick(x: number, y: number): Promise {
if (!this.page) throw new Error("Page not initialized");
await this.page.mouse.dblclick(x, y);
}
async scroll(
x: number,
y: number,
scroll_x: number,
scroll_y: number
): Promise {
if (!this.page) throw new Error("Page not initialized");
await this.page.mouse.move(x, y);
await this.page.evaluate(
({ scrollX, scrollY }) => {
window.scrollBy(scrollX, scrollY);
},
{ scrollX: scroll_x, scrollY: scroll_y }
);
}
async type(text: string): Promise {
if (!this.page) throw new Error("Page not initialized");
await this.page.keyboard.type(text);
}
async wait(ms: number = 1000): Promise {
await new Promise((resolve) => setTimeout(resolve, ms));
}
async move(x: number, y: number): Promise {
if (!this.page) throw new Error("Page not initialized");
await this.page.mouse.move(x, y);
}
async keypress(keys: string[]): Promise {
if (!this.page) throw new Error("Page not initialized");
const mappedKeys = keys.map(
(key) => CUA_KEY_TO_PLAYWRIGHT_KEY[key.toLowerCase()] || key
);
for (const key of mappedKeys) {
await this.page.keyboard.down(key);
}
for (const key of mappedKeys.reverse()) {
await this.page.keyboard.up(key);
}
}
async drag(path: Array<{ x: number; y: number }>): Promise {
if (!this.page) throw new Error("Page not initialized");
if (path.length === 0) return;
await this.page.mouse.move(path[0].x, path[0].y);
await this.page.mouse.down();
for (const point of path.slice(1)) {
await this.page.mouse.move(point.x, point.y);
}
await this.page.mouse.up();
}
async goto(url: string): Promise {
if (!this.page) throw new Error("Page not initialized");
try {
await this.page.goto(url);
} catch (error) {
console.log(`Error navigating to ${url}: ${error}`);
}
}
async back(): Promise {
if (!this.page) throw new Error("Page not initialized");
await this.page.goBack();
}
async forward(): Promise {
if (!this.page) throw new Error("Page not initialized");
await this.page.goForward();
}
async getViewportInfo(): Promise {
/**Get detailed viewport information for debugging.*/
if (!this.page) {
return {};
}
try {
return await this.page.evaluate(() => ({
innerWidth: window.innerWidth,
innerHeight: window.innerHeight,
devicePixelRatio: window.devicePixelRatio,
screenWidth: window.screen.width,
screenHeight: window.screen.height,
scrollX: window.scrollX,
scrollY: window.scrollY,
}));
} catch {
return {};
}
}
}
```
#### Step 3: Create the Agent Class
```typescript Typescript -wcn -f agent.ts
export class Agent {
private model: string;
private computer: SteelBrowser;
private tools: any[];
private autoAcknowledgeSafety: boolean;
private printSteps: boolean = true;
private debug: boolean = false;
private showImages: boolean = false;
private viewportWidth: number;
private viewportHeight: number;
private systemPrompt: string;
constructor(
model: string = "computer-use-preview",
computer: SteelBrowser,
tools: any[] = [],
autoAcknowledgeSafety: boolean = true
) {
this.model = model;
this.computer = computer;
this.tools = tools;
this.autoAcknowledgeSafety = autoAcknowledgeSafety;
const [width, height] = computer.getDimensions();
this.viewportWidth = width;
this.viewportHeight = height;
// Create dynamic system prompt with viewport dimensions
this.systemPrompt = SYSTEM_PROMPT.replace(
"",
`
* The browser viewport dimensions are ${width}x${height} pixels
* The browser viewport has specific dimensions that you must respect`
);
this.tools.push({
type: "computer-preview",
display_width: width,
display_height: height,
environment: computer.getEnvironment(),
});
// Add goto function tool for direct URL navigation
this.tools.push({
type: "function",
name: "goto",
description: "Navigate directly to a specific URL.",
parameters: {
type: "object",
properties: {
url: {
type: "string",
description:
"Fully qualified URL to navigate to (e.g., https://example.com).",
},
},
additionalProperties: false,
required: ["url"],
},
});
// Add back function tool for browser navigation
this.tools.push({
type: "function",
name: "back",
description: "Go back to the previous page.",
parameters: {},
});
}
debugPrint(...args: any[]): void {
if (this.debug) {
pp(args);
}
}
private async getViewportInfo(): Promise {
/**Get detailed viewport information for debugging.*/
return await this.computer.getViewportInfo();
}
private async validateScreenshotDimensions(
screenshotBase64: string
): Promise {
/**Validate screenshot dimensions against viewport.*/
try {
// Decode base64 and get image dimensions
const buffer = Buffer.from(screenshotBase64, "base64");
// Simple way to get dimensions from PNG buffer
// PNG width is at bytes 16-19, height at bytes 20-23
const width = buffer.readUInt32BE(16);
const height = buffer.readUInt32BE(20);
const viewportInfo = await this.getViewportInfo();
const scalingInfo = {
screenshot_size: [width, height],
viewport_size: [this.viewportWidth, this.viewportHeight],
actual_viewport: [
viewportInfo.innerWidth || 0,
viewportInfo.innerHeight || 0,
],
device_pixel_ratio: viewportInfo.devicePixelRatio || 1.0,
width_scale: this.viewportWidth > 0 ? width / this.viewportWidth : 1.0,
height_scale:
this.viewportHeight > 0 ? height / this.viewportHeight : 1.0,
};
// Warn about scaling mismatches
if (scalingInfo.width_scale !== 1.0 || scalingInfo.height_scale !== 1.0) {
console.log(`⚠️ Screenshot scaling detected:`);
console.log(` Screenshot: ${width}x${height}`);
console.log(
` Expected viewport: ${this.viewportWidth}x${this.viewportHeight}`
);
console.log(
` Actual viewport: ${viewportInfo.innerWidth || "unknown"}x${
viewportInfo.innerHeight || "unknown"
}`
);
console.log(
` Scale factors: ${scalingInfo.width_scale.toFixed(
3
)}x${scalingInfo.height_scale.toFixed(3)}`
);
}
return scalingInfo;
} catch (error) {
console.log(`⚠️ Error validating screenshot dimensions: ${error}`);
return {};
}
}
private validateCoordinates(actionArgs: any): any {
const validatedArgs = { ...actionArgs };
// Handle single coordinates (click, move, etc.)
if ("x" in actionArgs && "y" in actionArgs) {
validatedArgs.x = this.toNumber(actionArgs.x);
validatedArgs.y = this.toNumber(actionArgs.y);
}
// Handle path arrays (drag)
if ("path" in actionArgs && Array.isArray(actionArgs.path)) {
validatedArgs.path = actionArgs.path.map((point: any) => ({
x: this.toNumber(point.x),
y: this.toNumber(point.y),
}));
}
return validatedArgs;
}
private toNumber(value: any): number {
if (typeof value === "string") {
const num = parseFloat(value);
return isNaN(num) ? 0 : num;
}
return typeof value === "number" ? value : 0;
}
async executeAction(actionType: string, actionArgs: any): Promise {
const validatedArgs = this.validateCoordinates(actionArgs);
switch (actionType) {
case "click":
await this.computer.click(
validatedArgs.x,
validatedArgs.y,
validatedArgs.button || "left"
);
break;
case "doubleClick":
case "double_click":
await this.computer.doubleClick(validatedArgs.x, validatedArgs.y);
break;
case "move":
await this.computer.move(validatedArgs.x, validatedArgs.y);
break;
case "scroll":
await this.computer.scroll(
validatedArgs.x,
validatedArgs.y,
this.toNumber(validatedArgs.scroll_x),
this.toNumber(validatedArgs.scroll_y)
);
break;
case "drag":
const path = validatedArgs.path || [];
await this.computer.drag(path);
break;
case "type":
await this.computer.type(validatedArgs.text || "");
break;
case "keypress":
await this.computer.keypress(validatedArgs.keys || []);
break;
case "wait":
await this.computer.wait(this.toNumber(validatedArgs.ms) || 1000);
break;
case "goto":
await this.computer.goto(validatedArgs.url || "");
break;
case "back":
await this.computer.back();
break;
case "forward":
await this.computer.forward();
break;
case "screenshot":
break;
default:
const method = (this.computer as any)
[actionType];
if (typeof method === "function") {
await method.call(this.computer, ...Object.values(validatedArgs));
}
break;
}
}
async handleItem(
item: MessageItem | FunctionCallItem | ComputerCallItem
): Promise {
if (item.type === "message") {
if (this.printSteps) {
console.log(item.content[0].text);
}
} else if (item.type === "function_call") {
const { name, arguments: argsStr } = item;
const args = JSON.parse(argsStr);
if (this.printSteps) {
console.log(`${name}(${JSON.stringify(args)})`);
}
if (typeof (this.computer as any)
[name] === "function") {
const method = (this.computer as any)
[name];
await method.call(this.computer, ...Object.values(args));
}
return [
{
type: "function_call_output",
call_id: item.call_id,
output: "success",
},
];
} else if (item.type === "computer_call") {
const { action } = item;
const actionType = action.type;
const { type, ...actionArgs } = action;
if (this.printSteps) {
console.log(`${actionType}(${JSON.stringify(actionArgs)})`);
}
await this.executeAction(actionType, actionArgs);
const screenshotBase64 = await this.computer.screenshot();
// Validate screenshot dimensions for debugging
await this.validateScreenshotDimensions(screenshotBase64);
const pendingChecks = item.pending_safety_checks || [];
for (const check of pendingChecks) {
if (this.autoAcknowledgeSafety) {
console.log(`⚠️ Auto-acknowledging safety check: ${check.message}`);
} else {
throw new Error(`Safety check failed: ${check.message}`);
}
}
const callOutput: OutputItem = {
type: "computer_call_output",
call_id: item.call_id,
acknowledged_safety_checks: pendingChecks,
output: {
type: "input_image",
image_url: `data:image/png;base64,${screenshotBase64}`,
},
};
if (this.computer.getEnvironment() === "browser") {
const currentUrl = this.computer.getCurrentUrl();
checkBlocklistedUrl(currentUrl);
(callOutput.output as any).current_url = currentUrl;
}
return [callOutput];
}
return [];
}
async executeTask(
task: string,
printSteps: boolean = true,
debug: boolean = false,
maxIterations: number = 50
): Promise {
this.printSteps = printSteps;
this.debug = debug;
this.showImages = false;
const inputItems = [
{
role: "system",
content: this.systemPrompt,
},
{
role: "user",
content: task,
},
];
let newItems: any[] = [];
let iterations = 0;
let consecutiveNoActions = 0;
let lastAssistantMessages: string[] = [];
console.log(`🎯 Executing task: ${task}`);
console.log("=".repeat(60));
const isTaskComplete = (
content: string
): { completed: boolean; reason?: string } => {
const lowerContent = content.toLowerCase();
if (content.includes("TASK_COMPLETED:")) {
return { completed: true, reason: "explicit_completion" };
}
if (
content.includes("TASK_FAILED:") ||
content.includes("TASK_ABANDONED:")
) {
return { completed: true, reason: "explicit_failure" };
}
const completionPatterns = [
/task\s+(completed|finished|done|accomplished)/i,
/successfully\s+(completed|finished|found|gathered)/i,
/here\s+(is|are)\s+the\s+(results?|information|summary)/i,
/to\s+summarize/i,
/in\s+conclusion/i,
/final\s+(answer|result|summary)/i,
];
const failurePatterns = [
/cannot\s+(complete|proceed|access|continue)/i,
/unable\s+to\s+(complete|access|find|proceed)/i,
/blocked\s+by\s+(captcha|security|authentication)/i,
/giving\s+up/i,
/no\s+longer\s+able/i,
/have\s+tried\s+multiple\s+approaches/i,
];
if (completionPatterns.some((pattern) => pattern.test(content))) {
return { completed: true, reason: "natural_completion" };
}
if (failurePatterns.some((pattern) => pattern.test(content))) {
return { completed: true, reason: "natural_failure" };
}
return { completed: false };
};
const detectRepetition = (newMessage: string): boolean => {
if (lastAssistantMessages.length < 2) return false;
const similarity = (str1: string, str2: string): number => {
const words1 = str1.toLowerCase().split(/\s+/);
const words2 = str2.toLowerCase().split(/\s+/);
const commonWords = words1.filter((word) => words2.includes(word));
return commonWords.length / Math.max(words1.length, words2.length);
};
return lastAssistantMessages.some(
(prevMessage) => similarity(newMessage, prevMessage) > 0.8
);
};
while (iterations < maxIterations) {
iterations++;
let hasActions = false;
if (
newItems.length > 0 &&
newItems[newItems.length - 1]?.role === "assistant"
) {
const lastMessage = newItems[newItems.length - 1];
if (lastMessage.content?.[0]?.text) {
const content = lastMessage.content[0].text;
const completion = isTaskComplete(content);
if (completion.completed) {
console.log(`✅ Task completed (${completion.reason})`);
break;
}
if (detectRepetition(content)) {
console.log("🔄 Repetition detected - stopping execution");
lastAssistantMessages.push(content);
break;
}
lastAssistantMessages.push(content);
if (lastAssistantMessages.length > 3) {
lastAssistantMessages.shift(); // Keep only last 3
}
}
}
this.debugPrint([...inputItems, ...newItems].map(sanitizeMessage));
try {
const response = await createResponse({
model: this.model,
input: [...inputItems, ...newItems],
tools: this.tools,
truncation: "auto",
});
this.debugPrint(response);
if (!response.output) {
if (this.debug) {
console.log(response);
}
throw new Error("No output from model");
}
newItems.push(...response.output);
for (const item of response.output) {
if (item.type === "computer_call" || item.type === "function_call") {
hasActions = true;
}
const handleResult = await this.handleItem(item);
newItems.push(...handleResult);
}
if (!hasActions) {
consecutiveNoActions++;
if (consecutiveNoActions >= 3) {
console.log(
"⚠️ No actions for 3 consecutive iterations - stopping"
);
break;
}
} else {
consecutiveNoActions = 0;
}
} catch (error) {
console.error(`❌ Error during task execution: ${error}`);
throw error;
}
}
if (iterations >= maxIterations) {
console.warn(
`⚠️ Task execution stopped after ${maxIterations} iterations`
);
}
const assistantMessages = newItems.filter(
(item) => item.role === "assistant"
);
const finalMessage = assistantMessages[assistantMessages.length - 1];
return (
finalMessage?.content?.[0]?.text ||
"Task execution completed (no final message)"
);
}
}
```
#### Step 4: Create the Main Script
```typescript Typescript -wcn -f index.ts
import { SteelBrowser } from "./steelBrowser";
import { Agent } from "./agent";
import { STEEL_API_KEY, OPENAI_API_KEY, TASK } from "./helpers";
async function main(): Promise {
console.log("🚀 Steel + OpenAI Computer Use Assistant");
console.log("=".repeat(60));
if (STEEL_API_KEY === "your-steel-api-key-here") {
console.warn(
"⚠️ WARNING: Please replace 'your-steel-api-key-here' with your actual Steel API key"
);
console.warn(
" Get your API key at: https://app.steel.dev/settings/api-keys"
);
return;
}
if (OPENAI_API_KEY === "your-openai-api-key-here") {
console.warn(
"⚠️ WARNING: Please replace 'your-openai-api-key-here' with your actual OpenAI API key"
);
console.warn(" Get your API key at: https://platform.openai.com/");
return;
}
console.log("\nStarting Steel browser session...");
const computer = new SteelBrowser();
try {
await computer.initialize();
console.log("✅ Steel browser session started!");
const agent = new Agent("computer-use-preview", computer, [], true);
const startTime = Date.now();
try {
const result = await agent.executeTask(TASK, true, false, 50);
const duration = ((Date.now() - startTime) / 1000).toFixed(1);
console.log("\n" + "=".repeat(60));
console.log("🎉 TASK EXECUTION COMPLETED");
console.log("=".repeat(60));
console.log(`⏱️ Duration: ${duration} seconds`);
console.log(`🎯 Task: ${TASK}`);
console.log(`📋 Result:\n${result}`);
console.log("=".repeat(60));
} catch (error) {
console.error(`❌ Task execution failed: ${error}`);
process.exit(1);
}
} catch (error) {
console.log(`❌ Failed to start Steel browser: ${error}`);
console.log("Please check your STEEL_API_KEY and internet connection.");
process.exit(1);
} finally {
await computer.cleanup();
}
}
main().catch(console.error);
```
#### Running Your Agent
Execute your script to start an interactive AI browser session:
The agent will execute the task defined in the `TASK` environment variable or the default task. You can modify the task by setting the environment variable:
```bash Terminal -wc
export TASK="Research the top 5 electric vehicles with the longest range"
npm start
```
You'll see each action the agent takes displayed in the console, and you can view the live browser session by opening the session URL in your web browser.
#### Next Steps
* Explore the [Steel API documentation](/overview) for more advanced features
* Check out the [OpenAI documentation](https://platform.openai.com/docs/guides/tools-computer-use) for more information about the computer-use-preview model
* Add additional features like session recording or multi-session management
* Add additional features like session recording or multi-session management
# Quickstart
URL: /integrations/replit/quickstart
---
title: Quickstart
sidebarTitle: Quickstart
description: Quickstart guide for using Steel with Replit
llm: true
---
### Overview
Run Steel browser automation scripts directly in Replit's cloud environment without any local setup. Write, test, and deploy your Steel scripts with support for multiple languages including Python and Node.js. This combination is perfect for quick prototyping, collaborative development, or running scheduled automation tasks without managing infrastructure.
### Requirements & Limitations
* Steel API key (any plan, get a free key [here](https://app.steel.dev/settings/api-keys))
* Replit account (free tier available)
* Works with Python & Node.js (See full list of supported languages [here](https://replit.com/templates/languages))
### Starter Templates
* [**Steel Puppeteer Starter**](https://replit.com/@steel-dev/steel-puppeteer-starter) - Node.js template using Puppeteer
* [**Steel Playwright Starter**](https://replit.com/@steel-dev/steel-playwright-starter) - Node.js template using Playwright
* [**Steel Playwright Python Starter**](https://replit.com/@steel-dev/steel-playwright-python-starter) - Python template using Playwright
* [**Steel Selenium Starter**](https://replit.com/@steel-dev/steel-selenium-starter) - Python template using Selenium
#### Running Repls
To run any of these starter templates:
1. Hit "Remix this Template" to fork the template (requires a Replit account, which is free to create)
2. Add your `STEEL_API_KEY` to the secrets pane (located under "Tools" on the left hand pane)
**_Note:_** Don't have an API key? Get a free key at [app.steel.dev/settings/api-keys](http://app.steel.dev/settings/api-keys)
3. Hit Run
### Additional Resources
* [**Replit Documentation**](https://docs.replit.com/home) - Learn more about Replit's features
* [**Session API Overview**](/overview/sessions-api/overview) - Learn about Steel’s Sessions API
* [**Support**](/overview/need-help) - Get help from the Steel team
# Quickstart
URL: /integrations/stackblitz-bolt.new/quickstart
---
title: Quickstart
sidebarTitle: Quickstart
description: StackBlitz is an instant fullstack web IDE for the JavaScript ecosystem. It's powered by WebContainers, the first WebAssembly-based operating system which boots the Node.js environment in milliseconds, securely within your browser tab.
llm: true
---
### Overview
Run Steel browser automation scripts with JavaScript/TypeScript directly in StackBlitz without any local setup or installation. This browser-based environment makes it perfect for quick prototyping, sharing running examples, or collaborative development.
Plus, with [Bolt.new](http://bolt.new/) (StackBlitz's AI-powered web development agent), you can use natural language to write scripts and build full-stack applications around Steel's capabilities—all instantly in your browser.
While StackBlitz has limited Python support, we currently only offer TypeScript templates for Steel.
### Requirements & Limitations
* Steel API key (any plan, get a free key [here](https://app.steel.dev/settings/api-keys))
* Supported languages: JavaScript and TypeScript
* No account required to run code (only to save changes)
### Starter Templates
* [**Steel Puppeteer Starter**](https://stackblitz.com/edit/steel-puppeteer-starter) - Node.js template using Puppeteer
* [**Steel Playwright Starter**](https://stackblitz.com/edit/steel-playwright-starter) - Node.js template using Playwright
### Running any template
To run any of the starter templates:
1. Click on the template link above to open it in StackBlitz
2. Set your `STEEL_API_KEY` in one of two ways:
* Export it in the terminal: `export STEEL_API_KEY=your_key_here`
* Create a `.env` file and add: `STEEL_API_KEY=your_key_here`
Note: Don't have an API key? Get a free key at [app.steel.dev/settings/api-keys](http://app.steel.dev/settings/api-keys)
3. Run the command `npm run` in the terminal to run the script
No account is required to run or even edit the templates - you only need to sign in if you want to save your changes.
### AI-Powered Development with [Bolt.new](http://bolt.new/)
All our StackBlitz templates can be opened in [Bolt.new](http://bolt.new/), an AI-powered web development agent built on StackBlitz's WebContainer technology. With [Bolt.new](http://bolt.new/), you can:
* Use natural language prompts to modify Steel automation scripts
* Build full-stack applications around Steel's capabilities
* Get AI assistance while developing your browser automation workflows
* Deploy your projects with zero configuration
Look for the _"Open in_ [_Bolt.new_](http://bolt.new/)_"_ button on our templates to get started with AI-assisted development.
### Additional Resources
* [**StackBlitz Documentation**](https://developer.stackblitz.com/) - Learn more about StackBlitz's features
* [**Session API Overview**](/overview/sessions-api/overview) - Learn about Steel’s Sessions API
* [**Support**](/overview/need-help) - Get help from the Steel team
**Note:** Sections marked with → indicate detailed guides available.
# Overview
URL: /integrations/stagehand/overview
---
title: Overview
sidebarTitle: Overview
description: Stagehand is an open-source library that allows you to write browser automations in natural language. This integration connects Stagehand with Steel's infrastructure, allowing for seamless automation of web tasks and workflows in the cloud.
llm: false
---
### Requirements & Limitations
* **OpenAI API Key**: Access to the OpenAI API
* **Steel API Key**: Active subscription to Steel
* **Node.js or Python Environment**: Support for Stagehand in your preferred language
* **Supported Environments**: Works best with Steel's browser environment
### Documentation
[Quickstart Guide (Node.js)](/integrations/stagehand/quickstart-ts) → Step-by-step guide to building browser automation with Steel sessions in TypeScript & Node.
[Quickstart Guide (Python)](/integrations/stagehand/quickstart-py) → Step-by-step guide to building browser automation with Steel sessions in Python.
### Additional Resources
[Stagehand Documentation](https://docs.stagehand.dev/first-steps/introduction) - Official documentation for Stagehand
[Steel Sessions API Reference](/api-reference#tag/sessions) - Technical details for managing Steel browser sessions
[Cookbook Recipe (Node.js)](https://github.com/steel-dev/steel-cookbook/tree/main/examples/steel-stagehand-node-starter) - Working, forkable examples of the integration in Node.js
[Cookbook Recipe (Python)](https://github.com/steel-dev/steel-cookbook/tree/main/examples/steel-stagehand-python-starter) - Working, forkable examples of the integration in Python
[Community Discord](https://discord.gg/steel-dev) - Get help and share your implementations
# Quickstart (Python)
URL: /integrations/stagehand/quickstart-py
---
title: Quickstart (Python)
sidebarTitle: Quickstart (Python)
description: Build scripts that navigate the web using natural language instructions
llm: true
---
import PlaygroundButton from "components/playground-button.tsx";
This guide shows you how to use Stagehand with Steel browsers to create scripts that can interact with websites using natural language commands. We'll build a simple automation that extracts data from Hacker News and demonstrates search functionality.
### Prerequisites
Ensure you have the following:
* Python 3.8 or higher
* A Steel API key ([sign up here](https://app.steel.dev/))
* An OpenAI API key ([get one here](https://platform.openai.com/))
### Step 1: Set up your environment
First, create a project directory and install the required packages:
```bash Terminal -wc
# Create a project directory
mkdir steel-stagehand-starter
cd steel-stagehand-starter
# Install required packages
pip install steel-sdk stagehand pydantic python-dotenv
```
Create a `.env` file with your API keys:
```env ENV -wcn -f .env
# .env
STEEL_API_KEY=your_steel_api_key_here
OPENAI_API_KEY=your_openai_api_key_here
```
### Step 2: Create your data models
```python Python -wcn -f main.py
import asyncio
import os
from dotenv import load_dotenv
from pydantic import BaseModel, Field
from steel import Steel
from stagehand import StagehandConfig, Stagehand
# Load environment variables
load_dotenv()
# Get API keys from environment
STEEL_API_KEY = os.getenv("STEEL_API_KEY")
OPENAI_API_KEY = os.getenv("OPENAI_API_KEY")
# Define data models for structured extraction
class Story(BaseModel):
title: str = Field(..., description="Story title")
rank: int = Field(..., description="Story rank number")
class Stories(BaseModel):
stories: list[Story] = Field(..., description="List of top stories")
```
These models will help Stagehand extract structured data from web pages.
### Step 3: Create a Steel browser session
Add the session creation logic to connect with Steel's cloud browsers:
```python Python -wcn -f main.py
async def main():
print("🚀 Steel + Stagehand Automation")
print("=" * 50)
# Initialize Steel client
client = Steel(steel_api_key=STEEL_API_KEY)
# Create a new browser session
session = client.sessions.create()
print("✅ Steel browser session created!")
print(f"View live session at: {session.session_viewer_url}")
```
When you run this, you'll see a URL where you can watch your browser session live.
### Step 4: Configure and connect Stagehand
Now we'll connect Stagehand to your Steel session:
```python Python -wcn -f main.py
# Configure Stagehand to use Steel session
config = StagehandConfig(
env="LOCAL",
model_name="gpt-4o-mini",
model_api_key=OPENAI_API_KEY,
local_browser_launch_options={
"cdp_url": f"{session.websocket_url}&apiKey={STEEL_API_KEY}",
}
)
# Initialize Stagehand
stagehand = Stagehand(config)
await stagehand.init()
print("🤖 Stagehand connected to Steel browser")
```
This connects Stagehand to your Steel browser session via Chrome DevTools Protocol.
### Step 5: Navigate and extract data
Add the automation logic to navigate to a website and extract information:
```python Python -wcn -f main.py
try:
# Navigate to Hacker News
print("📰 Navigating to Hacker News...")
await stagehand.page.goto("https://news.ycombinator.com")
# Extract top stories using AI
print("🔍 Extracting top stories...")
stories_data = await stagehand.page.extract(
"Extract the titles and ranks of the first 5 stories on the page",
schema=Stories
)
# Display results
print("\n📋 Top 5 Hacker News Stories:")
for story in stories_data.stories:
print(f"{story.rank}. {story.title}")
print("\n✅ Automation completed successfully!")
except Exception as error:
print(f"❌ Error during automation: {error}")
```
You'll see the extracted story titles and rankings printed to your console.
### Step 6: Add proper cleanup
Always clean up your resources when finished:
```python Python -wcn -f main.py
finally:
# Close Stagehand
if stagehand:
await stagehand.close()
# Release Steel session
if session and client:
client.sessions.release(session.id)
print("🧹 Resources cleaned up")
# Run the automation
if __name__ == "__main__":
asyncio.run(main())
```
### Step 7: Run your automation
Execute your script:
You should see output like this:
```bash Terminal
🚀 Steel + Stagehand Automation
==================================================
✅ Steel browser session created!
View live session at: https://app.steel.dev/v1/sessions/uuid
🤖 Stagehand connected to Steel browser
📰 Navigating to Hacker News...
🔍 Extracting top stories...
📋 Top 5 Hacker News Stories:
1. Ask HN: What are you working on this week?
2. Show HN: I built a tool to analyze my GitHub contributions
3. The future of web development
4. Why I switched from React to Vue
5. Building scalable microservices with Go
✅ Automation completed successfully!
🧹 Resources cleaned up
```
### Complete Example
Here's the complete script that puts all steps together:
```python Python -wcn -f main.py
"""
AI-powered browser automation using Stagehand with Steel browsers.
https://github.com/steel-dev/steel-cookbook/tree/main/examples/steel-stagehand-python-starter
"""
import asyncio
import os
from dotenv import load_dotenv
from pydantic import BaseModel, Field
from steel import Steel
from stagehand import StagehandConfig, Stagehand
# Load environment variables
load_dotenv()
# Replace with your own API keys
STEEL_API_KEY = os.getenv("STEEL_API_KEY") or "your-steel-api-key-here"
OPENAI_API_KEY = os.getenv("OPENAI_API_KEY") or "your-openai-api-key-here"
# Define Pydantic models for structured data extraction
class Story(BaseModel):
title: str = Field(..., description="Story title")
rank: int = Field(..., description="Story rank number")
class Stories(BaseModel):
stories: list[Story] = Field(..., description="List of top stories")
async def main():
print("🚀 Steel + Stagehand Python Starter")
print("=" * 60)
if STEEL_API_KEY == "your-steel-api-key-here":
print("⚠️ WARNING: Please replace 'your-steel-api-key-here' with your actual Steel API key")
print(" Get your API key at: https://app.steel.dev/settings/api-keys")
return
if OPENAI_API_KEY == "your-openai-api-key-here":
print("⚠️ WARNING: Please replace 'your-openai-api-key-here' with your actual OpenAI API key")
print(" Get your API key at: https://platform.openai.com/")
return
session = None
stagehand = None
client = None
try:
print("\nCreating Steel session...")
# Initialize Steel client with the API key from environment variables
client = Steel(steel_api_key=STEEL_API_KEY)
session = client.sessions.create(
# === Basic Options ===
# use_proxy=True, # Use Steel's proxy network (residential IPs)
# proxy_url='http://...', # Use your own proxy (format: protocol://username:password@host:port)
# solve_captcha=True, # Enable automatic CAPTCHA solving
# session_timeout=1800000, # Session timeout in ms (default: 5 mins)
# === Browser Configuration ===
# user_agent='custom-ua', # Set a custom User-Agent
)
print(f"\033[1;93mSteel Session created!\033[0m")
print(f"View session at \033[1;37m{session.session_viewer_url}\033[0m")
config = StagehandConfig(
env="LOCAL",
model_name="gpt-4.1-mini",
model_api_key=OPENAI_API_KEY,
# Connect to Steel session via CDP
local_browser_launch_options={
"cdp_url": f"{session.websocket_url}&apiKey={STEEL_API_KEY}",
}
)
stagehand = Stagehand(config)
print("Initializing Stagehand...")
await stagehand.init()
print("Connected to browser via Stagehand")
print("Navigating to Hacker News...")
await stagehand.page.goto("https://news.ycombinator.com")
print("Extracting top stories using AI...")
stories_data = await stagehand.page.extract(
"Extract the titles and ranks of the first 5 stories on the page",
schema=Stories
)
print("\n\033[1;92mTop 5 Hacker News Stories:\033[0m")
for story in stories_data.stories:
print(f"{story.rank}. {story.title}")
print("\n\033[1;92mAutomation completed successfully!\033[0m")
except Exception as error:
print(f"Error during automation: {error}")
import traceback
traceback.print_exc()
finally:
if stagehand:
print("Closing Stagehand...")
try:
await stagehand.close()
except Exception as error:
print(f"Error closing Stagehand: {error}")
if session and client:
print("Releasing Steel session...")
try:
client.sessions.release(session.id)
print("Steel session released successfully")
except Exception as error:
print(f"Error releasing session: {error}")
# Run the main function
if __name__ == "__main__":
asyncio.run(main())
```
### Next Steps
Now that you have a working Stagehand + Steel automation, try these enhancements:
* **Custom data extraction**: Create your own Pydantic models for different websites
* **Complex interactions**: Use `stagehand.page.act()` for clicking, typing, and navigation
* **Multiple pages**: Navigate through multi-step workflows
* **Error handling**: Add retry logic and better error management
For more advanced features, check out:
* [Stagehand documentation](https://docs.stagehand.dev/) for natural language automation
* [Steel API documentation](https://docs.steel.dev/api-reference) for session management options
* [Steel GitHub examples](https://github.com/steel-dev/steel-cookbook) for more integration patterns
# Quickstart (Typescript)
URL: /integrations/stagehand/quickstart-ts
---
title: Quickstart (Typescript)
sidebarTitle: Quickstart (Typescript)
description: Build AI agents that navigate the web using natural language instructions
llm: true
---
import PlaygroundButton from "components/playground-button.tsx";
This guide shows you how to use Stagehand with Steel browsers to create AI agents that can interact with websites using natural language commands. We'll build a simple automation that extracts data from Hacker News and demonstrates search functionality.
### Prerequisites
Ensure you have the following:
* Node.js 20 or higher
* A Steel API key ([sign up here](https://app.steel.dev/))
* An OpenAI API key ([get one here](https://platform.openai.com/))
### Step 1: Set up your project
First, create a project directory and initialize your Node.js project:
```bash Terminal -wc
# Create a project directory
mkdir steel-stagehand-starter
cd steel-stagehand-starter
# Initialize npm project
npm init -y
# Install required packages
npm install @browserbasehq/stagehand dotenv steel-sdk typescript zod
# Install dev dependencies
npm install --save-dev @types/node ts-node
```
Create a `.env` file with your API keys:
```env ENV -wcn -f .env
# .env
STEEL_API_KEY=your_steel_api_key_here
OPENAI_API_KEY=your_openai_api_key_here
```
### Step 2: Create your data schemas
```typescript Typescript -wcn -f index.ts
import { Stagehand } from "@browserbasehq/stagehand";
import Steel from "steel-sdk";
import { z } from "zod";
import dotenv from "dotenv";
// Load environment variables
dotenv.config();
const STEEL_API_KEY = process.env.STEEL_API_KEY;
const OPENAI_API_KEY = process.env.OPENAI_API_KEY;
// Define data schemas for structured extraction
const StorySchema = z.object({
title: z.string(),
rank: z.number()
});
const StoriesSchema = z.object({
stories: z.array(StorySchema)
});
```
These schemas will help Stagehand extract structured data from web pages using Zod validation.
### Step 3: Create a Steel browser session
```typescript Typescript -wcn -f index.ts
async function main() {
console.log("🚀 Steel + Stagehand Automation");
console.log("=".repeat(50));
// Initialize Steel client
const client = new Steel({
steelAPIKey: STEEL_API_KEY,
});
// Create a new browser session
const session = await client.sessions.create();
console.log("✅ Steel browser session created!");
console.log(`View live session at: ${session.sessionViewerUrl}`);
}
```
When you run this, you'll see a URL where you can watch your browser session live.
### Step 4: Configure and connect Stagehand
```typescript Typescript -wcn -f index.ts
// Configure Stagehand to use Steel session
const stagehand = new Stagehand({
env: "LOCAL",
localBrowserLaunchOptions: {
cdpUrl: `${session.websocketUrl}&apiKey=${STEEL_API_KEY}`,
},
enableCaching: false,
modelClientOptions: {
apiKey: OPENAI_API_KEY,
},
});
// Initialize Stagehand
console.log("🤖 Initializing Stagehand...");
await stagehand.init();
console.log("Connected to Steel browser via Stagehand");
```
This connects Stagehand to your Steel browser session via Chrome DevTools Protocol.
### Step 5: Navigate and extract data
Add the automation logic to navigate to a website and extract information:
```typescript Typescript -wcn -f index.ts
try {
// Navigate to Hacker News
console.log("📰 Navigating to Hacker News...");
await stagehand.page.goto("https://news.ycombinator.com");
// Extract top stories using AI
console.log("🔍 Extracting top stories...");
const stories = await stagehand.page.extract({
instruction: "extract the titles and ranks of the first 5 stories on the page",
schema: StoriesSchema,
});
// Display results
console.log("\n📋 Top 5 Hacker News Stories:");
stories.stories.forEach((story, index) => {
console.log(`${story.rank}. ${story.title}`);
});
console.log("\n✅ Automation completed successfully!");
} catch (error) {
console.error("❌ Error during automation:", error);
}
```
You'll see the extracted story titles and rankings printed to your console.
### Step 6: Add proper cleanup
Always clean up your resources when finished:
```typescript Typescript -wcn -f index.ts
finally {
// Close Stagehand
if (stagehand) {
await stagehand.close();
}
// Release Steel session
if (session && client) {
await client.sessions.release(session.id);
console.log("🧹 Resources cleaned up");
}
}
// Run the automation
main().catch((error) => {
console.error("Unhandled error:", error);
process.exit(1);
});
```
### Step 7: Run your automation
Execute your script:
You should see output like this:
```bash Terminal
🚀 Steel + Stagehand Automation
==================================================
✅ Steel browser session created!
View live session at: https://api.steel.dev/v1/sessions/[session-id]/player
🤖 Initializing Stagehand...
Connected to Steel browser via Stagehand
📰 Navigating to Hacker News...
🔍 Extracting top stories...
📋 Top 5 Hacker News Stories:
1. Ask HN: What are you working on this week?
2. Show HN: I built a tool to analyze my GitHub contributions
3. The future of web development
4. Why I switched from React to Vue
5. Building scalable microservices with Go
✅ Automation completed successfully!
🧹 Resources cleaned up
```
### Complete Example
Here's the complete script that puts all steps together:
```typescript Typescript -wcn -f index.ts
/*
* AI-powered browser automation using Stagehand with Steel browsers.
*/
import { Stagehand } from "@browserbasehq/stagehand";
import Steel from "steel-sdk";
import { z } from "zod";
import dotenv from "dotenv";
// Load environment variables
dotenv.config();
const STEEL_API_KEY = process.env.STEEL_API_KEY;
const OPENAI_API_KEY = process.env.OPENAI_API_KEY;
// Define data schemas for structured extraction
const StorySchema = z.object({
title: z.string(),
rank: z.number()
});
const StoriesSchema = z.object({
stories: z.array(StorySchema)
});
async function main() {
console.log("🚀 Steel + Stagehand Automation");
console.log("=".repeat(50));
let session: any = null;
let stagehand: Stagehand | null = null;
try {
// Initialize Steel client and create session
const client = new Steel({
steelAPIKey: STEEL_API_KEY,
});
session = await client.sessions.create();
console.log("✅ Steel browser session created!");
console.log(`View live session at: ${session.sessionViewerUrl}`);
// Configure and initialize Stagehand
stagehand = new Stagehand({
env: "LOCAL",
localBrowserLaunchOptions: {
cdpUrl: `${session.websocketUrl}&apiKey=${STEEL_API_KEY}`,
},
enableCaching: false,
modelClientOptions: {
apiKey: OPENAI_API_KEY,
},
});
console.log("🤖 Initializing Stagehand...");
await stagehand.init();
console.log("Connected to Steel browser via Stagehand");
// Navigate and extract data
console.log("📰 Navigating to Hacker News...");
await stagehand.page.goto("https://news.ycombinator.com");
console.log("🔍 Extracting top stories...");
const stories = await stagehand.page.extract({
instruction: "extract the titles and ranks of the first 5 stories on the page",
schema: StoriesSchema,
});
console.log("\n📋 Top 5 Hacker News Stories:");
stories.stories.forEach((story, index) => {
console.log(`${story.rank}. ${story.title}`);
});
console.log("\n✅ Automation completed successfully!");
} catch (error) {
console.error("❌ Error during automation:", error);
} finally {
// Clean up resources
if (stagehand) {
await stagehand.close();
}
if (session) {
const client = new Steel({ steelAPIKey: STEEL_API_KEY });
await client.sessions.release(session.id);
}
console.log("🧹 Resources cleaned up");
}
}
// Run the automation
main().catch((error) => {
console.error("Unhandled error:", error);
process.exit(1);
});
```
### Advanced Usage Examples
#### Custom Data Extraction Schema
```typescript Typescript -wcn -f schema.ts
const ProductSchema = z.object({
products: z.array(
z.object({
name: z.string(),
price: z.string(),
rating: z.number().optional(),
inStock: z.boolean(),
})
),
});
const productData = await stagehand.page.extract({
instruction: "extract product information from this e-commerce page",
schema: ProductSchema,
});
```
#### Complex Actions with Natural Language
```typescript Typescript -wcn -f index.ts
// Fill out a form using natural language
await stagehand.page.act(
"fill out the contact form with name 'John Doe', email 'john@example.com', and message 'Hello!'"
);
// Navigate through multi-step processes
await stagehand.page.act(
"click on the 'Sign Up' button and then fill out the registration form"
);
// Handle dynamic content
await stagehand.page.act(
"wait for the page to load completely, then click on the first product"
);
```
### Next Steps
Now that you have a working Stagehand + Steel automation, try these enhancements:
* **Custom data extraction**: Create your own Zod schemas for different websites
* **Complex interactions**: Use `stagehand.page.act()` for clicking, typing, and navigation
* **Multiple pages**: Navigate through multi-step workflows
* **Error handling**: Add retry logic and better error management
For more advanced features, check out:
* [Stagehand documentation](https://docs.stagehand.dev/) for natural language automation
* [Steel API documentation](https://docs.steel.dev/api-reference) for session management options
* [Steel GitHub examples](https://github.com/steel-dev/steel-cookbook) for more integration patterns
# Overview
URL: /integrations/valtown/overview
---
title: Overview
sidebarTitle: Overview
description: Val Town is a collaborative platform for writing and deploying TypeScript functions, enabling you to build APIs and schedule tasks directly from your browser.
llm: false
---
### Overview
Val Town enables you to run Steel + Puppeteer scripts as serverless functions with one-click deployment. Write your automation code in the browser, schedule it to run on intervals, or trigger it via API endpoints - all without managing servers or containers.
Val Town runs on the Deno runtime and supports JavaScript, TypeScript, JSX, and TSX. For Puppeteer integrations, we recommend using the deno-puppeteer library as shown in the below starter template.
### Requirements
* Steel API key (any plan, get a free key [here](https://app.steel.dev/settings/api-keys))
* Val Town account (free tier available)
* Basic JavaScript/TypeScript knowledge
* Familiarity with Puppeteer
### Quickstart Template
Val.town starter
**How to use this Val:**
1. Get a free Steel API key at [https://app.steel.dev/settings/api-keys](https://app.steel.dev/settings/api-keys)
2. Add it to your [Val Town Environment Variables](https://www.val.town/settings/environment-variables) as `STEEL_API_KEY`
3. Fork [this val](https://www.val.town/v/steel/steel_puppeteer_starter)
4. Click `Run` on that val
5. View the magic in the logs ✨
### Additional Resources
* [**Val Town Documentation**](https://docs.val.town/) - Learn more about Val Town's features
* [**Session API Overview**](/overview/sessions-api/overview) - Learn about Steel’s Sessions API
* [**Support**](/overview/need-help) - Get help from the Steel team
# Quickstart
URL: /integrations/valtown/quickstart
---
title: Quickstart
sidebarTitle: Quickstart
isLink: true
llm: false
---
# Overview
URL: /overview/captchas-api/overview
---
title: Overview
sidebarTitle: Overview
description: Automatically detect and solve CAPTCHAs in browser sessions using Steel's integrated captcha solvers and the CAPTCHAs API.
full: true
llm: true
---
Steel's CAPTCHA system is designed to work seamlessly with browser automation workflows, automatically detecting and solving CAPTCHAs without interrupting your automation flow.
Steel's CAPTCHAs API provides a robust solution for handling CAPTCHAs that appear during your automations. The system uses a bridge architecture that connects browser sessions with our CAPTCHA-solving capabilities, enabling real-time detection, solving, and state management.
CAPTCHA solving is particularly useful for:
* Scraping jobs that encounter CAPTCHA challenges
* Browser workflows that need to submit forms or handle authentication flows
* AI agents that need to navigate CAPTCHA-protected websites
### How CAPTCHA Solving Works with the CAPTCHAs API
Steel's CAPTCHAs API operates through a bridge architecture that connects your browser sessions with our external CAPTCHA-solving capabilities. It helps with four key parts:
1. **Detection**: The system automatically detects when CAPTCHAs appear on pages
2. **State Management**: CAPTCHA states are tracked per page with real-time updates
3. **Solving**: CAPTCHAs are then solved by us using various methods
4. **Completion**: The system reports back when CAPTCHAs are solved or failed
### Getting CAPTCHA Status
You can check the current CAPTCHA status for any session to understand what CAPTCHAs are active and their current solving progress.
```typescript !! Typescript -wcn
import Steel from 'steel-sdk';
const client = new Steel();
const response = await client.sessions.captchas.status('sessionId');
console.log(response);
```
```python !! Python -wcn
from steel import Steel
client = Steel()
response = client.sessions.captchas.status(
"sessionId",
)
print(response)
```
#### Response Format
The status endpoint returns an array of current pages and their CAPTCHA states. An example output might look like:
```json JSON
[
{
"pageId":"page_12345",
"url":"https://example.com/login",
"isSolvingCaptcha":true,
"tasks":[
{
"id":"task_67890",
"type":"image_to_text",
"status":"solving",
"created":1640995200000,
"totalDuration":5000
}
],
"created":1640995200000,
"lastUpdated":1640995205000
}
]
```
#### CAPTCHA Task Status
Tasks can have the following statuses:
* `undetected`: CAPTCHA has not been detected
* `detected`: CAPTCHA has been detected but solving hasn't started
* `solving`: CAPTCHA is currently being solved
* `solved`: CAPTCHA has been successfully solved
* `failed_to_detect`: CAPTCHA detection failed
* `failed_to_solve`: CAPTCHA solving failed
### Solving Image CAPTCHAs
For image-based CAPTCHAs, you can provide XPath selectors to help the system locate and solve the CAPTCHA.
The `url` parameter is optional and defaults to the current page.
```typescript !! Typescript -wcn
import Steel from 'steel-sdk';
const client = new Steel();
const response = await client.sessions.captchas.solveImage('sessionId', {
imageXPath: '//img[@id="captcha-image"]',
inputXPath: '//input[@name="captcha"]',
});
console.log(response.success);
```
```python !! Python -wcn
from steel import Steel
client = Steel()
response = client.sessions.captchas.solve_image(
session_id=session.id,
image_x_path='//img[@id="captcha-image"]',
input_x_path='//input[@name="captcha"]',
)
print(response.success)
```
#### Parameters
* `imageXPath` (required): XPath selector for the CAPTCHA image element
* `inputXPath` (required): XPath selector for the CAPTCHA input field
* `url` (optional): URL where the CAPTCHA is located (defaults to current page)
#### Response
```json JSON
{
"success": true,
"message": "Image captcha solve request sent"
}
```
### WebSocket Bridge
The CAPTCHA bridge uses WebSocket connections to maintain real-time communication between browser sessions and CAPTCHA-solving extensions. This enables:
* **Real-time state updates**: Immediate notification when CAPTCHAs are detected or solved
* **Bidirectional communication**: Extensions can send updates and receive solve requests
* **Persistent connections**: Maintains connection throughout the session lifecycle
### State Management
The CAPTCHA bridge uses intelligent state management to handle complex scenarios:
#### Page-Based Tracking
States are tracked by `pageId` rather than URL to avoid duplicates and handle dynamic URLs effectively.
#### Task Merging
When multiple updates occur for the same CAPTCHA task, the system intelligently merges the information, preserving important details like:
* Creation and detection timestamps
* Solving duration calculations
* Status progression
#### Duration Calculation
The system automatically calculates task durations based on:
* `created` or `detectedTime`: When the CAPTCHA was first detected
* `solveTime` or `failureTime`: When the CAPTCHA was solved or failed
* Real-time updates during the solving process
### Integrating with Existing Automations
Steel's CAPTCHA system is designed to work seamlessly with your existing automations using Playwright/Puppeteer:
#### Monitoring CAPTCHA Progress
```typescript Typescript -wcn -f captcha.ts
async function waitForCaptchaSolution(sessionId, timeout = 30000) {
const startTime = Date.now();
while (Date.now() - startTime < timeout) {
const status = await getCaptchaStatus(sessionId);
const activeCaptchas = status.filter(state => state.isSolvingCaptcha);
if (activeCaptchas.length === 0) {
console.log('All CAPTCHAs solved!');
return true;
}
// Log progress
activeCaptchas.forEach(captcha => {
console.log(`CAPTCHA on ${captcha.url}: ${captcha.tasks.length} tasks`);
});
await new Promise(resolve => setTimeout(resolve, 1000));
}
throw new Error('CAPTCHA solving timeout');
}
```
#### Basic Integration Pattern
```typescript Typescript -wcn -f main.ts
// Navigate to a page that might have CAPTCHAs
await page.goto('https://example.com/protected-page');
// Check if CAPTCHAs are present
const captchaStatus = await checkCaptchaStatus(sessionId);
if (captchaStatus.some(state => state.isSolvingCaptcha)) {
// Wait for CAPTCHA to be solved
await waitForCaptchaSolution(sessionId);
}
// Continue with automation
await page.click('#submit-button');
```
#### Handling Different CAPTCHA Types
The CAPTCHA bridge automatically handles most common CAPTCHA types. For image CAPTCHAs, you can use the image solving endpoint with specific XPath selectors.
The captcha types for each task are mapped to the CAPTCHA types we support like so:
* `recaptchaV2`: Google's reCAPTCHA v2 with "I'm not a robot" checkbox and image challenges
* `recaptchaV3`: Google's reCAPTCHA v3 with invisible background scoring and risk analysis
* `turnstile`: Cloudflare Turnstile with minimal user interaction verification
* `image_to_text:` Traditional text-based CAPTCHA requiring OCR of distorted characters
#### Best Practices
1. **Monitor State Changes**: Regularly check CAPTCHA status during automation
2. **Handle Timeouts**: Set reasonable timeouts for automatic CAPTCHA solving operations
3. **Use Specific Selectors**: Provide accurate XPath selectors for image CAPTCHAs
4. **Error Handling**: Implement proper error handling for failed CAPTCHA attempts
5. **Logging**: Log CAPTCHA events for debugging and monitoring
The CAPTCHA system is designed to be as transparent as possible to your automation workflows, handling the complexity of CAPTCHA detection and solving while providing you with the control and visibility you need.
:::callout
type: help
### Need help building with the Captchas API?
Reach out to us on the #help channel on [Discord](https://discord.gg/steel-dev) under the ⭐ community section.
:::
# Overview
URL: /overview/extensions-api/overview
---
title: Overview
sidebarTitle: Overview
description: Add Chrome extensions to your Steel sessions.
full: true
llm: true
---
:::callout
Steel’s Extensions system is currently in beta and is subject to improvements, updates, and changes. If you have feedback, join our Discord or open an issue on GitHub.
:::
Steel's extensions are designed to enhance the functionality of Steel sessions by providing additional features and capabilities. These extensions can be used to automate tasks, enhance security, and improve the overall agent experience. They can be installed through the API for your organization and attached to any session.
Extensions have long been a part of the browser ecosystem, since the release of Internet Explorer version 4 in 1997, users have been able to create their own extensions and make their browser their own. With the advent of agentic browsing and browser agents, extensions have gained a whole new light. Allowing thousands of agents to extend their own browser sessions with custom functionality.
### Getting Started
Before extensions can be used in a browser session, they must first be uploaded either with a .zip/.crx file or downloaded from the Chrome Web Store.
All extensions are stored globally against your organization. You only need to upload them once. The supported formats include .zip and .crx
### Upload Extension From File
The extensions uploaded have a couple of requirements. They need a preliminary manifest.json file to define the extension's metadata and functionality. This file should include details such as the extension's name, version, and any permissions required.
```typescript !! Typescript -wcn
await client.extensions.upload({
file: fs.readFileSync('extensions/recorder/recorder.zip')
});
```
```python !! Python -wcn
with open("extensions/recorder/recorder.zip", "rb") as file:
client.extensions.upload(
file=file
)
```
### Upload Extension from Chrome Web Store
Go to the Chrome Web Store and click on the extension you want to upload. Copy the URL and include it in the request below
```typescript !! Typescript -wcn
await client.extensions.upload({
url: "https://chromewebstore.google.com/detail/.../..."
});
```
```python !! Python -wcn
client.extensions.upload(
url="https://chromewebstore.google.com/detail/.../..."
)
```
Once they are installed for your organization, you can inject them into your sessions.
### Injecting Extensions into a Session
You can inject specific extensions into your sessions based on the `extensionId` field or you can pass `all_ext` to inject all extensions from your organization.
```typescript !! Typescript -wcn
const session = await client.sessions.create({
extensionIds: ['all_ext'] // extensionIds=['extensionId_1', 'extensionId_2']
});
```
```python !! Python -wcn
client.sessions.create(
extension_ids=['all_ext'] # extension_ids=['extensionId_1', 'extensionId_2']
)
```
And now your sessions have extensions!
These extensions will be injected into the Steel browser session that then runs with that session. Extensions are loaded and initialized when the session starts. They can communicate with the session using the Chrome DevTools Protocol (CDP) and interact with the browser environment.
### Updating Extensions From File
After using your extensions, you can update them by uploading a new version of the extension. You will need to specify the `extensionId` of the extension you want to update.
```typescript !! Typescript -wcn
await client.extensions.update("{extensionId}",{
file: fs.readFileSync("extensions/recorder2/recorder2.zip")
});
```
```python !! Python -wcn
with open("extensions/recorder2/recorder2.zip", "rb") as file:
client.extensions.update("{extensionId}",
file=file
)
```
### Updating Extensions From Chrome Web Store
You will need to specify the `extensionId` of the extension you want to update
```typescript !! Typescript -wcn
await client.extensions.update("{extensionId}",{
url: "https://chromewebstore.google.com/detail/.../..."
});
```
```python !! Python -wcn
client.extensions.update("{extensionId}",
url="https://chromewebstore.google.com/detail/.../..."
)
```
### Seeing your Extensions
To see your organization's installed extensions, you can use the `GET /v1/extensions` endpoint.
```typescript !! Typescript -wcn
const extensions = await client.extensions.list();
```
```python !! Python -wcn
extensions = client.extensions.list()
```
### Deleting an Extension
To delete one of your organization's installed extensions, you can use the `DELETE /v1/extensions/{extensionId}` endpoint.
```typescript !! Typescript -wcn
await client.extensions.delete("{extensonId}")
```
```python !! Python -wcn
client.extensions.delete("{extensionId}")
```
### Deleting all Extensions
To delete all of your organization's installed extensions, you can use the `DELETE /v1/extensions/` endpoint.
```typescript !! Typescript -wcn
await client.extensions.deleteAll()
```
```python !! Python -wcn
client.extensions.deleteAll()
```
:::callout
type: help
### Need help building with the Extensions API?
Reach out to us on the #help channel on [Discord](https://discord.gg/steel-dev) under the ⭐ community section.
:::
# Overview
URL: /overview/files-api/overview
---
title: Overview
sidebarTitle: Overview
description: How to upload, download, manage and work with files within an active session
full: true
llm: true
---
import Image from 'next/image'
Steel provides two complementary file management systems: Session Files for working with files within active browser sessions, and Global Files for persistent file storage across your organization.
### Overview
Steel's file management system makes it easy to work with files in your automated workflows:
* **Session-Based File Operations**: Upload files to active sessions for immediate use in browser automations, download files acquired during browsing
* **Persistent File Storage**: Maintain a global file repository for reuse across multiple sessions and workflows
* **Workspace Management**: Organize and access files generated across different automation runs
* **Data Pipeline Integration**: Upload datasets once and reference them across multiple automation sessions
* **File Archival**: Automatically preserve files from completed sessions for later access
### How It Works
#### Session Files System
Files uploaded to active sessions become available within that session's isolated VM environment. These files can be used immediately with web applications and browser automation tools. When files are downloaded from the internet during a session, they become accessible through the same API. Session files persist beyond session lifecycle - files are automatically backed up when sessions end.
#### Global Files System
The Global Files API provides persistent, organization-wide file storage independent of browser sessions. Files uploaded to global storage can be referenced and mounted in any session. All session files are automatically promoted to global storage when sessions are released, creating a comprehensive file workspace.
### Session Files API
This section outlines how to interact with the filesystem inside of the VM that your session is running from. All of these files are accessible from the browser.
#### Upload Files to Session File System
```typescript !! Typescript -wcn
// Upload file to session environment
const file = fs.createReadStream("./steel.png");
const session = await client.sessions.create();
const uploadedFile = await client.sessions.files.upload(session.id, {
file: file, // or path in global files api or absolute url
});
```
```python !! Python -wcn
import requests
session_id = "YOUR_SESSION_ID"
api_key = "YOUR_API_KEY_HERE"
file_path = "./steel.png"
with open(file_path, "rb") as f:
response = requests.post(
f"https://api.steel.dev/v1/sessions/{session_id}/files/upload",
headers={"steel-api-key": api_key},
files={"file": f}
)
print(response.json())
```
#### List Files in a Session File System
```typescript !! Typescript -wcn
const files = await client.session.files.list(sessionId);
files.forEach(file => {
console.log(`${file.path} | Size: ${file.size} | Last Modified: ${file.lastModified}`);
});
```
```python !! Python -wcn
import requests
session_id = "YOUR_SESSION_ID"
api_key = "YOUR_API_KEY_HERE"
response = requests.get(
f"https://api.steel.dev/v1/sessions/{session_id}/files",
headers={"steel-api-key": api_key}
)
for file in response.json():
print(f"{file['path']} | Size: {file['size']} | Last Modified: {file['lastModified']}")
```
#### Download Files from Session File System
```typescript !! Typescript -wcn
// Download a specific file from a session
const response = await client.sessions.files.download(sessionId, "path/to/file");
const fileBlob = await response.blob();
// Download all files as zip archive
const archiveResponse = await client.sessions.files.downloadArchive(sessionId);
```
```python !! Python -wcn
import requests
session_id = "YOUR_SESSION_ID"
api_key = "YOUR_API_KEY_HERE"
# Download a specific file
file_resp = requests.get(
f"https://api.steel.dev/v1/sessions/{session_id}/files/path/to/file",
headers={"steel-api-key": api_key}
)
with open("downloaded_file", "wb") as f:
f.write(file_resp.content)
# Download all files as zip archive
archive_resp = requests.get(
f"https://api.steel.dev/v1/sessions/{session_id}/files/archive",
headers={"steel-api-key": api_key}
)
with open("session_files.zip", "wb") as f:
f.write(archive_resp.content)
```
#### Delete Files from Sessions File System
```typescript !! Typescript -wcn
// Delete a specific file from a session
const response = await client.sessions.files.delete(sessionId, "path/to/file");
// Delete all files in a session
const archiveResponse = await client.sessions.files.deleteAll(session.id);
```
```python !! Python -wcn
import requests
session_id = "YOUR_SESSION_ID"
api_key = "YOUR_API_KEY_HERE"
# Delete a specific file
del_resp = requests.delete(
f"https://api.steel.dev/v1/sessions/{session_id}/files/path/to/file",
headers={"steel-api-key": api_key}
)
print(del_resp.status_code)
# Delete all files in a session
del_all_resp = requests.delete(
f"https://api.steel.dev/v1/sessions/{session_id}/files",
headers={"steel-api-key": api_key}
)
print(del_all_resp.status_code)
```
### Global Files API
#### Upload File to Global Storage
```typescript !! Typescript -wcn
const file = fs.createReadStream("./dataset.csv");
const globalFile = await client.files.upload({
file,
// path: "dataset.csv" // optional
});
console.log(globalFile.path); // dataset.csv
// Using the file from Global Files API in a session
const session = await client.sessions.create();
const uploadedFile = await client.sessions.files.upload(session.id, {
file: globalFile.path
});
```
```python !! Python -wcn
import requests
api_key = "YOUR_API_KEY_HERE"
file_path = "./dataset.csv"
with open(file_path, "rb") as f:
response = requests.post(
"https://api.steel.dev/v1/files/upload",
headers={"steel-api-key": api_key},
files={"file": f}
)
print(response.json())
```
#### List All Files
```typescript !! Typescript -wcn
const files = await client.files.list();
files.forEach(file => {
console.log(`${file.path} | Size: ${file.size} | Last Modified: ${file.lastModified}`);
});
```
```python !! Python -wcn
import requests
api_key = "YOUR_API_KEY_HERE"
response = requests.get(
"https://api.steel.dev/v1/files",
headers={"steel-api-key": api_key}
)
for file in response.json():
print(f"{file['path']} | Size: {file['size']} | Last Modified: {file['lastModified']}")
```
#### Download Global File
```typescript !! Typescript -wcn
const response = await client.files.download(file.path); // dataset.csv
const fileBlob = await response.blob();
```
```python !! Python -wcn
import requests
api_key = "YOUR_API_KEY_HERE"
file_path = "dataset.csv"
response = requests.get(
f"https://api.steel.dev/v1/files/{file_path}",
headers={"steel-api-key": api_key}
)
with open(file_path, "wb") as f:
f.write(response.content)
```
#### Delete Global File
```typescript !! Typescript -wcn
await client.files.delete(file.path);
```
```python !! Python -wcn
import requests
api_key = "YOUR_API_KEY_HERE"
file_path = "dataset.csv"
response = requests.delete(
f"https://api.steel.dev/v1/files/{file_path}",
headers={"steel-api-key": api_key}
)
print(response.status_code)
```
### Usage in Context
#### Set File Input Values
Reference uploaded files in file input elements using CDP (Chrome DevTools Protocol).
```typescript Typescript -wcn -f main.ts
// Create CDP session for advanced controls
const cdpSession = await currentContext.newCDPSession(page);
const document = await cdpSession.send("DOM.getDocument");
// Find the input element
const inputNode = await cdpSession.send("DOM.querySelector", {
nodeId: document.root.nodeId,
selector: "#file-input"
});
// Set the uploaded file as input
await cdpSession.send("DOM.setFileInputFiles", {
files: [uploadedSessionFile.path],
nodeId: inputNode.nodeId,
});
```
#### Standard Playwright/Puppeteer Upload
```typescript Typescript -wcn -f main.ts
// For simple/smaller file uploads,
// using standard automation library methods will look at local files
await page.setInputFiles("#file-input", [uploadedSessionFile.path]);
```
#### Complete Example
End-to-end workflow demonstrating global file management and session file operations.
```typescript Typescript -wcn -f main.ts
import dotenv from "dotenv";
import fs from "fs";
import { chromium } from "playwright";
import Steel from "steel-sdk";
dotenv.config();
const client = new Steel({
steelAPIKey: process.env.STEEL_API_KEY,
});
async function main() {
let session;
let browser;
try {
// Upload dataset to global storage for reuse
const datasetFile = new File(
[fs.readFileSync("./data/stock-data.csv")],
"stock-data.csv",
{ type: "text/csv" }
);
const globalFile = await client.files.upload({ file: datasetFile });
console.log(`Dataset uploaded to global storage: ${globalFile.id}`);
// Create session and mount global file
session = await client.sessions.create();
console.log(`Session created: ${session.sessionViewerUrl}`);
const sessionFile = await client.sessions.files.upload(session.id, {
file: globalFile.path
});
// Connect browser and use the file
browser = await chromium.connectOverCDP(
`wss://connect.steel.dev?apiKey=${process.env.STEEL_API_KEY}&sessionId=${session.id}`
);
const currentContext = browser.contexts()[0];
const page = currentContext.pages()[0];
// Navigate to data visualization tool
await page.goto("");
// Upload file to web application using CDP
const cdpSession = await currentContext.newCDPSession(page);
const document = await cdpSession.send("DOM.getDocument");
const inputNode = await cdpSession.send("DOM.querySelector", {
nodeId: document.root.nodeId,
selector: "#load-file",
});
await cdpSession.send("DOM.setFileInputFiles", {
files: [sessionFile.path],
nodeId: inputNode.nodeId,
});
// Wait for visualization and capture
await page.waitForSelector("svg.main-svg");
// Download all session files (original upload + any generated files)
const archiveResponse = await client.sessions.files.download.archive(session.id);
const zipBlob = await archiveResponse.blob();
// Files are automatically available in global storage after session ends
} catch (error) {
console.error("Error:", error);
} finally {
if (browser) await browser.close();
if (session) await client.sessions.release(session.id);
// List all available files in global storage
const allFiles = await client.files.list();
console.log(`Total files in storage: ${allFiles.length}`);
}
}
main();
```
:::callout
type: help
### Need help building with the Files API?
Reach out to us on the #help channel on [Discord](https://discord.gg/steel-dev) under the ⭐ community section.
:::
# Credentials API
URL: /overview/credentials-api/overview
---
title: Credentials API
sidebarTitle: Overview
description: Programmatic access to stroing credentials for users or agents.
llm: true
---
import Image from 'next/image'
# Overview
Securely store and inject login credentials into browser sessions without exposing them to agents or the page.
:::callout
Steel's Credential system is currently in beta and is subject to improvements, updates, and changes. It will be free to use and store credentials during this period.
If you have feedback, join our Discord or open an issue on GitHub.
:::
Steel's Credentials system is designed to allow developers to securely store credentials, inject them into sessions, and automatically sign-into websites. All without leaking sensitive data back to the agents, programs, or humans viewing a live session.
Some of the most important use-cases for AI agents are hidden behind an auth wall. Some of the data most important to both our work and personal lives live inside sign-in-protected applications. If we want browser agents to help us automate the most tedious aspects of our lives, they need access to those same applications.
The problem is sending your personal credentials (username/passwords, etc) to a browser-agent, powered by an opaque LLM API that may or may not be training on your data, represents a non-trivial security risk. Further, the process of logging in can be error prone and keeping/storing credentials on behalf of users, as an application developer, can represent a ton of responsibility and overhead.
That is the motivation behind Steel's Credentials system. Credentials are stored globally against your organization, so once created, you can reuse them in any session going forward – no need to constantly re-enter or re-provision them.
Steel's Credentials system is built around three core goals:
- Secure storage of credentials using enterprise-grade encryption.
- Controlled injection into browser sessions without exposing sensitive fields.
- Isolation mechanisms to prevent agents from extracting secrets post-injection.
### Table of Contents
- [Getting Started](#getting-started)
- [Injecting Credentials into a Session](#injecting-credentials-into-a-session)
- [TOTP Support](#totp-support)
- [How credentials are injected](#how-credentials-are-injected)
- [Envelope encryption](#envelope-encryption)
- [Using with Agent Frameworks](#using-with-agent-frameworks)
## Getting Started
Before credentials can be used in a browser session, they must first be uploaded and stored securely.
:::callout
All credentials are stored globally against your organization. You only need to create them once.
:::
To upload credentials:
```typescript !! Typescript -wcn
await client.credentials.create({
origin: "https://app.example.com",
value: {
username: "test@example.com",
password: "password123"
}
});
```
```python !! Python -wcn
client.credentials.create(
origin="https://app.example.com",
value={
"username": "test@example.com",
"password": "password123"
}
)
```
These credentials are encrypted and stored securely within Steel’s credential management service. The `namespace` field helps separate use cases for the same origin and must match the namespace used when creating the session. For more information on how namespaces work [visit the namespace section](#namespaces). You can optionally include a `totpSecret` field if your login flow uses one-time passwords (see [TOTP Support](#totp-support)).
## Injecting Credentials into a Session
When starting a session via `POST /sessions`, you can request credential injection using the optional `credentials` field:
```typescript !! Typescript -wcn
const session = await client.sessions.create({
namespace: "default",
credentials: {}
});
```
```python !! Python -wcn
client.sessions.create(
namespace="default",
credentials={}
)
```
If the `credentials` object is omitted, no credentials will be injected. If included as an empty object (`credentials: {}`), the default options apply:
```json JSON
{
"autoSubmit": true,
"blurFields": true,
"exactOrigin": true
}
```
- `autoSubmit`: If `true`, the form will automatically submit once filled.
- `blurFields`: If `true`, each filled field is blurred immediately after input, preventing access.
- `exactOrigin`: If `true`, credentials will only inject into pages that match the exact origin.
You can override any of these to suit your use-case. Remember to match the `namespace` with the one used in your credential creation, if omitted, it defaults to `"default"`.
Once the session is active and on the login page, credentials are typically injected within **2 seconds**. If `autoSubmit` is disabled, the agent or user must manually click the login button.
## TOTP Support
Steel supports auto-filling TOTP (Time-based One-Time Passwords). To use this feature, include a `totpSecret` in the `value` object when uploading credentials:
```json JSON
{
"username": "test@example.com",
"password": "password123",
"totpSecret": "JBSWY3DPEHPK3PXP"
}
```
The secret is securely stored and never exposed to the page. When a one-time password field is detected, Steel generates a valid code on-demand and injects it directly.
## How Credentials are Injected
The system is responsible for securely retrieving and injecting them into service webpages. This happens through a general background communication layer that connects to a secure credential service.
### Overview: how the service fills credentials in a page
1. The credential service loads a lightweight script into each active page and frame.
2. On startup, it watches for forms or login components using mutation observers and shadow DOM traversal.
3. When a valid credential target is detected, it is validated and ranked.
4. The top-ranked candidate is selected as the active target.
5. Observers are attached to the relevant input fields and forms.
6. The credential service requests credentials matching the current org, namespace, and target origin.
7. Once decrypted, credentials are injected directly into the selected form fields.
8. Inputs are updated programmatically, preserving synthetic events and page behavior.
1. We detect and only inject credentials into a username, password, and one-time password field. The username field is generic and we try our best to map any identifier to this property (email, identifier, username, etc.).
2. inputs are blurred once a value is inserted (configurable) to prevent vision agents from reading PII
9. The form is submitted either natively or via simulated interaction, depending on the form structure if autoSubmit is configured.
10. Updates to the DOM are continuously monitored to adapt to dynamic changes in the page.
## Envelope encryption
Envelope encryption is a secure and scalable pattern where data is encrypted using a randomly generated data key (usually with a symmetric algorithm like AES), and that data key is then encrypted with a master key managed by a key management store (KMS).
Each credential is protected with its own short‑lived AES‑256‑GCM key. The key is then encrypted with a private KMS key specific to an organization. The encrypted data and the encrypted key travel together.
At decryption time, the inverse happens where we then get the encrypted AES key, decrypt it using the specific key pair for the KMS and then use this decrypted AES key to decrypt the credential. The clear-text credentials are placed directly into the in-memory session and sent to the target service over our private WireGuard backbone ensuring end-to-end encryption and safe keeping of your credentials.
#### Additional authenticated data (AAD)
We bind the cipher-text to its context by including the org ID and credential origin as AAD. A mismatch during decrypt causes the operation to fail which blocks replay attacks across orgs.
## Namespaces
Namespaces allow you to differentiate between multiple credentials for the same origin. This is useful when you need to store and use separate login details for different users or use cases.
By default, all credentials and sessions are created under the `default` namespace. If you don’t specify a namespace, this is what will be used.
#### Why Use Namespaces?
If you have multiple credentials for the same website, namespaces help you control which one is used in a given session.
For example, say you have two users who log in to the same domain:
```json JSON
// Credential A
{
"namespace": "example:fred",
"origin": "https://app.example.com",
"value": {
"username": "fred@example.com",
"password": "hunter2"
}
}
// Credential B
{
"namespace": "example:jane",
"origin": "https://app.example.com",
"value": {
"username": "jane@example.com",
"password": "letmein"
}
}
```
To use **Fred’s** credentials in a session:
```json JSON
POST /sessions
{
"namespace": "example:fred",
"credentials": {}
}
```
This ensures only the credentials created under `example:fred` will be injected.
#### Best Practices
- Use simple, descriptive namespaces like `example:fred` or `test:jane`.
- Stick to a consistent pattern (e.g., `org:user`) for better organization.
- Always match the `namespace` in your session with the one used to create the credentials.
:::callout
Namespace matching is exact. There is no inheritance or wildcard matching—only credentials in the exact namespace provided will be used.
:::
## Using with Agent Frameworks
Steel is designed to integrate seamlessly with browser automation tools and agent frameworks such as `browser-use` and similar libraries.
While we don’t yet expose framework-specific SDKs or utilities, the process is straightforward and works out of the box with minimal setup.
#### How it Works
Once credentials are linked to your session, injection and login will occur automatically as part of the page lifecycle. To make use of this in your agent or script, follow this basic pattern:
1. **Navigate** to the login page of the target website.
2. **Wait** at least 2 seconds to allow Steel to detect and fill the form.
3. **Continue** once logged in.
If `autoSubmit` is enabled (which it is by default), the login form will be submitted automatically once the fields are populated and validated.
If `autoSubmit` is disabled, you must explicitly trigger the login action (e.g., click the login button) after credentials are filled.
#### Example Flow
```typescript Typescript -wcn -f main.ts
await page.goto("https://app.example.com/login");
// Optional: ensure login form is present
await page.waitForSelector("form");
// Wait for Steel to inject and (optionally) submit the form
await page.waitForTimeout(2000);
// Recommended: confirm login succeeded
await page.waitForSelector(".dashboard"); // or some element/text that confirms login
```
#### Notes
- Credential injection is bound to the session's namespace and the origin provided when the credential was created.
- Injection will only occur on exact origins if `exactOrigin: true` (default).
- The page must be fully loaded and interactive for injection to proceed reliably.
We plan to release official helpers and utilities for common frameworks like `browser-use`, `Playwright`, and `Puppeteer` soon. For now, you can build on this guide to integrate Steel into your existing automation workflows.
:::callout
type: help
### Need help building with the Credentials API?
Reach out to us on the #help channel on [Discord](https://discord.gg/steel-dev) under the ⭐ community section.
:::
# Overview
URL: /overview/profiles-api/overview
---
title: Overview
sidebarTitle: Overview
description: Reuse browser context, auth, cookies, extensions, credentials, and browser settings across sessions.
full: true
llm: true
---
### Overview
Steel's profiles API allows you to create, update, and persist profiles acrsoss sessions. Profiles are used to store information about the browser session like auth, cookies, extensions, credentials, and browser settings.
Then you can keep reusing profiles across sessions for each different use case. Think a LinkedIn profile, a GitHub profile, or a Facebook profile.
This allows your agents to look more human, persist everything across sessions and frees you to focus on the most important part of your workflow.
### Limits
- There is a 300 MB limit on the size of a profile, if the upload fails after a session, the profile will be set to a `FAILED` state and cannot be used
- If a profile is not used after 30 days, it will be automatically deleted
### How Profiles Work
Profiles work by storing a snapshot of the browser's User Data Directory. This includes all the data that is stored in the browser, such as cookies, extensions, credentials, and browser settings.
1. Session gets created with a `persistProfile` flag
2. Initial profile gets created with some information on the session and gets stored in an `UPLOADING` state
3. After the session is released, the userDataDir is persisted and the additional information on the profile is updated and the profile is set to the `READY` state
4. Whenever a session is created with the `profileId`, the profile is loaded from the storage and the session is started with the same userDataDir and context
#### Persist a profile when starting a session
```typescript !! Typescript -wcn
// Start a session and persist the profile
const firstSession = await client.sessions.create({ persistProfile: true })
```
```python !! Python -wcn
# Start a session and persist the profile
first_session = client.sessions.create(persist_profile=True)
```
#### Start a second session with your new profile
```typescript !! Typescript -wcn
// Start a session with the persisted profile
const secondSession = await client.sessions.create({ profileId: firstSession.profileId })
```
```python !! Python -wcn
# Start a session with the persisted profile
second_session = client.sessions.create(profile_id=first_session.profile_id)
```
This will return a profileId from the session which will allow you to pass it into new sessions in the future.
### Persisting browser information automatically
Persisting additional information about the browser session like auth, cookies, extensions, credentials, and browser settings is not on by default, to keep building up context with each session, pass persistProfile=True along with your profileId.
#### Update your profile after a new session
```typescript !! Typescript -wcn
// Update the profile with new information, this will update the profile with whatever happens in the session
const thirdSession = await client.sessions.create({ profileId: firstSession.profileId, persistProfile: true })
```
```python !! Python -wcn
# Update the profile with new information, this will update the profile with whatever happens in the session
third_session = client.sessions.create(profile_id=first_session.profile_id, persist_profile=True)
```
### Persisting browser information manually
You can also manually create and update a profile via the Profiles API. This allows you to update the proxy, user-agent, or replace the entire userDataDir for your profile.
#### Create your profile
```typescript !! Typescript -wcn
// Create a new profile with new information
await client.profiles.create({ userDataDir: fs.readFileSync('path/to/userDataDir.zip'), userAgent: 'Mozilla/5.0 (Windows NT 10.0; Win64; x64) AppleWebKit/537.36 (KHTML, like Gecko) Chrome/58.0.3029.110 Safari/537.3'})
```
```python !! Python -wcn
# Create a new profile with new information
with open("path/to/userDataDir.zip", "rb") as file:
client.profiles.create(user_data_dir=file, user_agent='Mozilla/5.0 (Windows NT 10.0; Win64; x64) AppleWebKit/537.36 (KHTML, like Gecko) Chrome/58.0.3029.110 Safari/537.3')
```
#### Update your profile with some information
```typescript !! Typescript -wcn
// Update the profile with new information, this will be used next session
await client.profiles.update(firstSession.profileId, { userAgent: 'Mozilla/5.0 (Windows NT 10.0; Win64; x64) AppleWebKit/537.36 (KHTML, like Gecko) Chrome/58.0.3029.110 Safari/537.3'})
```
```python !! Python -wcn
# Update the profile with new information, this will be used next session
client.profiles.update(first_session.profile_id, user_agent='Mozilla/5.0 (Windows NT 10.0; Win64; x64) AppleWebKit/537.36 (KHTML, like Gecko) Chrome/58.0.3029.110 Safari/537.3')
```
# Docker
URL: /overview/self-hosting/docker
---
title: Docker
sidebarTitle: Docker
description: Self-Hosting Steel Browser Using Docker
full: true
llm: true
---
# Overview
This guide provides step-by-step instructions to set up your own Steel Browser instance using Docker. The setup consists of two main components: an API service that manages Chrome instances and a user interface for interaction.
### Prerequisites
* Docker (20.10.0 or later)
* At least 4GB of RAM
* 10GB of free disk space
### Quick Start
1. Create a new directory for your Steel Browser instance:
```bash Terminal -wc
mkdir steel-browser && cd steel-browser
```
2. Create the following file:
#### docker-compose.yaml
```yaml YAML -wc -f docker-compose.yaml
services:
api:
image: ghcr.io/steel-dev/steel-browser-api:latest
ports:
- "3000:3000"
- "9223:9223"
volumes:
- ./.cache:/app/.cache
networks:
- steel-network
ui:
image: ghcr.io/steel-dev/steel-browser-ui:latest
ports:
- "5173:80"
depends_on:
- api
networks:
- steel-network
networks:
steel-network:
name: steel-network
driver: bridge
```
3. Launch the containers:
```bash Terminal -wc
docker compose up -d
```
4. Access Steel Browser by opening `http://localhost:5173`in your web browser.
### Advanced Setup
#### Building From Source
If you prefer to build the containers yourself:
1. Clone the repository:
```bash Terminal -wc
git clone https://github.com/steel-dev/steel-browser.git
cd steel-browser
```
2. Create a `.env` file (optional):
3. Build and start using the development compose file:
```bash Terminal -wc
docker compose -f docker-compose.dev.yml up -d --build
```
_The “-d” will run the containers in the background._
#### Configuration Options
* **API Port**: Default is 3000 (also 3000 inside the container). Change in the compose file if needed
* Heads up, changing the external facing port won’t change the fact that anything on the `steel-network` will just use internal ports — so you will also have to change the port that the api binds to, for it to be reflected in the UI
* **UI Port**: Default is 5173 (or 80 inside container). Adjust if required
* **Chrome Debugging Port**: Default is 9223. Required for browser communication
#### Volume Persistence
The `.cache` directory stores Chrome data and extensions. Mount it as a volume for persistence:
```yaml YAML -wc -f docker-compose.yaml
volumes:
- ./.cache:/app/.cache
```
### Architecture
Steel Browser consists of two main components:
1. **API Container**: Runs Chrome in headless mode, providing CDP (Chrome DevTools Protocol) services
2. **UI Container**: Nginx-based frontend for interacting with the browser
### Customizing the Build
#### Using a Different Chrome Version
The API container uses Chrome 128.0.6613.119 by default. To use a different version:
1. Create a custom Dockerfile based on the API one
2. Modify the Chrome installation section:
```dockerfile Dockerfile -w -f Dockerfile
ARG CHROME_VERSION="128.0.6613.119"
RUN apt-get update && \
DEBIAN_FRONTEND=noninteractive apt-get install -y --no-install-recommends \
wget \
ca-certificates \
curl \
unzip \
&& CHROME_DEB="google-chrome-stable_${CHROME_VERSION}-1_amd64.deb" \
&& wget -q "https://mirror.cs.uchicago.edu/google-chrome/pool/main/g/google-chrome-stable/${CHROME_DEB}" \
# ...rest of the installation...
```
#### Changing Node Version
Both containers use Node 22.13.0 by default. To use a different version, modify the build arguments:
```yaml YAML -wc -f docker-compose.yaml
services:
api:
build:
context: .
dockerfile: ./api/Dockerfile
args:
NODE_VERSION: 18.19.0
```
### Troubleshooting
#### Chrome Won't Start
Ensure your host has enough resources and check the API container logs:
```bash Terminal -wc
docker logs steel-browser_api_1
```
Common issues:
* Running on ARM architecture (solution for this coming soon!)
* Insufficient memory
* Missing shared libraries
* Permission problems with `.cache` directory
#### Connectivity Issues
If the UI can't connect to the API:
1. Verify both containers are running:
2. Check if the API is accessible:
```bash Terminal -wc
curl http://localhost:3000/api/health
```
3. Ensure the containers can communicate over the network:
```bash Terminal -wc
docker exec steel-browser_ui_1 curl http://api:3000/api/health
```
### Production Deployment
For production environments:
1. Use specific image versions instead of `latest`
2. Set up proper reverse proxy with HTTPS
3. Configure appropriate resource limits
Example production compose file:
```yaml YAML -wc -f docker-compose.yaml
services:
api:
image: ghcr.io/steel-dev/steel-browser-api:sha256:...
restart: always
ports:
- "3000:3000"
deploy:
resources:
limits:
memory: 2G
volumes:
- ./data/.cache:/app/.cache
networks:
- steel-network
ui:
image: ghcr.io/steel-dev/steel-browser-ui:sha256:...
restart: always
ports:
- "5173:80"
networks:
- steel-network
networks:
steel-network:
name: steel-network
driver: bridge
```
### Security Considerations
* Don't expose Chrome debugging port (9223) to the public internet
* You can also choose to not expose the API as well if you’re automations/agent also run within the same network as the `ui` and `api` containers
* Set up proper authentication if deploying publicly
* Keep containers updated with the latest versions
### Updating
To update to the latest version:
```bash Terminal -wc
docker compose pull
docker compose up -d
```
For custom builds:
```bash Terminal -wc
git pull
docker compose -f docker-compose.dev.yml up -d --build
```
Now your Steel Browser instance is up and running on your own infrastructure!
:::callout
type: help
### Need help running locally?
Reach out to us on the #help channel on [Discord](https://discord.gg/steel-dev) under the ⭐ community section.
:::
# Railway
URL: /overview/self-hosting/railway
---
title: Railway
sidebarTitle: Railway
description: A quick guide on deploying Steel Browser to Railway using our template
full: true
llm: true
---
[Deploy the Template on Railway ↗](https://railway.com/deploy/steelbrowser?referralCode=Jwc4kg&utm_medium=integration&utm_source=template&utm_campaign=generic)
### Overview
Hosting Steel Browser on Railway provides a reliable, scalable environment for running headless Chrome instances. The Steel Browser API handles browser session management, proxy configuration, and CDP passthroughs while Railway provides extremely easy APIs to scale and handles resource allocation automatically. Running Steel Browser on Railway's infrastructure ensures your browser automations run consistently with minimal configuration, while providing automatic scaling and health monitoring for production workloads.
### Common Use Cases
- **Web Scraping:** Extract data from dynamic websites that require JavaScript rendering
- **Browser Automation:** Automate repetitive web tasks and workflows
- **End-to-End Testing:** Run automated browser tests for web applications
- **Screenshot & PDF Generation:** Capture screenshots or generate PDFs from web content
- **Data Collection:** Gather information from multiple web sources programmatically
### Dependencies for Hosting Steel Browser
- **Docker:** Steel Browser runs as a containerized application
- **Chrome/Chromium:** Headless browser engine (included in the Docker image)
- **Node.js Runtime:** Required for the Steel Browser service
### Deployment Dependencies
- [Steel Browser GitHub Repository](https://github.com/steel-dev/steel-browser)
- [Steel Browser Documentation](https://docs.steel.dev/)
- [Chrome DevTools Protocol Documentation](https://chromedevtools.github.io/devtools-protocol/)
### Implementation Details
**Health Check Endpoint:**
Verify your instance is running:
```bash
curl https://your-domain.railway.app/v1/health
```
**Connecting to Steel Browser:**
After deployment, create a session and connect to your Steel Browser instance on the public domain using Playwright:
```typescript
import { chromium } from "playwright";
import Steel from "steel-sdk";
const client = new Steel({
baseUrl: `https://${process.env.RAILWAY_PUBLIC_DOMAIN}`,
});
session = await client.sessions.create();
browser = await chromium.connectOverCDP(session.websocketUrl);
// The rest of your automation
```
### Why Deploy Steel Browser on Railway?
Railway is a singular platform to deploy your infrastructure stack. Railway will host your infrastructure so you don't have to deal with configuration, while allowing you to vertically and horizontally scale it.
By deploying Steel Browser on Railway, you are one step closer to supporting a complete full-stack application with minimal burden. Host your servers, databases, AI agents, and more on Railway.
**Benefits of Steel Browser on Railway:**
- Automatic HTTPS/SSL configuration
- Built-in health monitoring
- Easy scaling as your browser automation needs grow
- Simple environment variable management
- Seamless integration with other Railway services
### Post-Deployment Notes
After deploying this template, users should:
1. **Access the Instance:** Navigate to the Railway-provided public domain
2. **Verify Health:** Check the `/v1/health` endpoint returns a successful response
3. **Configure API Access:** Use the public domain URL in their application code
4. **Monitor Usage:** Check Railway's metrics dashboard for resource usage
### Security Considerations:
- Consider adding authentication if exposing publicly
- Monitor for unusual traffic patterns
- Set up rate limiting if needed for production use
# Render
URL: /overview/self-hosting/render
---
title: Render
sidebar: false
isLink: true
llm: false
---
# Steel Local vs Steel Cloud
URL: /overview/self-hosting/steel-local-vs-steel-cloud
---
title: Steel Local vs Steel Cloud
sidebarTitle: Steel Local vs Steel Cloud
description: What's the difference between local Steel and Steel Cloud?
llm: true
---
# Overview
| Feature | Steel Local | Steel Cloud |
|------------------|-------------------------------------------|--------------------------------------------------------------|
| Concurrency | 1 | 100+ |
| Stealth | Limited | Advanced Stealth (docs) |
| Captcha Solving | None | Supported with the Captchas API |
| Proxies | Bring your own | Bring your own + Steel Managed Proxies |
| Multi-Region | Host it yourself | Supported with region flag during session creation |
| Credentials | Not supported | Supported with the Credentials API |
| Extensions | Supported by loading in `api/extensions/` | Supported by using the Extensions API |
| Files | Not supported | Supported by the Files API |
The defining factor between running Steel locally and using Steel Cloud is concurrency.
For the Extensions API, if you put the extensions you would like to build/load in the `api/src/extensions/` folder then Steel Local will build these and inject them into the session. Credentials are not supported in Steel Local.
:::callout
type: help
### Need help running locally?
Reach out to us on the #help channel on [Discord](https://discord.gg/steel-dev) under the ⭐ community section.
:::
# Multi-region
URL: /overview/sessions-api/multi-region
---
title: Multi-region
sidebarTitle: Multi-region
description: Control where your Steel browser sessions are hosted for optimal performance and latency.
llm: false
---
### Overview
By default, Steel automatically selects the data center closest to the client’s request location when creating a new browser session. This ensures optimal performance and minimal latency for your browser automation tasks. However, you can also manually specify which region you want your browser session to run in using the `region` parameter.
This region selection determines the physical location of the browser instance itself, which can help reduce latency for applications targeting specific geographic areas or comply with data residency requirements.
### Automatic Region Selection
When you create a session without specifying a region, Steel automatically determines the closest data center based on your request location:
```typescript !! Typescript -wcn
import Steel from 'steel-sdk';
const client = new Steel();
// Automatically uses the closest region
const session = await client.sessions.create();
```
```python !! Python -wcn
from steel import Steel
client = Steel()
# Automatically uses the closest region
session = client.sessions.create()
```
### Manual Region Selection
To specify a particular region for your browser session, use the `region` parameter when creating a session:
```typescript !! Typescript -wcn
import Steel from 'steel-sdk';
const client = new Steel();
// Create session in Los Angeles data center
const session = await client.sessions.create({
region: "LAX"
});
```
```python !! Python -wcn
from steel import Steel
client = Steel()
# Create session in Los Angeles data center
session = client.sessions.create(
region="LAX"
)
```
### Available Regions
Steel is available in the following regions:
| Region | Code | Data Center Location |
|----------------|------|---------------------------|
| Los Angeles | LAX | Los Angeles, USA |
| Chicago | ORD | Chicago, USA |
| Washington DC | IAD | Washington DC, USA |
| Mumbai | BOM | Mumbai, India |
| Santiago | SCL | Santiago, Chile |
| Frankfurt | FRA | Frankfurt, Germany |
| Hong Kong | HKG | Hong Kong |
### Region vs Proxy Selection
Region selection determines where your browser session runs, which is different from proxy selection. The region parameter controls the physical location of the browser instance, while the useProxy and proxyUrl parameters control the network routing and IP address used by the browser for web requests.
You can combine region selection with proxy settings:
```typescript !! Typescript -wcn
// Browser runs in Hong Kong, but uses a US proxy for requests
const session = await client.sessions.create({
region: "HKG",
useProxy: true
});
```
```python !! Python -wcn
# Browser runs in Hong Kong, but uses a US proxy for requests
session = client.sessions.create(
region="HKG",
use_proxy=True
)
```
We’ll be launching new features soon to allow you to control regions for proxies as well. Right now, all are US based.
:::callout
type: help
### Need help building with multi-region?
Reach out to us on the #help channel on [Discord](https://discord.gg/steel-dev) under the ⭐ community section.
:::
# Overview
URL: /overview/sessions-api/overview
---
title: Overview
sidebarTitle: Overview
description: The Sessions API lets you create and control cloud-based browser sessions through simple API calls. Each session is like a fresh incognito window, but running in our cloud and controlled through code.
llm: false
---
[Go to Quickstart Example](/overview/sessions-api/quickstart)
### What is a Session?
Sessions are the atomic unit of our Sessions API. Think of sessions as giving your AI agents their own dedicated browser windows. Just like you might open an incognito window to start a fresh browsing session, the Sessions API lets your agents spin up isolated browser instances on demand. Each session maintains its own state, cookies, and storage - perfect for AI agents that need to navigate the web, interact with sites, and maintain context across multiple steps.
### Get started
[Getting Started](/overview/sessions-api/quickstart)
### Connect with your preferred tools
[Connect with Puppeteer](/cookbook/puppeteer)
[Connect with Playwright](/cookbook/playwright)
[Connect with Playwright (Python)](/cookbook/playwright-python)
[Connect with Selenium](/cookbook/selenium)
[Python SDK Reference](/steel-python-sdk)
[Node SDK Reference](/steel-js-sdk)
### Understanding sessions
[Session Lifecycle](/overview/sessions-api/session-lifecycle)
:::callout
type: help
### Need help building with the Sessions API?
Reach out to us on the #help channel on [Discord](https://discord.gg/steel-dev/) under the community ⭐ section.
:::
# Quickstart
URL: /overview/sessions-api/quickstart
---
title: Quickstart
sidebarTitle: Quickstart
description: Get up a running with your first Steel Session in a few minutes.
---
### Overview
This guide will walk you through setting up your Steel account, creating your first browser session in the cloud, and driving it using Typescript/Playwright. In just a few minutes, you'll be up and programatically controlling a Steel browser Session.
### Initial Setup
#### 1\. Create a Steel Account
1. Sign up for a free account at steel.dev
2. The free plan includes 100 browser hours to get you started
3. No credit card required
#### 2\. Get Your API Key
1. After signing up, navigate to Settings > API Keys
2. Create an API key and save it somewhere safe. You will not be able to generate the same key again.
#### 3\. Set Up Environment Variables
1. Create a `.env` file in your project root (if you don't have one)
2. Add your Steel API key:
Make sure to add `.env` to your `.gitignore` file to keep your key secure
### Installing Dependencies
Install the Steel SDK and Playwright:
```package-install
steel-sdk playwright
```
### Create Your First Session
Let's create a simple script that launches and then releases a Steel session:
```typescript Typescript -wcn -f steel-client.ts
import Steel from 'steel-sdk';
import dotenv from 'dotenv';
dotenv.config();
const client = new Steel({
steelAPIKey: process.env.STEEL_API_KEY,
});
async function main() {
// Create a session
const session = await client.sessions.create();
console.log('Session created:', session.id);
console.log(`View live session at: ${session.sessionViewerUrl}`);
// Your session is now ready to use!
// When done, release the session
await client.sessions.release(session.id);
console.log('Session released');
}
main().catch(console.error);
```
### Connecting to Your Session
Now that you have a session, you can connect to it using your preferred automation tool.
```typescript Typescript -wcn -f puppeteer.ts
import puppeteer from 'puppeteer';
const browser = await puppeteer.connect({
browserWSEndpoint: `wss://connect.steel.dev?apiKey=${process.env.STEEL_API_KEY}&sessionId=${session.id}`,
});
const page = await browser.newPage();
await page.goto('https://example.com');
```
### Session Features
Want to do more with your session? Here are some common options you can add when creating:
```typescript Typescript -wcn
const session = await client.sessions.create({
useProxy: true, // Use Steel's residential proxy network
solveCaptcha: true, // Enable automatic CAPTCHA solving
apiTimeout: 1800000, // Set 30-minute timeout (default is 5 minutes)
userAgent: 'custom-ua' // Set a custom user agent
});
```
You've now created your first Steel session and learned the basics of session management. With these fundamentals, you can start building more complex automations using Steel's cloud browser infrastructure.
:::callout
type: help
### Need help building with the Sessions API?
Reach out to us on the #help channel on [Discord](https://discord.gg/steel-dev) under the ⭐ community section.
:::
# Session Lifecycle
URL: /overview/sessions-api/session-lifecycle
---
title: Session Lifecycle
sidebarTitle: Session Lifecycle
description: Learn how to start and release browser sessions programatically.
llm: false
---
### Overview
Sessions are the foundation of browser automation in Steel. Each session represents an isolated browser instance that persists until it's either explicitly released or times out.
Each session can be in one of three states:
* **Live**: The session is active and ready to accept commands/connections. This is the state right after creation and during normal operation.
* **Released**: The session has been intentionally shut down, either through explicit release or timeout. Resources have been cleaned up. Can no longer accept commands/connections.
* **Failed**: Something went wrong during the session's lifetime (like a crash or connection loss). These sessions are automatically cleaned up.
Browser sessions are billed and metered by the minute. A session can last up to 24 hours depending on your plan.
Understanding how sessions live and die helps you manage resources effectively and build more reliable applications.
### Session Lifetime and Timeout
When you start a session, it stays alive for 5 minutes by default but you can change it by passing the `apiTimeout`/`api_timeout` parameter. After the time passes, the session will be automatically released.
```typescript !! Typescript -wcn
import Steel from 'steel-sdk';
const client = new Steel();
// Create session and keep it running for 10 minutes.
const session = await client.sessions.create({
apiTimeout: 600000 // 10 minutes (NOTE: Units are in milliseconds)
});
```
```python !! Python -wcn
import os
from steel import Steel
client = Steel()
# Create session and keep it running for 10 minutes.
session = client.sessions.create(
api_timeout=600000 # 10 minutes (NOTE: Units are in milliseconds)
)
```
**Note:** Currently, Steel doesn’t support editing a the timeout duration of a live session.
### **Releasing a Session**
When you're done with a session, it's best practice to release it explicitly rather than waiting for the timeout. You can release a session any time before the timeout is up by calling the `release` method.
```typescript !! Typescript -wcn
// Release a single session
const response = await client.sessions.release(session.id);
```
```python !! Python -wcn
# Release a single session
response = client.sessions.release(session.id)
```
#### Bulk Session Release
Sometimes you need to clean up all active sessions at once. Steel provides a convenient way to do this:
```typescript !! Typescript -wcn
// Release all active sessions
const response = await client.sessions.releaseAll();
console.log(response.message); // "All sessions released successfully"
```
```python !! Python -wcn
# Release all active sessions
response = client.sessions.release_all()
print(response.message) # "All sessions released successfully"
```
:::callout
type: help
### Need help building with the Sessions API?
Reach out to us on the #help channel on [Discord](https://discord.gg/steel-dev) under the ⭐ community section.
:::
# Captcha Solving
URL: /overview/stealth/captcha-solving
---
title: Captcha Solving
sidebarTitle: Captcha Solving
description: CAPTCHA solving is one of Steel's advanced capabilities that helps AI agents and automation tools navigate the modern web more effectively. This document explains how our CAPTCHA solving system works, what types of CAPTCHAs we support, and best practices for implementation.
fullL: true
llm: true
---
### How Steel Handles CAPTCHAs
Steel takes a two-pronged approach to dealing with CAPTCHAs:
1. **Prevention First**: Our sophisticated browser fingerprinting and anti-detection systems often prevent CAPTCHAs from appearing in the first place. We maintain realistic browser profiles that make your automated sessions appear more human-like, reducing the likelihood of triggering CAPTCHA challenges.
2. **Automatic Solving**: When CAPTCHAs do appear, our automatic solving system kicks in to handle them transparently, allowing your automation to continue without interruption.
### Supported CAPTCHA Types
Currently, Steel's auto-solver supports these CAPTCHA services:
✅ **Currently Supported**:
* ReCAPTCHA v2 / v3
* Cloudflare Turnstile
* ImageToText CAPTCHAs
* Amazon AWS WAF
🔜 **Coming Soon**:
* GeeTest v3/v4
❌ **Not Currently Supported**:
* Custom implementation CAPTCHAs
* Enterprise-specific CAPTCHA systems
* FunCAPTCHA
* Other specialized CAPTCHA types
### How CAPTCHA Solving Works
When you enable CAPTCHA solving in your Steel session, here's what happens behind the scenes:
1. **Detection**: Our system continuously monitors the page for CAPTCHA elements using multiple detection methods:
* DOM structure analysis
* Known CAPTCHA iframe patterns
* Common CAPTCHA API endpoints
* Visual element detection
2. **State Management**: CAPTCHA states are tracked per page with real-time updates
3. **Classification**: Once detected, the system identifies the specific type of CAPTCHA and routes it to the appropriate solver.
4. **Solving**: CAPTCHAs are then solved by us using various methods:
* Machine learning models
* Third-party solving services
* Browser automation techniques
* Token manipulation (when applicable)
5. **Verification**: The system verifies that the CAPTCHA was successfully solved before allowing the session to continue.
### Best Practices for Implementation
#### 1\. Enable CAPTCHA Solving
```typescript !! Typescript -wc
// Typescript
const session = await client.sessions.create({
solveCaptcha: true // Enable CAPTCHA solving
});
```
```python !! Python -wcn
# Python
session = client.sessions.create(
solve_captcha=True # Enable CAPTCHA solving
)
```
#### 2\. Implement Proper Waiting
When navigating to pages that might contain CAPTCHAs, it's important to implement proper waiting strategies:
```typescript !! Typescript -wcn
// Typescript example using Puppeteer
await page.waitForNetworkIdle(); // Wait for network activity to settle
await page.waitForTimeout(2000); // Additional safety buffer
```
```python !! Python -wcn
# Python example using Playwright
await page.wait_for_load_state('networkidle') # Wait for network activity to settle
await page.wait_for_timeout(2000) # Additional safety buffer
```
#### 3\. Detecting CAPTCHA Presence
You can detect CAPTCHA presence using these selectors:
```typescript Typescript -wcn
// Common CAPTCHA selectors
const captchaSelectors = [
'iframe[src*="recaptcha"]',
'#captcha-box',
'[class*="captcha"]'
];
```
### Important Considerations
1. **Plan Availability**: CAPTCHA solving is only available on Developer, Startup, and Enterprise plans. It is not included in the free tier.
2. **Success Rates**: While our system has high success rates, CAPTCHA solving is not guaranteed to work 100% of the time. Always implement proper error handling.
3. **Timing**: CAPTCHA solving can add latency to your automation. Account for this in your timeouts and waiting strategies.
4. **Rate Limits**: Even with successful CAPTCHA solving, respect the target site's rate limits and terms of service.
### Common Issues and Solutions
1. **Timeout Issues**
* Increase your session timeout when working with CAPTCHA-heavy sites
* Implement exponential backoff for retries
2. **Detection Issues**
* Use Steel's built-in stealth profiles
* Implement natural delays between actions
* Rotate IP addresses using Steel's proxy features
3. **Solving Failures**
* Implement proper error handling
* Have fallback strategies ready
* Consider implementing manual solving as a last resort
### Best Practices for Avoiding CAPTCHAs
1. **Use Steel's Fingerprinting**: Our automatic fingerprinting often helps bypass avoidable CAPTCHAs entirely by making your sessions appear more human-like.
2. **Session Management**:
* Reuse successful sessions when possible
* Maintain cookies and session data
* Use Steel's session persistence features
3. **Request Patterns**:
* Implement natural delays between actions
* Vary your request patterns
* Avoid rapid, repetitive actions
### Looking Forward
Steel is continuously improving its CAPTCHA handling capabilities. We regularly update our solving mechanisms to handle new CAPTCHA variants and improve success rates for existing ones.
Stay updated with our documentation for the latest information about supported CAPTCHA types and best practices.
:::callout
type: help
### Need help building with captcha solving?
Reach out to us on the #help channel on [Discord](https://discord.gg/steel-dev) under the ⭐ community section.
:::
# Proxies
URL: /overview/stealth/proxies
---
title: Proxies
sidebarTitle: Proxies
description: Proxies make your browser sessions appear to originate from different locations and IP addresses. This is essential for accessing geo-restricted content, avoiding rate limits, and maintaining anonymity during web automation.
llm: true
---
## Overview
Steel offers two powerful ways to use proxies: our built-in **Managed Residential Proxies** or connecting to your own proxy provider with our **Bring Your Own Proxy (BYOP)** feature.
### Which Proxy Approach Should you choose?
Use this table to pick the right option for your project.
| Feature | Steel-Managed Proxies | Default Behavior (No proxies) | Bring Your Own Proxies (BYOP) |
|-------------|---------------------------------------------------------------------------------------|---------------------------------------------------------------|------------------------------------------------------------------------|
| Best For | Quickly accessing high-quality residential IPs from specific countries without setup. | General web access, testing, or sites that don't block datacenter IPs. | Full control over your proxy infrastructure, using specialized providers. |
| IP Type | High-quality residential IPs | Datacenter | Any (Datacenter, Residential, Mobile) |
| Control | Managed by Steel (automatic rotation) | Static datacenter IP assigned by Steel | Full control over IPs and rotation logic |
| Cost | Billed per GB of usage by Steel | Free (included in all plans) | No charge from Steel; you pay your own proxy provider |
| Availability| Developer, Pro, & Enterprise plans | All plans, including Hobby (free) | All plans, including Hobby (free) |
### Steel-Managed Proxies
⭐ **_This is the best option for most use-cases._**
Steel maintains a high-quality pool of residential IP addresses that make your browser sessions appear to come from real user connections. Our residential proxy network includes:
* **Hundreds of millions of IP addresses** sourced from legitimate residential connections
* **United States locations by default** with options for global geographic targeting
* **Continuous quality monitoring** through our internal testing and validation systems
* **Automatic IP rotation** to ensure fresh addresses for each session
These proxies are ideal for accessing sites that block datacenter IPs or when you need to appear as a genuine residential user.
### Default Behavior (No Proxies)
When you create a Steel session without enabling proxies, your requests originate from the datacenter/machine’s IP addresses where Steel's browser infrastructure is hosted. This option is free, available on all plans, and incurs no charges on proxy bandwidth. This approach works well for:
* Interacting with websites that aren’t blocking default these datacenter IPs
* General web scraping that doesn't require specific geographic locations
* Internal applications or APIs that don't have geo-restrictions
* Testing and development where IP location isn't critical
### Bring Your Own Proxies (BYOP)
If you have existing proxy infrastructure or specific proxy requirements, you can route Steel sessions through your own proxy servers. This approach gives you:
* **Complete control** over your proxy infrastructure and IP sources
* **No additional costs** from Steel - you only pay for your own proxy services
* **Flexibility** to use specialized proxy providers or custom configurations
* **Compatibility** with both Steel Cloud and the open-source Steel browser
By default, proxies are disabled (`useProxy: false` is the implicit setting). This means your traffic originates from Steel's own datacenter IPs.
### Using Steel-Managed Residential Proxies
To enable it, simply set `useProxy: true` when creating a session. By default, your traffic will be routed through a new US-based IP address each session:
```typescript !! Typescript -wcn
// Typescript SDK
const session = await client.sessions.create({
useProxy: true
});
```
```python !! Python -wcn
# Python SDK
session = client.sessions.create(
use_proxy=True
)
```
### Geographic Targeting
You can easily target countries, states (US only), or cities:
**Quality vs. Specificity**
The more specific your targeting, the smaller the IP pool. For the best performance and highest quality IPs, use the broadest targeting that meets your needs (e.g., prefer country-level over city-level). Generally, we’ve seen US and GB proxies have the highest quality.
```typescript !! Typescript -wcn
// Target specific state
const session = await client.sessions.create({
useProxy: {
geolocation: { country: "US", state: "NY" },
},
});
// Target specific city
const session = await client.sessions.create({
useProxy: {
geolocation: { city: "LOS_ANGELES" },
},
});
```
```python !! Python -wcn
# Target specific state
session = client.sessions.create(
use_proxy={
"geolocation": { "country": "US", "state": "NY" }
}
)
# Target specific city
session = client.sessions.create(
use_proxy={
"geolocation": { "city": "LOS_ANGELES" }
}
)
```
**Available targeting options:**
* **Countries**: We support over 200 countries via their two-letter Alpha-2 codes
* **States**: Supported for the US only
* **Cities**: Available for major global cities
### Bring Your Own Proxies (BYOP)
If you already have a proxy provider or need highly specialized configurations, you can route Steel sessions through your own proxy server. This gives you complete control and avoids any additional proxy fees from Steel.
```typescript !! Typescript -wcn
// Typescript SDK
const session = await client.sessions.create({
useProxy: {
server: "http://username:password@proxy.example.com:8080",
},
});
```
```python !! Python -wcn
# Python SDK
session = client.sessions.create(
use_proxy={
"server": "http://username:password@proxy.example.com:8080"
}
)
```
**Supported proxy formats:**
* `http://username:password@hostname:port`
* `https://username:password@hostname:port`
* `socks5://username:password@hostname:port`
Your proxy credentials are handled securely and never logged or stored by Steel beyond the duration of your session.
#### Proxy Connection Errors
You may occasionally encounter proxy connection errors like `ERR_TUNNEL_CONNECTION_FAILED`, `ERR_PROXY_CONNECTION_FAILED`, or `ERR_CONN_REFUSED`. This error indicates a connectivity issue between Steel's infrastructure and the proxy server.
**This is normal behavior** and can happen for several reasons:
* Temporary proxy server unavailability
* Network connectivity issues between Steel and the proxy
* The target website blocking the specific proxy IP
**When this happens:**
1. **Retry your request.** These errors are usually transient.
2. If using **Steel-Managed proxies,** we automatically rotate to a new IP on retry.
3. If using **BYOP**, ensure your proxy server is online and accessible.
If the error persists across multiple retries, it may point to a more systemic issue.
#### **Website Blocking**
To maintain a high-quality and compliant network, Steel and its partners may restrict access to certain websites. We do this to ensure the long-term health and reputation of our IP pool. Blocklists are typically maintained for:
* Gambling and betting websites
* Government and restricted institutional sites
* Ticketing websites
* Other categories flagged for compliance reasons
**If you're experiencing unexpected or persistent blocking:**
1. **Change the geographic region.** A different IP block might solve the problem.
2. **Use BYOP.** If you need access to specific restricted content, using your own proxy provider gives you full control.
3. **Contact Support.** If you believe a legitimate site is being blocked, please let us know. If retries and changing regions consistently fail, it might indicate the domain is on a compliance blocklist. Escalating to our team helps us investigate.
Most blocking issues can be resolved through configuration adjustments or by working with our team to whitelist specific domains.
Follow these guidelines to get the most out of your proxies and build more resilient automations.
1. **Establish a Baseline Without Proxies**
Before assuming you need a proxy for anti-bot measures, try accessing the target website without one. If Steel's default datacenter IPs work, you can save on costs. Use proxies as the next step if you encounter blocks.
2. **Start with Broad Targeting**
For the best performance, always start with country-level targeting. The larger IP pool provides higher quality and better success rates. Only use state or city-level targeting when it is a strict requirement for your use case.
3. **Build Fallback Logic in Your Code**
Proxy connections can sometimes fail (e.g., `ERR_TUNNEL_CONNECTION_FAILED`). This is normal. Your code should anticipate this by including retry logic. For critical tasks, consider having a fallback plan, such as retrying the request without a proxy or with a different proxy configuration.
4. **Monitor Success Rates with Narrow Targeting**
If you must use city-level targeting, closely monitor your job success rates. A high rate of failure could mean the local IP pool is too small or contains IPs that have been blocked or are of lower quality.
5. **Test Different Regions for Blocked Content**
If you're consistently blocked when targeting a specific country, try your request again from a different region. The target website may have different rules or restrictions for different geographic locations.
:::callout
type: help
### Need help building with proxies?
Reach out to us on the #help channel on [Discord](https://discord.gg/steel-dev) under the ⭐ community section.
:::